In Mockedule, a task is the sticky note or frame itself on the board. You don’t copy anything into a separate list: make a sticky note a task and it gets an assignee, a due date and a status, and shows up on the schedule. Managers, Members and External editors can create and change tasks. External viewers and Clients can only view them.
Make a task
Sticky notes and frames (including screens) can be tasks. Text and shapes cannot.
Turn sticky notes into tasks
- Select a sticky note on the board. You can select several and make them tasks at once
- Click “Make a task” in the toolbar above the selection, or press ⇧+T
- Fill in “Assignee”, “Start date” and “Due date”, then click “Make tasks”. You can leave any of them empty
The sticky note now shows its key, assignee, due date and status along the bottom. A new task starts as “To do”.
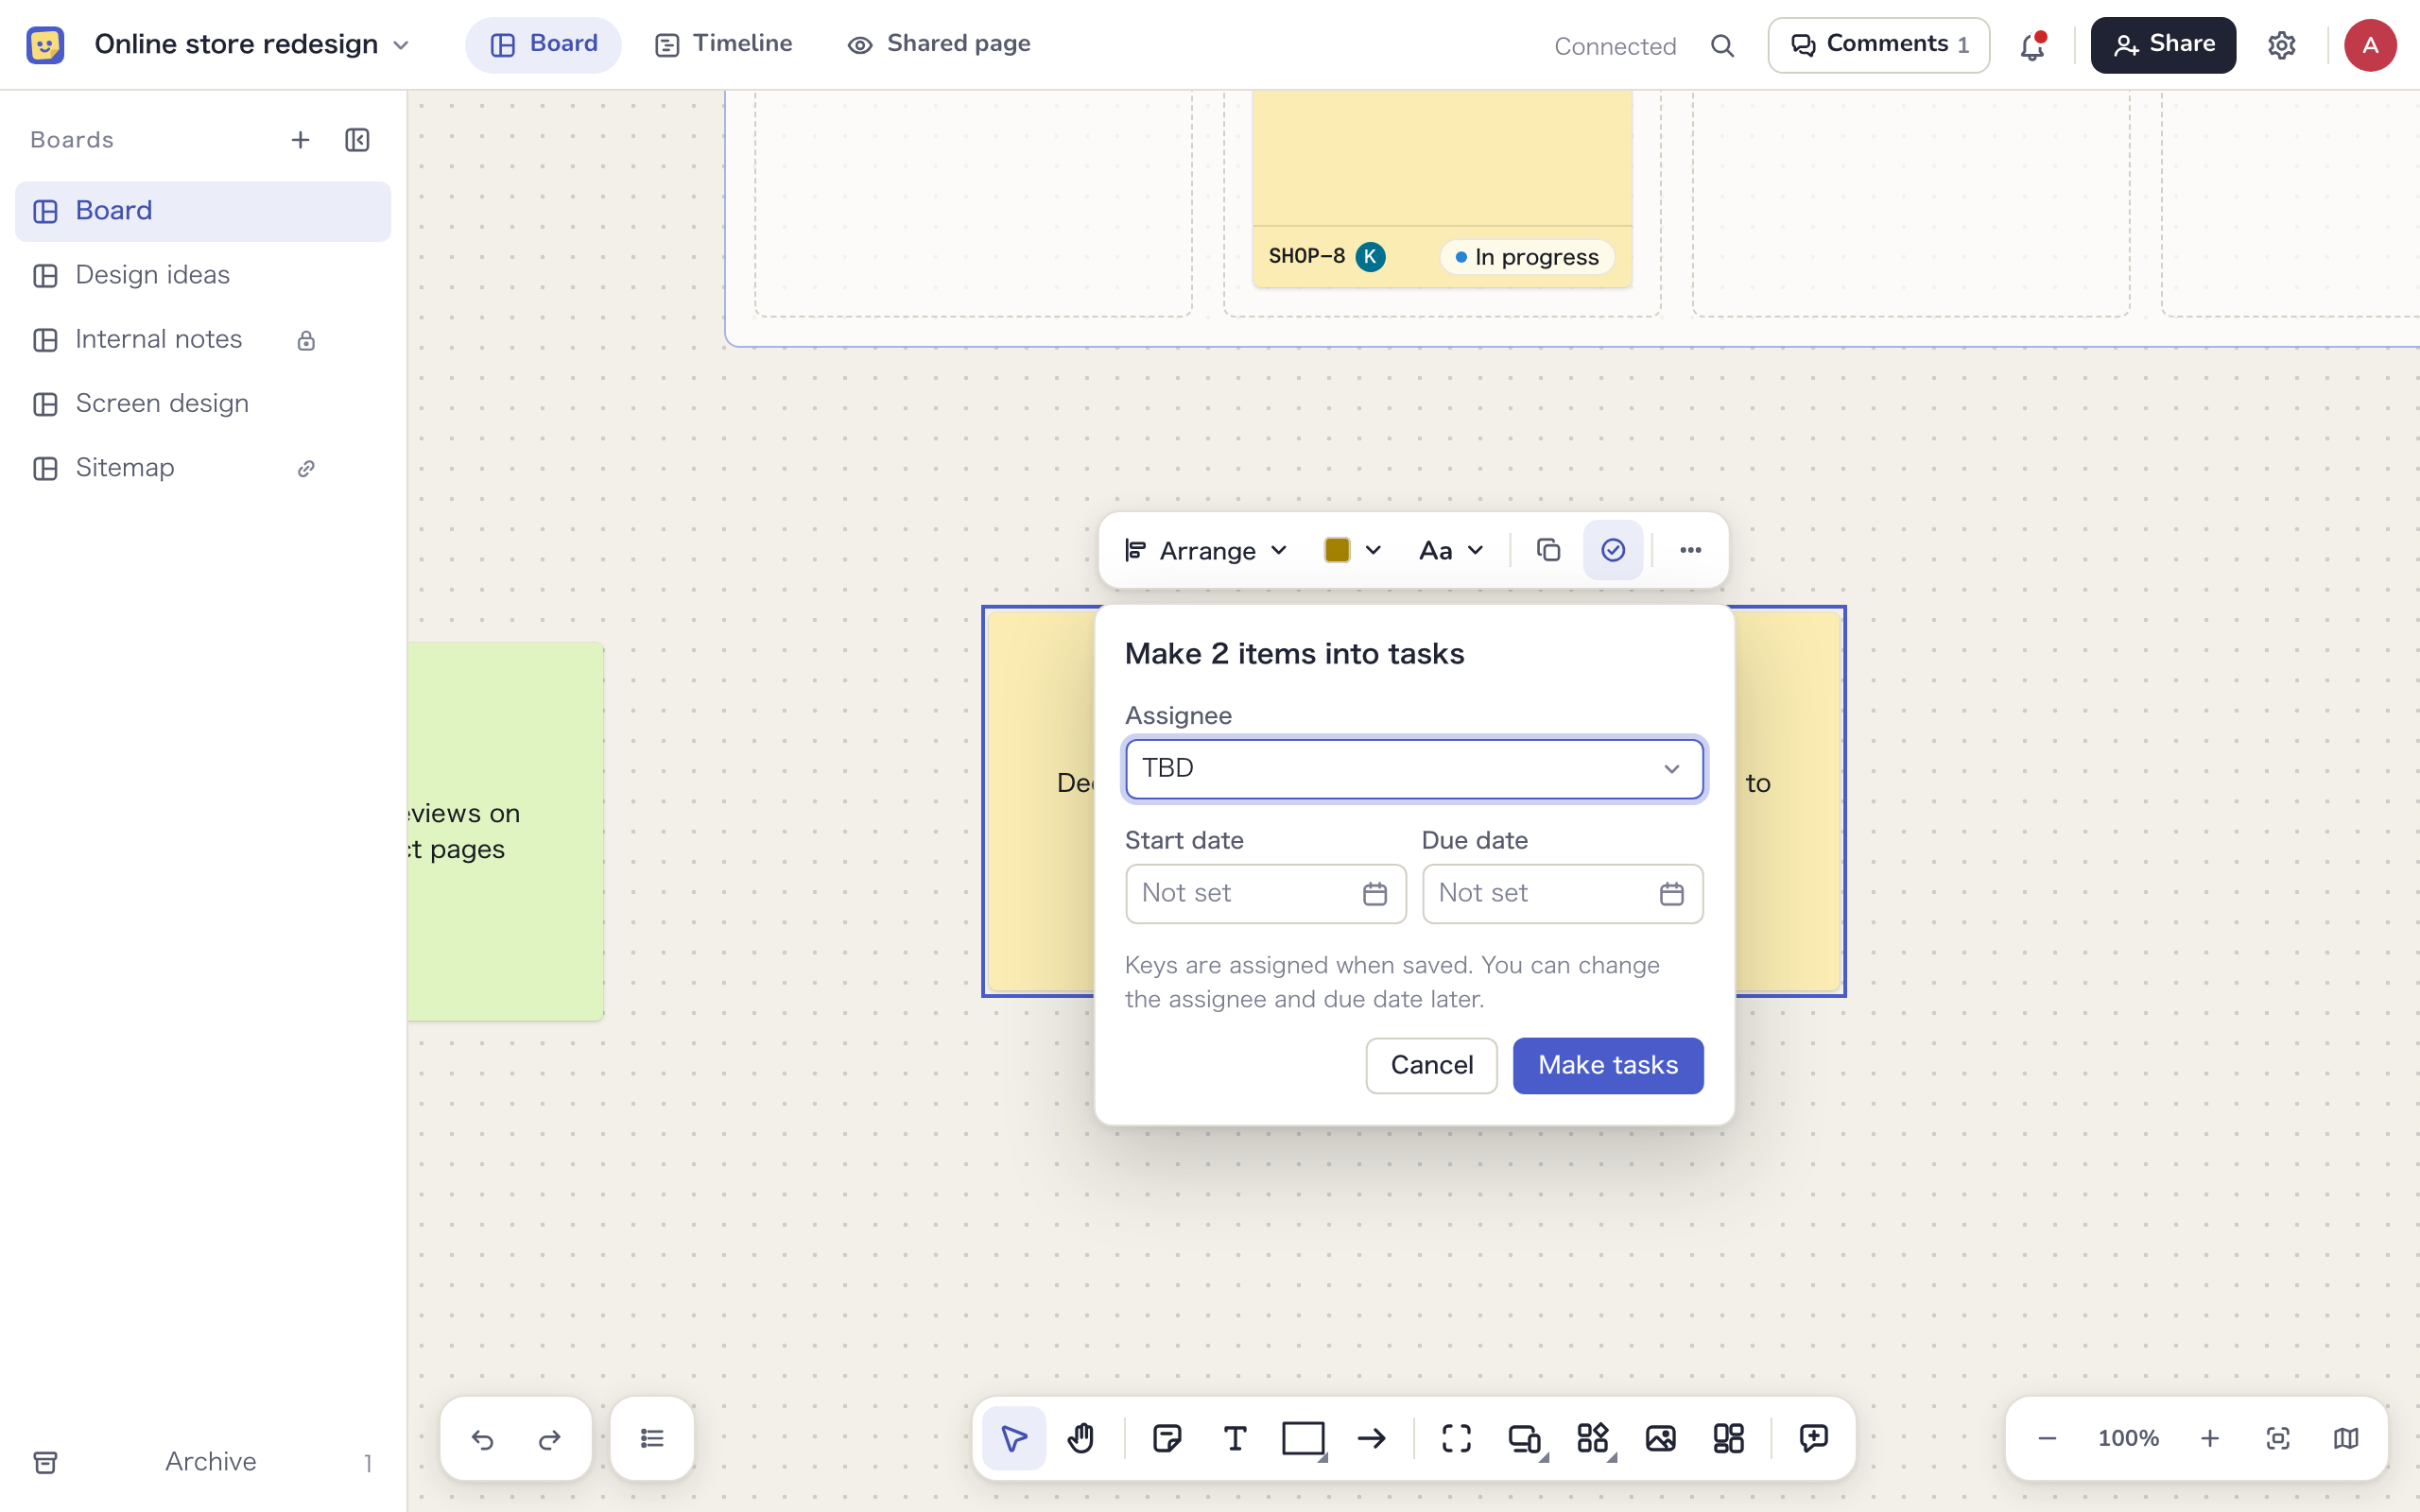
If your selection mixes sticky notes with other items, anything that can’t be a task is skipped: frames inside a status column, frames containing a phase, and anything other than sticky notes and frames. The form tells you how many will be skipped.
Drop into a status column
Turn on “Make stickies placed here tasks automatically” for a status column (a frame such as “To do” or “In progress”). Any sticky note you drop into that column becomes a task with the column’s status. See Status columns and phases.
Make a frame or screen a task
You can treat one screen, several screens, or a group of notes and shapes as a single task. Everything inside the frame belongs to the task, and the frame name becomes the task title.
- Make a frame a task: select the frame and click “Make a task” or press ⇧+T
- Combine several items into one task: select two or more items, then choose “Combine into one task” from “More actions” (…) in the toolbar or from the right-click menu. Enter a name, assignee, start date and due date, and click “Combine”. A frame is created around the selection and becomes a task. Items in different frames, items inside a status column, items containing a phase and locked items can’t be combined
- Make a screen a task: click “Make this screen a task” in the screen’s header menu or in the side panel when the screen is selected
- Add a task inside a screen: click “Task” in the screen header. A sticky note task called “Finalize (screen name)” appears inside the screen. You can change its text later
Sticky note tasks inside a frame task stay as separate tasks. The frame task is their “Parent task”. Its status doesn’t change automatically, even when every task inside is done.
Task keys
Each task gets a key such as “MD-12”. The first part is the key prefix chosen when the project was created (2–10 letters and numbers). The second part is a running number within the project. Keys never repeat within a project and stay the same when you move a task to another board.
- Right after you make a task, it shows “Assigning a key” for a moment instead of the key
- Open a URL with the key, such as
https://app.mockedule.com/k/MD-12, to go straight to the board with that task selected. It’s handy for mentioning tasks in chat or documents - Put the key in a GitHub branch name, commit or pull request and it appears in that task’s activity (see Integrations)
If the task was deleted, or belongs to a project you can’t view, the page says the task “was not found”. The key prefix can’t be changed after the project is created.
Task cards
A sticky note task becomes a card with its key, the assignee’s avatar, due date and status along the bottom. A frame task shows the same in the frame header, plus how many tasks inside are done (“2/3 done”).
- Click the status on a card to change it right there
- When a task is past its due date and not done, the due date turns red
- A task with a priority shows a priority icon to the left of its key, and a task with a checklist shows its progress, such as “2/5”. Labels line up near the bottom of the card, and any that don’t fit become “+2”
- When a small sticky note runs out of room, checklist progress, the due date and the assignee are hidden in that order. You can still see them in the panel
Task panel
Select a task on the board and the task panel opens on the right. The same panel opens when you click a task on the timeline.
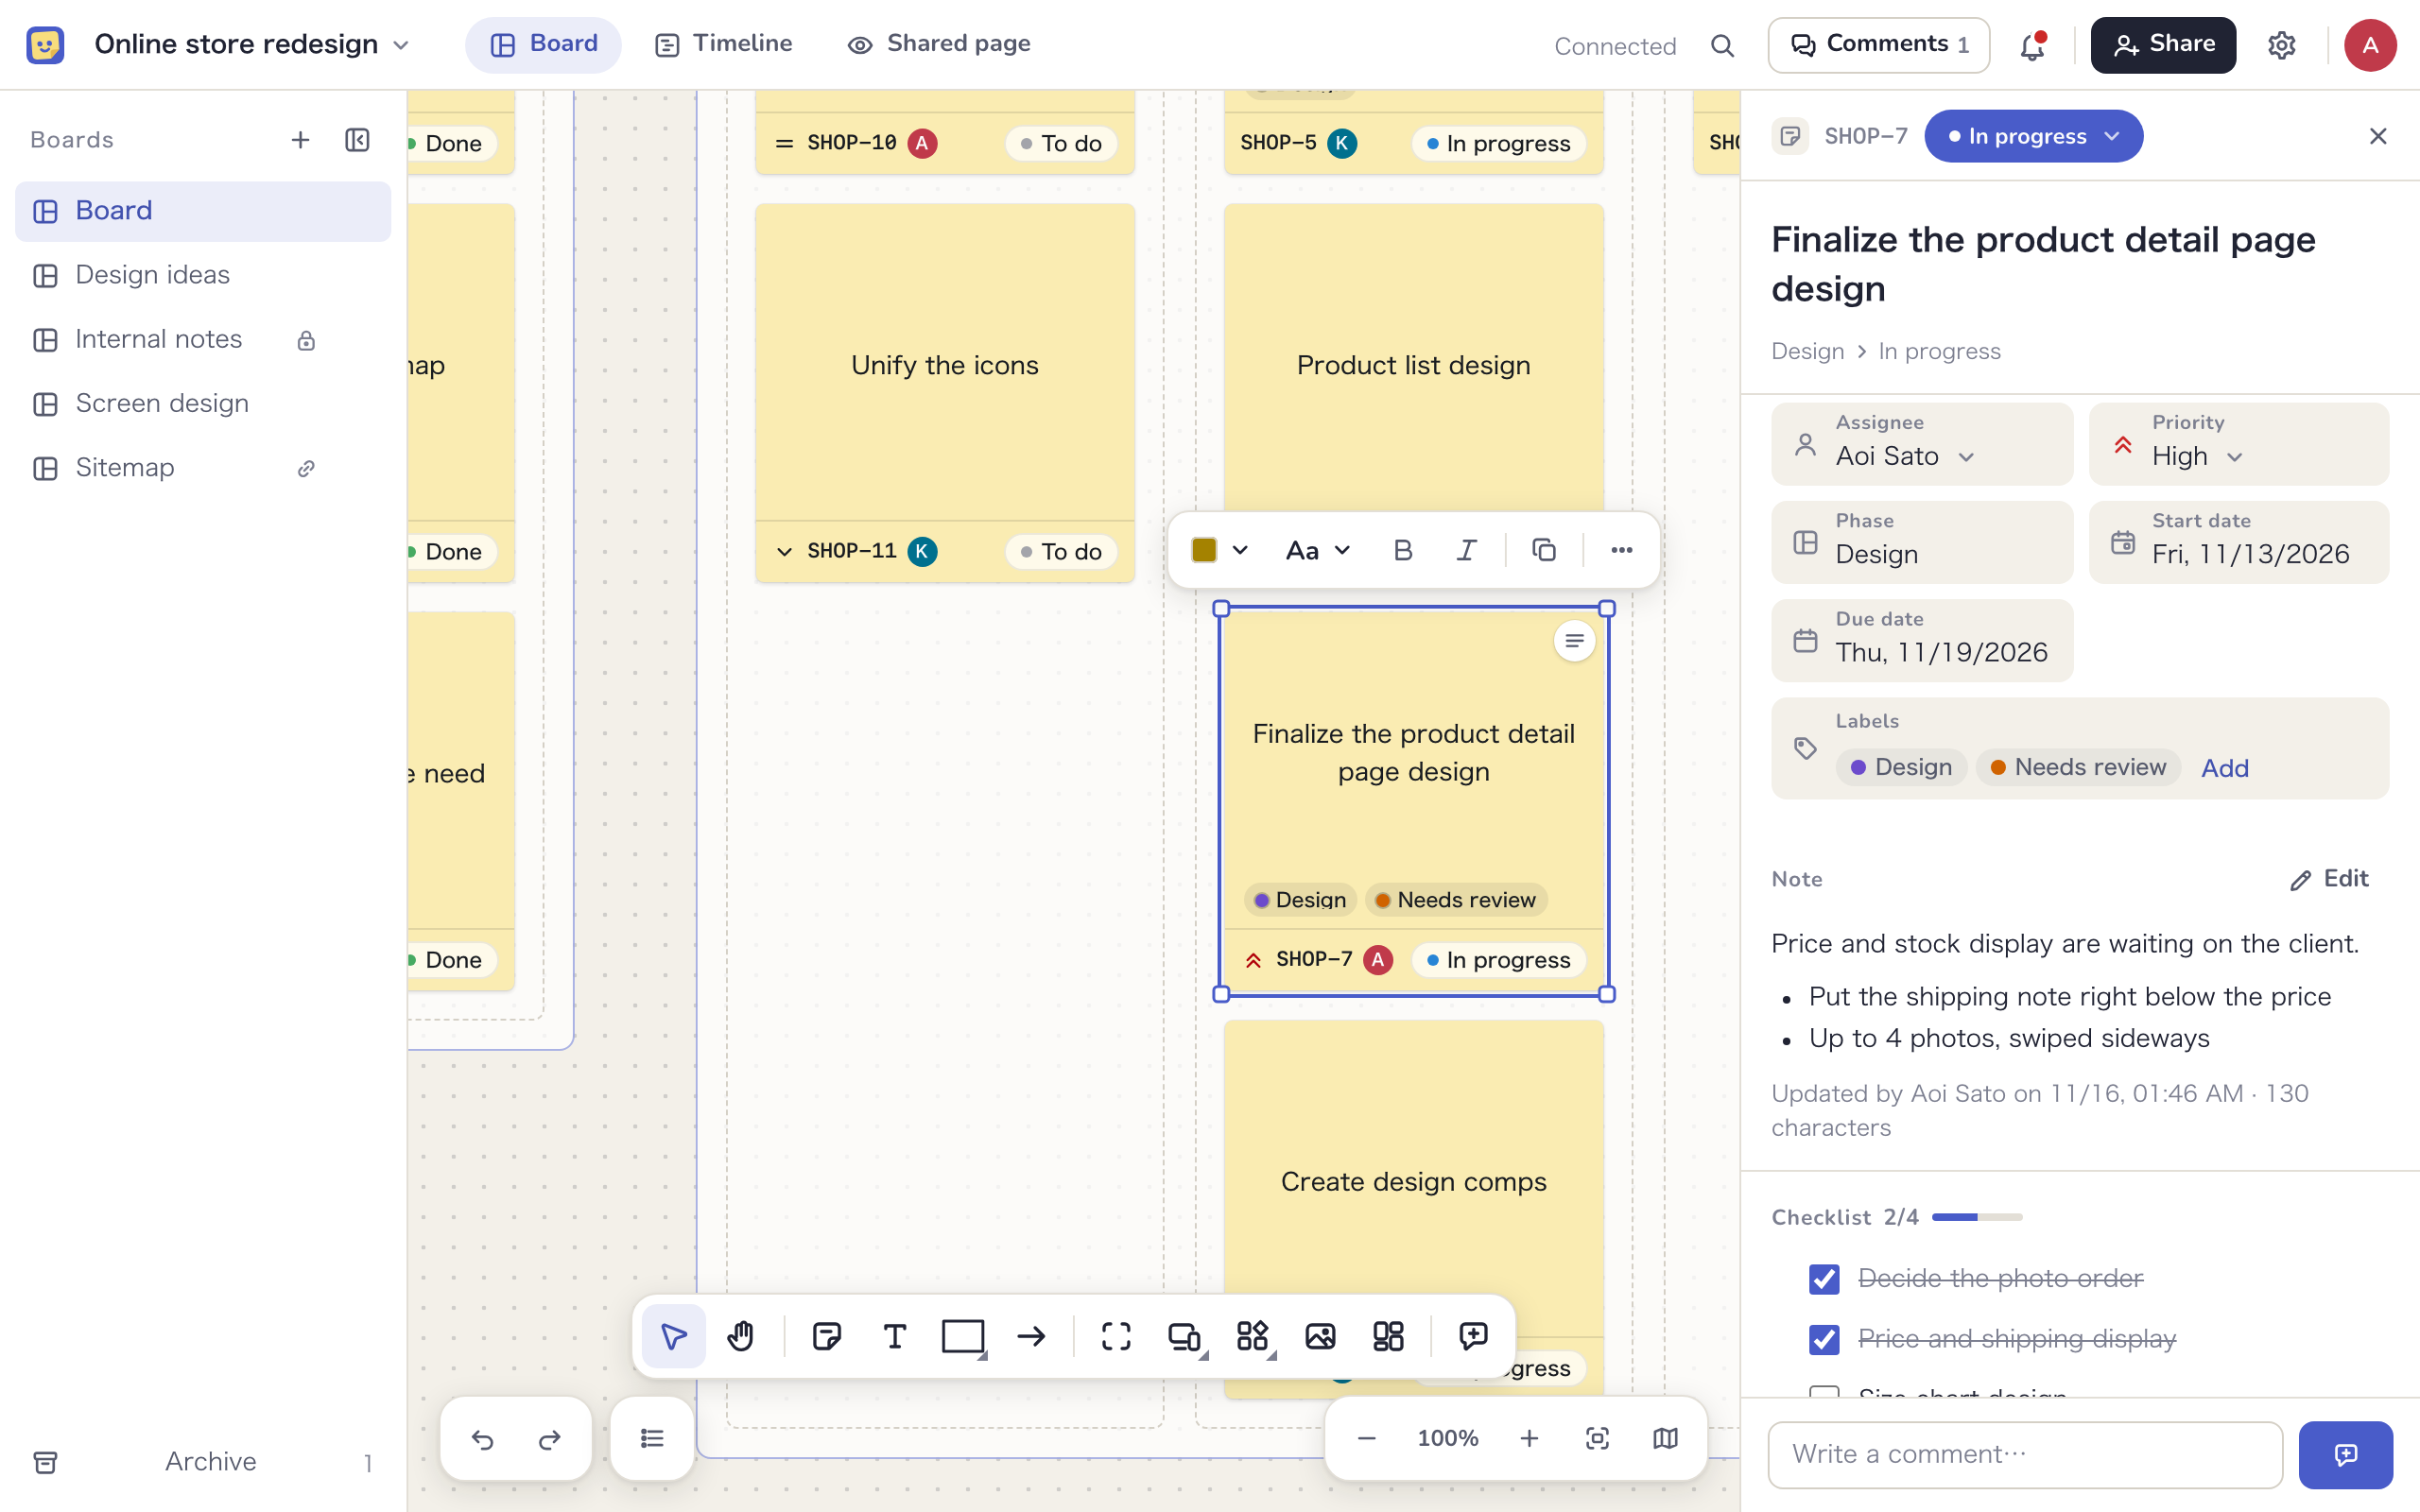
| Field | What you can do |
|---|---|
| Status | Click the status in the panel header and choose “To do”, “In progress”, “In review” or “Done”. You can move from any status to any other |
| Text or name | The sticky note text (or the frame name for a frame task) is the task title. Editing it here changes the note on the board too |
| Assignee | Choose one Manager, Member or External editor. Tasks on internal-only boards can’t be assigned to external participants |
| Priority | Choose “High”, “Medium”, “Low” or “None” (see Priority, labels and checklists) |
| Phase | Set by the phase frame the task sits in, so you can’t change it here |
| Start date and due date | Pick dates. The start date can’t be after the due date. A task past its due date and not done shows something like “3 days overdue” |
| Labels | Add labels from the project’s list |
| Parent task | Shown when a frame task surrounds this task. Click it to open that task |
| Note | Write a longer description with “Add a note”. Headings, lists, tables and more are supported. Everyone who can see the board can read it, so keep internal matters in an internal-only comment |
| Checklist | List the small steps in the task and check them off |
| Work log and activity | Status changes, work logs and more, newest first. Only internal members can see it (see Comments and activity) |
| Dependencies | Link tasks under “Depends on” and “Followed by” (see Dependencies) |
| Links | Enter a URL in “Add link”. Up to 50 per task. Pasting a URL while the task is selected adds it too |
| Comments | Comments on the task are listed here, and you can write one from the box at the bottom of the panel |
A frame task also has a “Tasks inside” section that shows how many are done and lists them. Click one to open it.
Changes in the panel show up right away for everyone with the board open. Changes made on the board can be undone with ⌘+Z.
Status columns and phases
Lay out status columns on the board and you can change status by moving sticky notes, like a kanban board. Put the columns inside a phase frame and their tasks belong to that phase.
- Add a phase: right-click an empty spot and choose “Add a phase”, or click “Phase” at the right end of an existing phase header. Enter a name and period, then click “Add”. Four columns are created inside: “To do”, “In progress”, “In review” and “Done”. The end date becomes the milestone
- Move into a column: move a task into a column and it takes that column’s status. The other way round, changing the status on the card or in the panel moves the card to the matching column in the same phase
- Column settings: select a column frame to change “Status” and “Make stickies placed here tasks automatically” in the panel. Changing the status changes every task inside too, so check the count and click “Change”
- You can delete, add and rename columns later. A phase can have two columns with the same status
Managers and Members can create phases and change their dates. External editors can only do this when “Let them create phases and change phase dates” is on under “Participants & visibility” in the project settings.
Priority, labels and checklists
You set all three in the task panel. Anyone who can change a task’s status can change them. Tasks without them look the same as before.
Priority
Choose “High”, “Medium” or “Low” in the “Priority” field, or “None” to clear it. High shows a double upward chevron, Medium two lines, and Low a downward chevron, on cards, the timeline and the list. Priority changes are recorded in the activity.
Labels
- Click “Add” in the “Labels” field
- Find a label by name and click it to add it. Click it again to remove it
- Click “Done” to close the list
Each project has its own labels with names and colors, and you can add the same label to tasks on any board. Internal members can type a new name and click “Create “…”” to make and add a label on the spot. Rename, recolor and delete labels under “Labels” in the project settings (see Project settings).
- Up to 10 labels per task and 50 per project
- Label names are visible to every project participant, including Clients. Don’t use words you wouldn’t show outside your team
Checklist
Write down the small steps in a task and check them off as you go. Items have no assignee or due date. If a piece of work needs its own assignee or date, make it a separate task.
- Click “Add a checklist”, type in “Add an item” and press Enter or click “Add”. You can keep typing the next item
- Paste several lines of text to add one item per line
- Click an item’s text to edit it, and click × to delete it
- Drag the handle on the left, or focus it and press ⌥+↑ or ⌥+↓, to reorder items
- Up to 50 items per task and 200 characters per item
The heading shows how many are done, such as “2/5”. Checking every item doesn’t change the status.
Dependencies
You can link tasks so that one starts after another is finished. Tasks on different boards can be linked as long as they’re in the same project. Dependencies appear as lines on the timeline.
Add or remove a dependency
- From the panel: click “Add” under “Depends on” or “Followed by”, then search by key or title and pick a task. Click × on a row to remove it. Click the row to open that task
- From the timeline: hover over or select a bar and a round handle appears at its right end. Drag the handle onto another task’s bar. The task you dragged from comes first and the one you dropped on follows. Select a line and press ⌫ to remove it
A task can’t depend on itself, and you can’t link tasks in a loop. A task can have up to 20 tasks before it and 20 after it, and a project up to 2,000 dependencies. If a task still shows “Assigning a key”, wait until it has a key.
Shift the tasks that follow
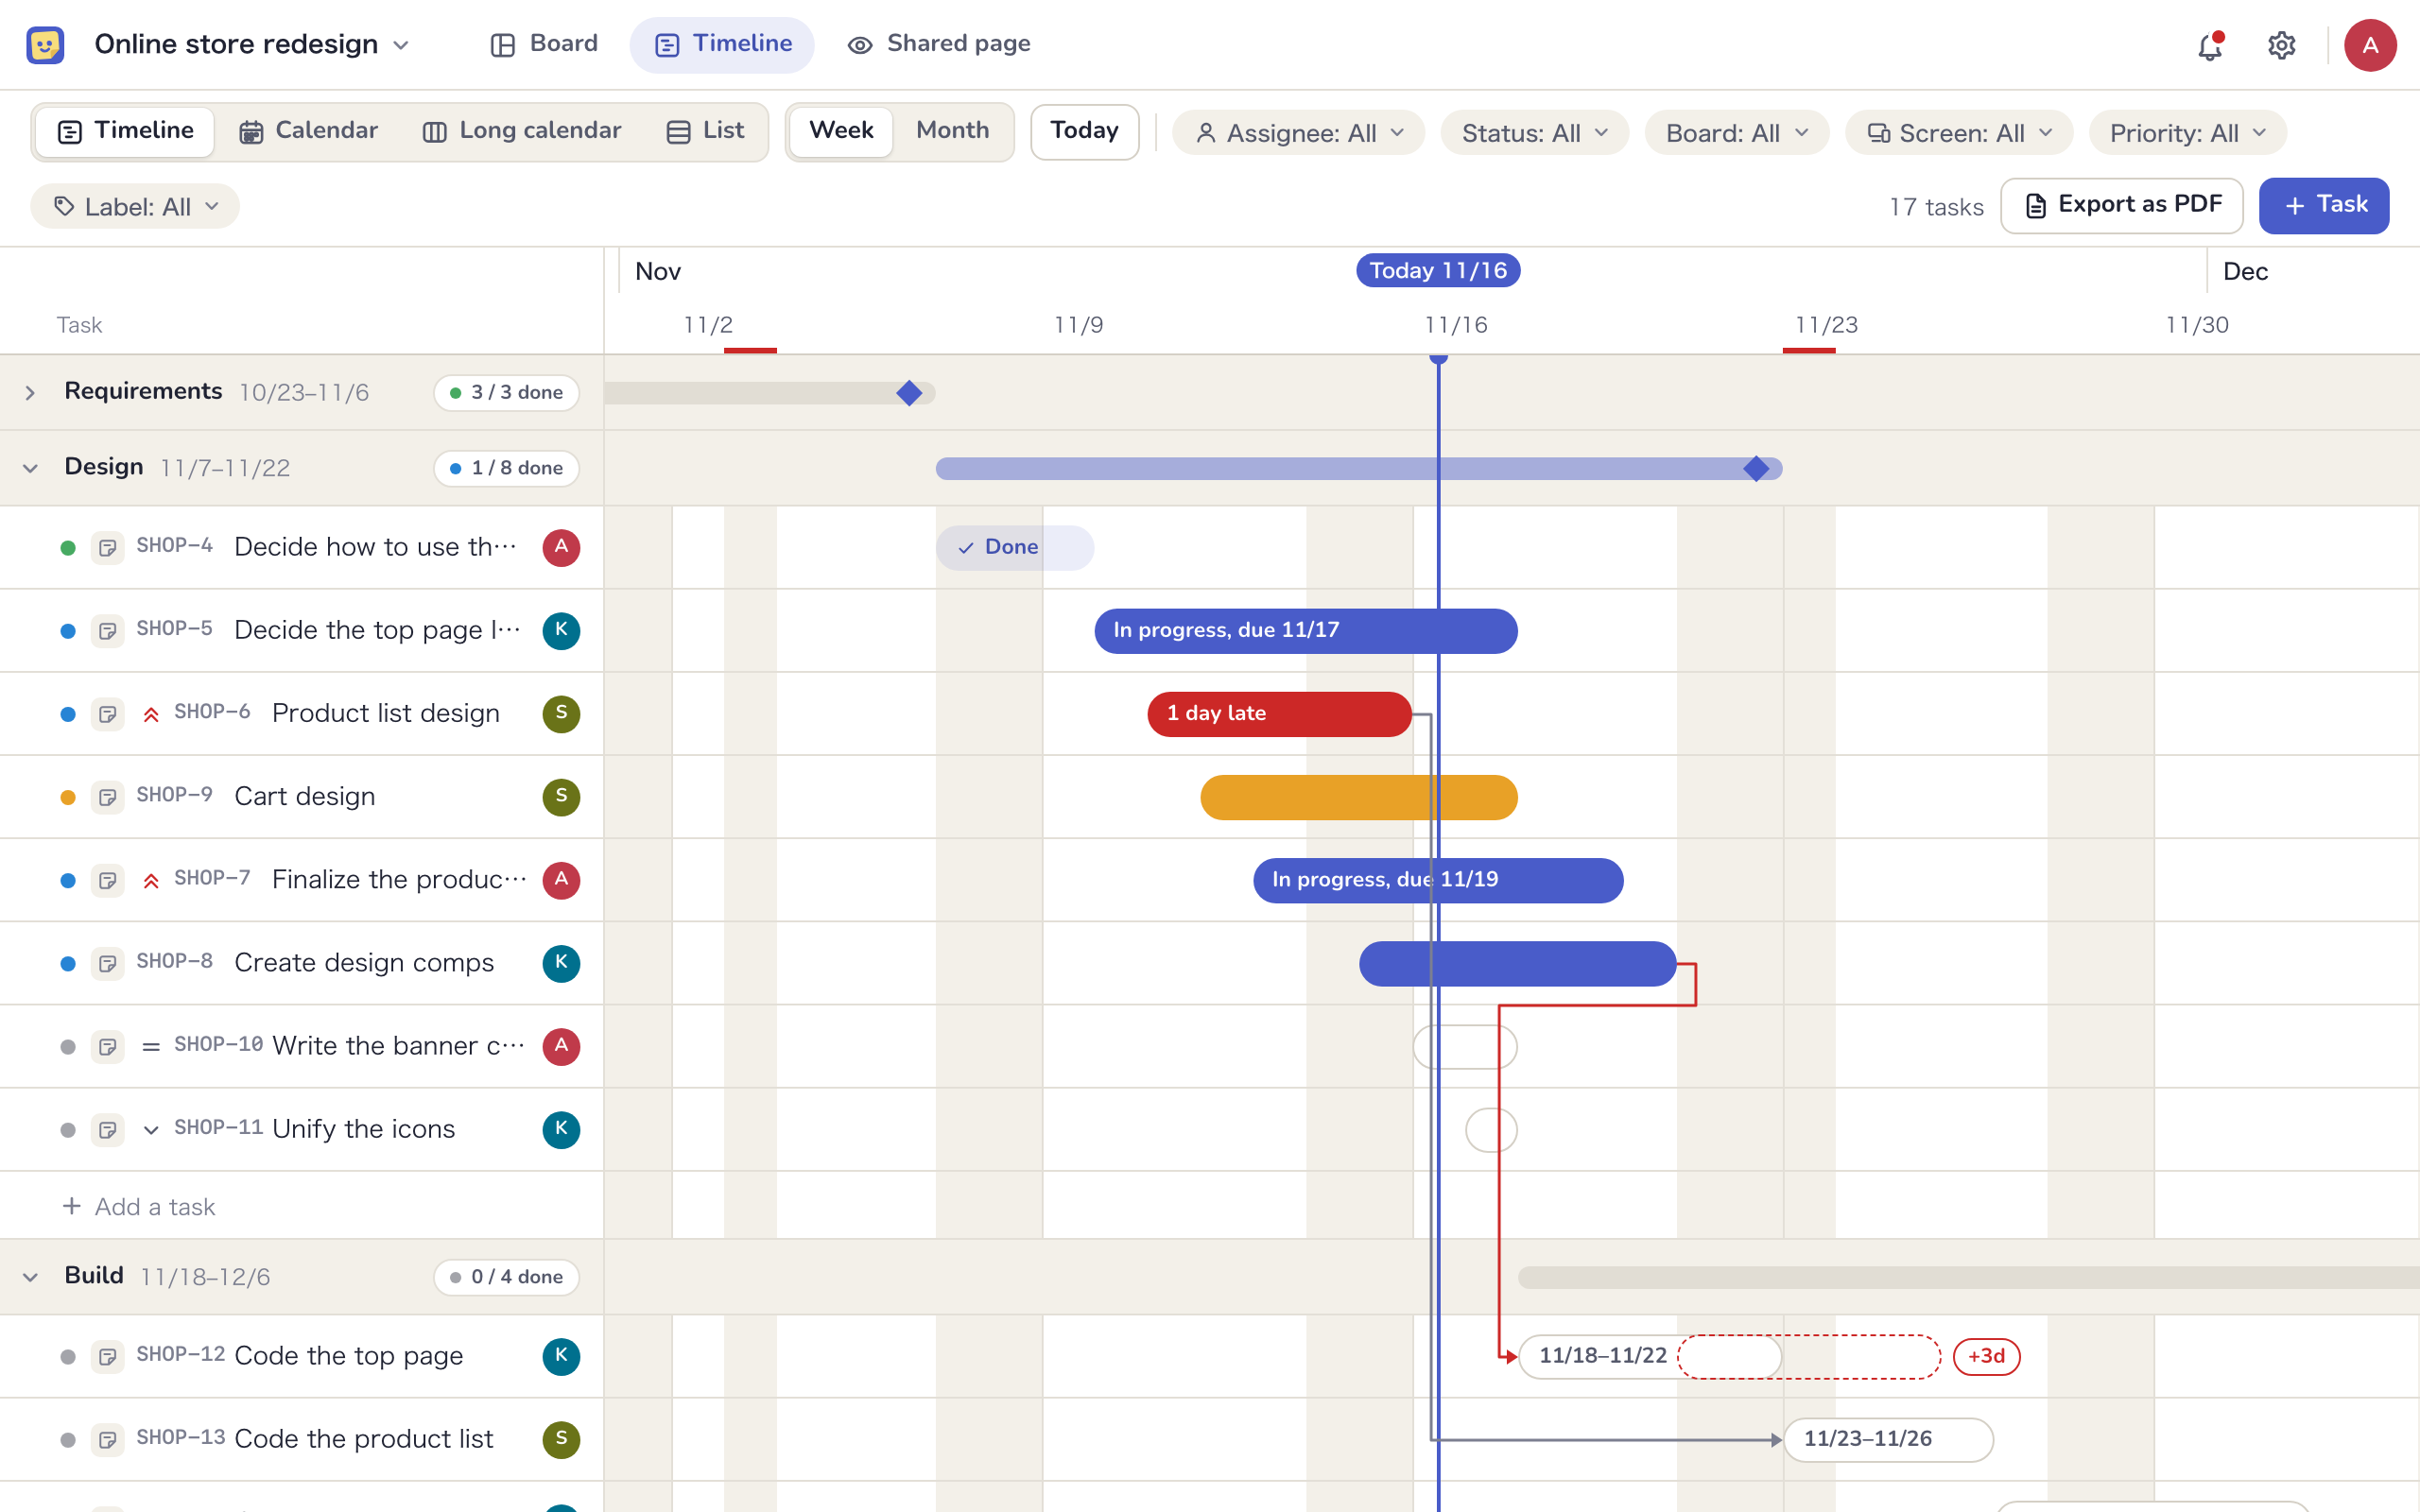
When you push back an earlier task’s due date, or it passes its due date without being done, the dates of the tasks that follow don’t move by themselves. Instead, a “+3d” badge appears to the right of the following task’s bar on the timeline, with a dotted outline showing where it would move. Days are counted on the calendar, including weekends and holidays.
- Click the “+3d” badge on the timeline, or “Shift the tasks that follow” in the panel
- Check the list of tasks with their current and new dates, then click “Shift”
The start date and due date move by the same number of days, so each task keeps its length. Phase dates don’t move. Only Managers and Members can use “Shift the tasks that follow”.
Dependencies don’t stop you from setting a following task to “In progress” before the earlier one is done. They don’t appear on the calendar, list, board or shared page.
Remove or delete a task
- Remove the task: click “Remove the task” at the bottom of the panel to turn it back into a plain sticky note (or frame). The key is kept, so making it a task again brings back the same key. Labels and the checklist come back too, but the priority is cleared
- Delete the task: select the sticky note or frame and press ⌫, or choose “Delete” from the right-click menu. Undo with ⌘+Z and it comes back with the same key
When you delete a frame task with items inside, choose “Delete only the frame and keep the contents” or “Delete with contents”. If you keep the contents, the tasks inside stay as they are.
“Delete with contents” deletes every task inside as well. Check the number of items and tasks shown in the dialog before you click it.