Mockedule has a built-in MCP server, so you can ask your AI to do almost anything you can do in the web app. Mockedule does not include an AI of its own. The work is done by the AI you connect. For an overview of what is possible, see Works with your AI.
Before you connect
- You need an AI app that supports remote MCP servers. There are no API keys to create and nothing to install
- A connection is yours alone. The AI acts on behalf of your account and can only do what your role allows
- MCP calls have no monthly cap and no extra fees, on the Free plan too
The connection URL is below. You can also find it under “Connection URL” in “AI connections” in your account settings, where you can copy it with “Copy”.
https://app.mockedule.com/mcp
Connect
Claude (web and desktop)
- In the Claude web or desktop app, open the connector directory
- Find Mockedule and connect
- The Mockedule consent screen opens in your browser. Make your choices as described in Consent screen and allow the connection
If Mockedule is not listed, open the connector settings, choose “Add custom connector” and enter the URL above.
Claude Code
- Run this line in your terminal.
claude mcp add --transport http mockedule https://app.mockedule.com/mcp - Open Claude Code, run
/mcp, choose mockedule and authenticate - The consent screen opens in your browser. Make your choices and allow the connection
ChatGPT, Codex and VS Code
- ChatGPT: On the web, add a custom MCP server and enter the URL above. Writing is available on the Business, Enterprise and Edu plans. Pro is read-only
- Codex: Add it with this line.
codex mcp add mockedule --url https://app.mockedule.com/mcp - VS Code: Run “MCP: Add Server”, choose HTTP and enter the URL above
Any other AI that can add a remote MCP server connects with the same URL. Details about each AI are based on what each company published as of November 2026.
Consent screen
When you start connecting, a Mockedule page opens in your browser. If you are not signed in, you sign in first. The consent screen is currently in Japanese only, so the labels below include the Japanese text you will see.
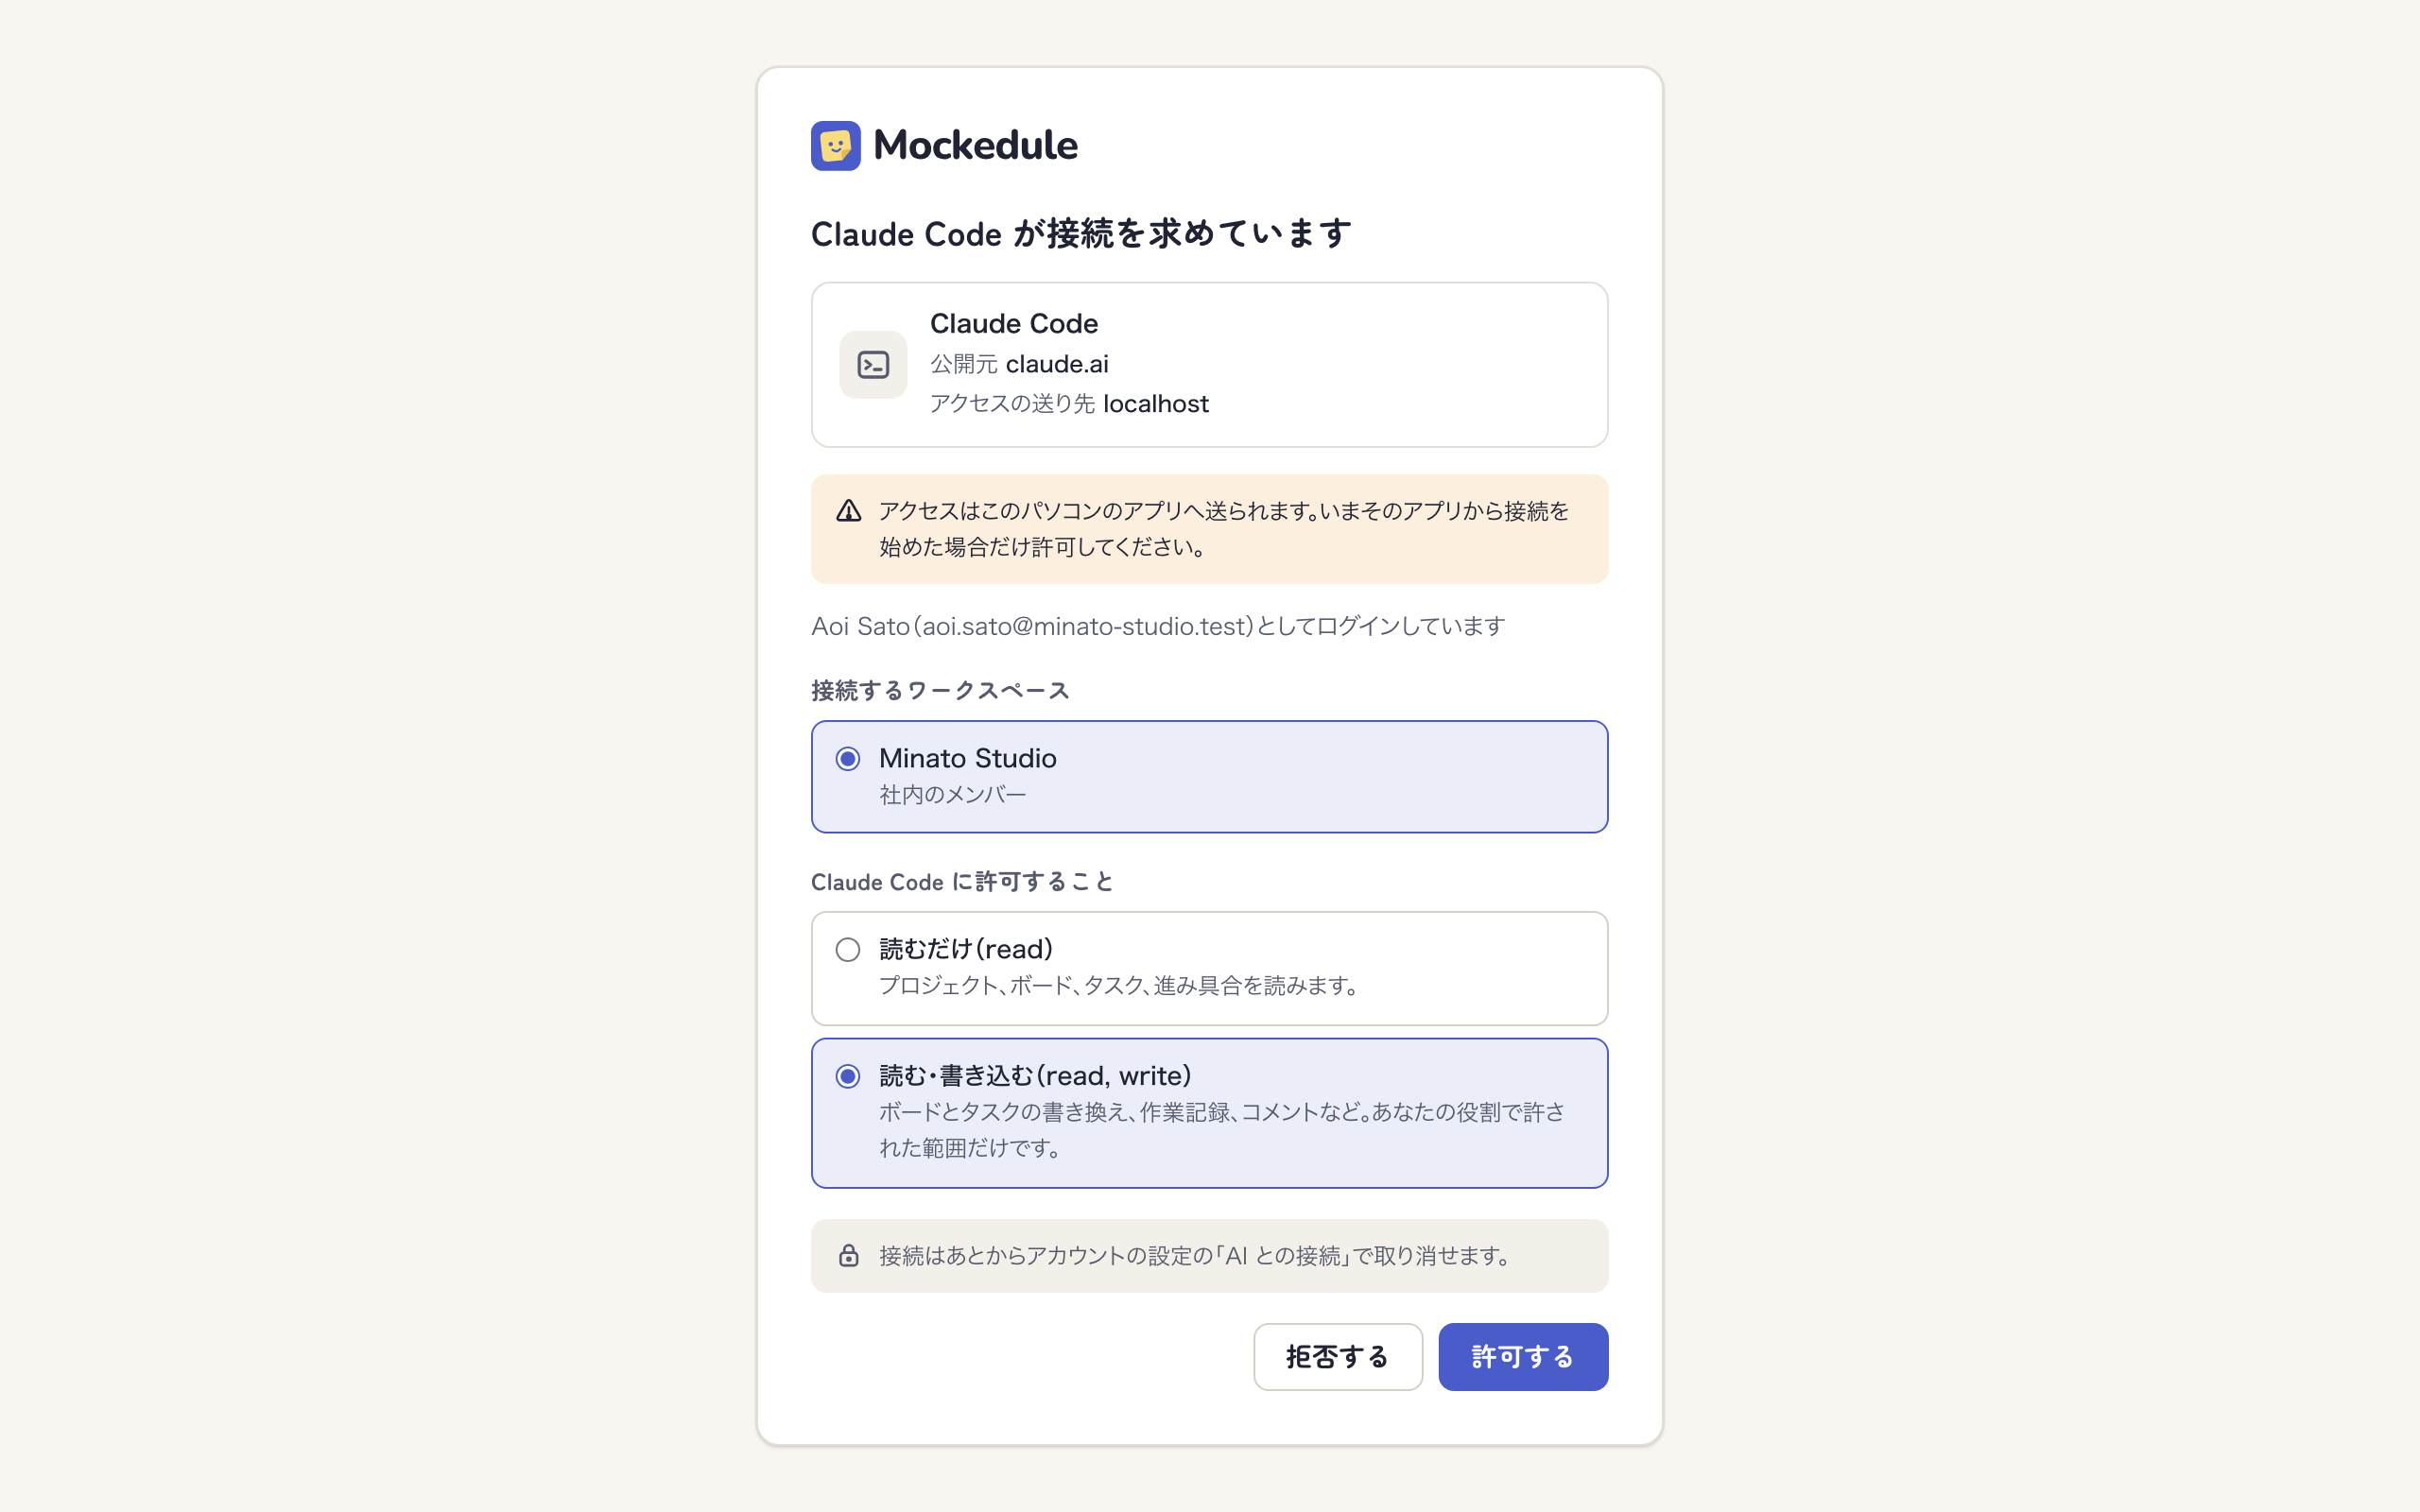
- Check the name of the app asking to connect and where access is sent. Apps whose name cannot be verified show a warning
- Choose the workspace to connect (接続するワークスペース). In a workspace where you are an external participant, only the projects you take part in are included
- Choose what to allow
- Click 許可する (Allow). To stop, click 拒否する (Deny)
| Choice | What the AI can do |
|---|---|
| 読むだけ (read) | Read projects, boards, tasks and progress |
| 読む・書き込む (read, write) | Read, plus edit boards and tasks, add work logs, write comments and more, within what your role allows |
Each connection covers the one workspace you choose here. To use another workspace, connect again and choose it. In Claude (web and desktop), connecting again ends the previous connection. If you connected read only and later want the AI to write, connect again as well and choose 読む・書き込む (read, write).
Asking your AI
Example requests
Ask in plain words. The AI reads the board, picks the right actions and writes the result. Mentioning the project or board name, or a task key like SHOP-12, makes the target clear.
- Turn the notes from this meeting into sticky notes, then make them tasks with assignees and due dates
- Create the screens from sign-in to password reset and connect the screen flow
- List overdue tasks grouped by assignee
- Push the design phase back one week
- Add what this PR did to the work log of SHOP-12
- Summarize this week’s progress as a message for the client
Anything the AI adds or changes reaches people who have the board open right away. It is highlighted for a moment with a label like “Kenta Suzuki (via Claude)” so you can tell whose AI made the change. You can edit it like anything a person added.
The AI writes progress summaries in the conversation and does not save them in Mockedule. To show one to the client, read and edit it, then paste it into “Note from the team” on the shared page (see Shared page and view links).
Run a ready-made workflow
Common workflows are available as MCP prompts. In Claude Code, run them as slash commands such as /mcp__mockedule__log_session.
| Prompt | What it does |
|---|---|
| plan_from_frame | Reads the sticky notes in a frame, suggests which to make tasks with assignees and due dates, and makes the tasks once you agree |
| summarize_discussion | Sorts a discussion in a frame or sticky notes into topics, decisions and open questions, and places them as sticky notes in a new frame |
| log_session | At the end of a Claude Code session, finds the task from the branch name or conversation and adds a work log |
| implement_screen | Reads a screen’s design brief, shows an implementation plan, builds it once you agree, then adds a work log |
| wireframe_to_figma | Recreates a screen’s wireframe as Figma frames using the Figma MCP and links them to the screen |
| progress_report | Reads the progress sources and writes a summary for the client in the conversation. Works with read-only connections too |
What AI can do
The AI can only do what the connected person’s role allows. An AI connected by an external participant reads only what external participants can see. For what each role can do, see Roles and visibility.
These actions are only available in the web app, so a person always checks them. Asking the AI will not work.
- Changing plans, payments and cancelling (the AI can only read the plan and usage)
- Writing “Note from the team” on the shared page
- Creating or turning off view links, and changing “Allow view links” for the workspace
- Connecting or disconnecting Slack and Chatwork notifications
- Connecting your Figma and GitHub accounts
- Transferring ownership
- Changing “What external editors can do” (whether they can manage phases)
- Deleting your account
By default, the AI cannot make members Admins either. Only when the Owner turns on “Let AI make members admins” under “AI integration” in the workspace settings can Owners and Admins ask the AI to do so. This keeps an AI that follows instructions written on sticky notes or in comments from making someone an Admin.
People outside your team can also write on boards and in comments, and the AI may act on instructions written there. When the AI asks you to confirm a big action such as deleting something or changing roles, read what it is about to do before you agree.
Write limit
To prevent abuse, writes that add sticky notes, tasks, screens, work logs and similar items are limited to 120 per person every 60 seconds. Changes to single existing items are not counted. Writes over the limit are refused, so wait about a minute and ask again. There is no monthly cap.
Revoke a connection
Revoke your own connections
- Open “Settings” from your menu at the top right, then open “AI connections” under Account
- “My connections” lists each connected app with when it was last used. Click “Revoke” on the one to remove
- Click “Revoke” in the confirmation dialog
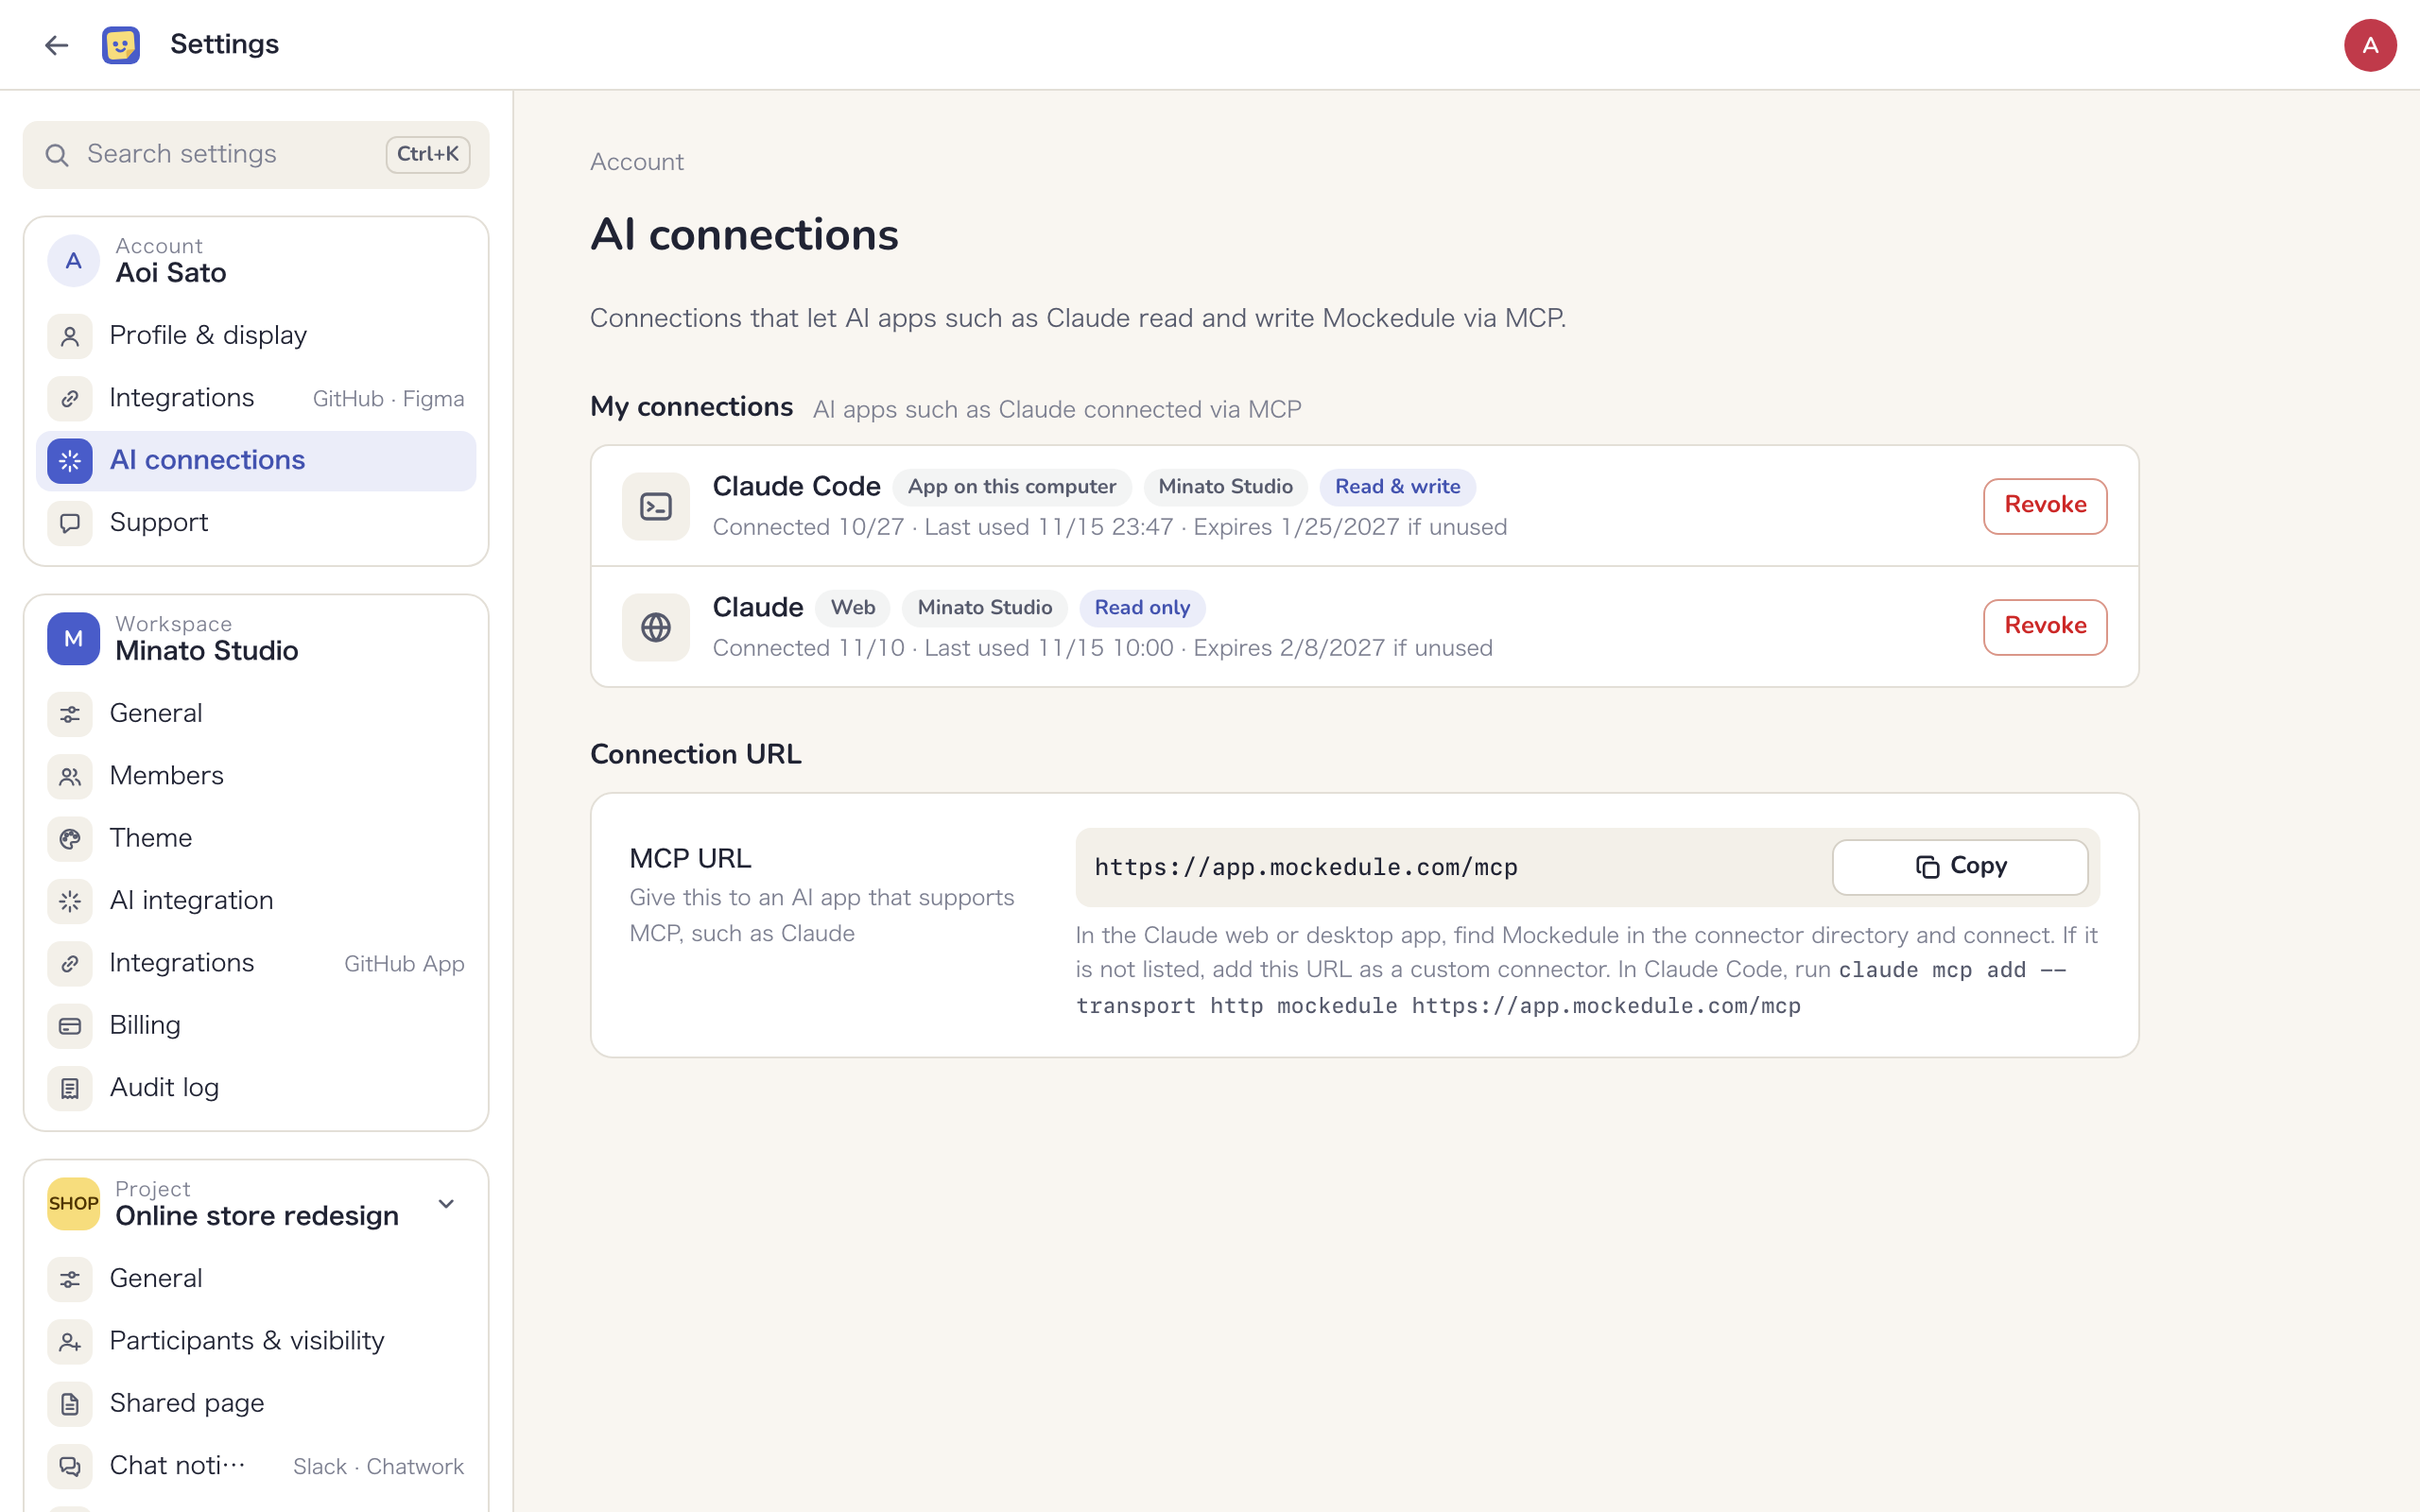
- To use a revoked app again, connect it again
- The same app can leave separate rows for each computer or for older connections. Check when each was last used and revoke the ones you no longer use
- A connection that goes unused for 30 days expires on its own. Each row shows the date it expires if unused
Revoke connections to a workspace
Owners and Admins can see every connection to the workspace, and whose it is, under “Connected AI apps” in “AI integration” in the workspace settings, and revoke any of them with “Revoke”. Use this to stop connections left behind after someone leaves.