Mockedule has no passwords. You sign in with a link sent to your email, or with your Google account.
Sign up
Sign up with an email address or a Google account. You start on the Free plan, with no credit card needed.
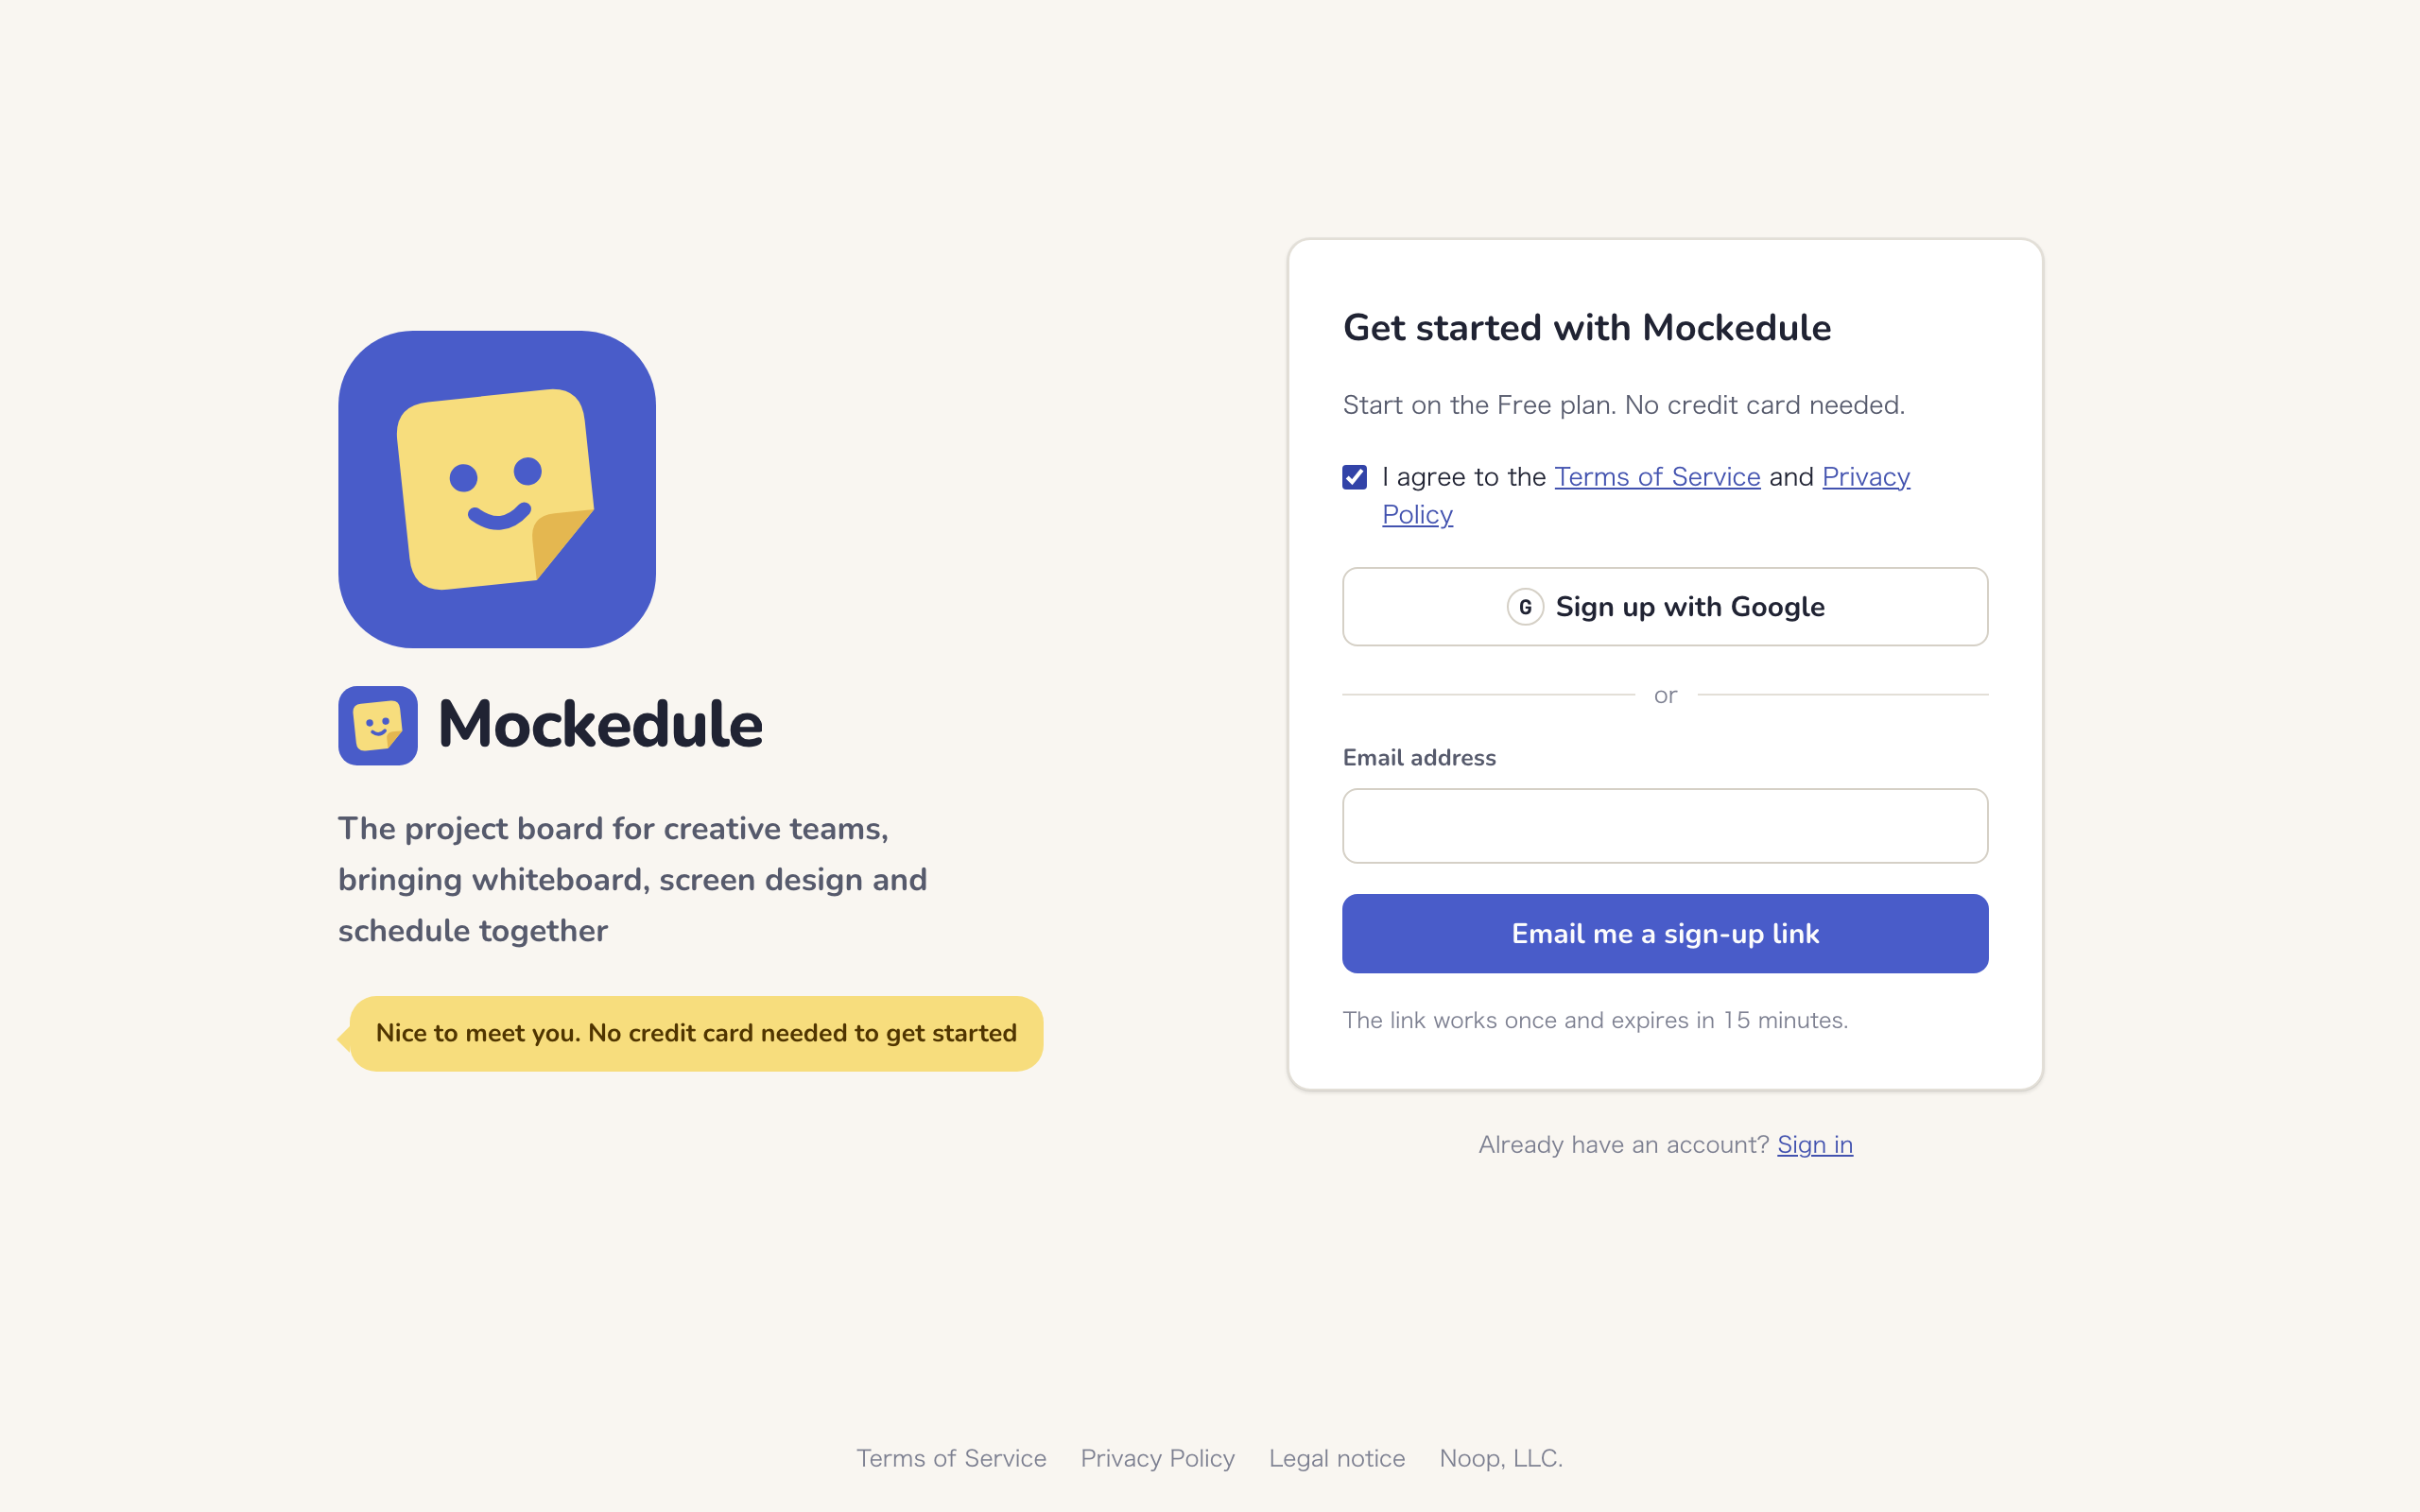
Sign up with your email
- Open the sign-up page. You can also get there from “Start free” on this site
- If a verification box appears, follow its prompt. Sometimes it finishes on its own
- Check “I agree to the Terms of Service and Privacy Policy”
- Enter your address under “Email address” and click “Email me a sign-up link”
- Open the link in the email within 15 minutes. On the “Continue sign-up” page, click “Finish sign-up”. You go on to create a workspace
Opening the link alone does not finish sign-up. You are signed up when you click the button on the page, so an email app that opens links automatically cannot use up your link.
The link works once. If the email does not arrive, check your spam folder, or click “Try another address” and enter it again. If the address is already registered, you get a sign-in link instead.
If you see “This link cannot be used”, the link has expired (links last 15 minutes) or was already used. Click “Back to sign-up” and request a new one.
Sign up with Google
Pass the verification and check the agreement box, then click “Sign up with Google” and pick your account on Google’s page. When sign-up finishes, you go on to create a workspace.
Sign in
Open app.mockedule.com. If you are not signed in, the “Sign in” page appears.
Sign in with an email link
- Enter your registered address under “Email address” and click “Send a sign-in link”
- Open the link in the email within 15 minutes
- Click “Sign in” on the page that opens
The page shows the same “Check your email” message even if the address is not registered. This keeps others from finding out who has an account. If nothing arrives, check the address and click “Send again” or “Try another address”.
Sign in with Google
Click “Sign in with Google” and pick your account on Google’s page. If you pick an account that is not registered, you see “This Google account is not registered.” Choose “Go to sign-up” or “Sign in with another Google account”.
You stay signed in for 30 days after you last used Mockedule. The period extends each time you use it, so you rarely need to sign in again. To sign out, use “Sign out” in your account menu.
Create a workspace
A workspace represents your team or company. Projects, internal members and your plan all belong to a workspace.
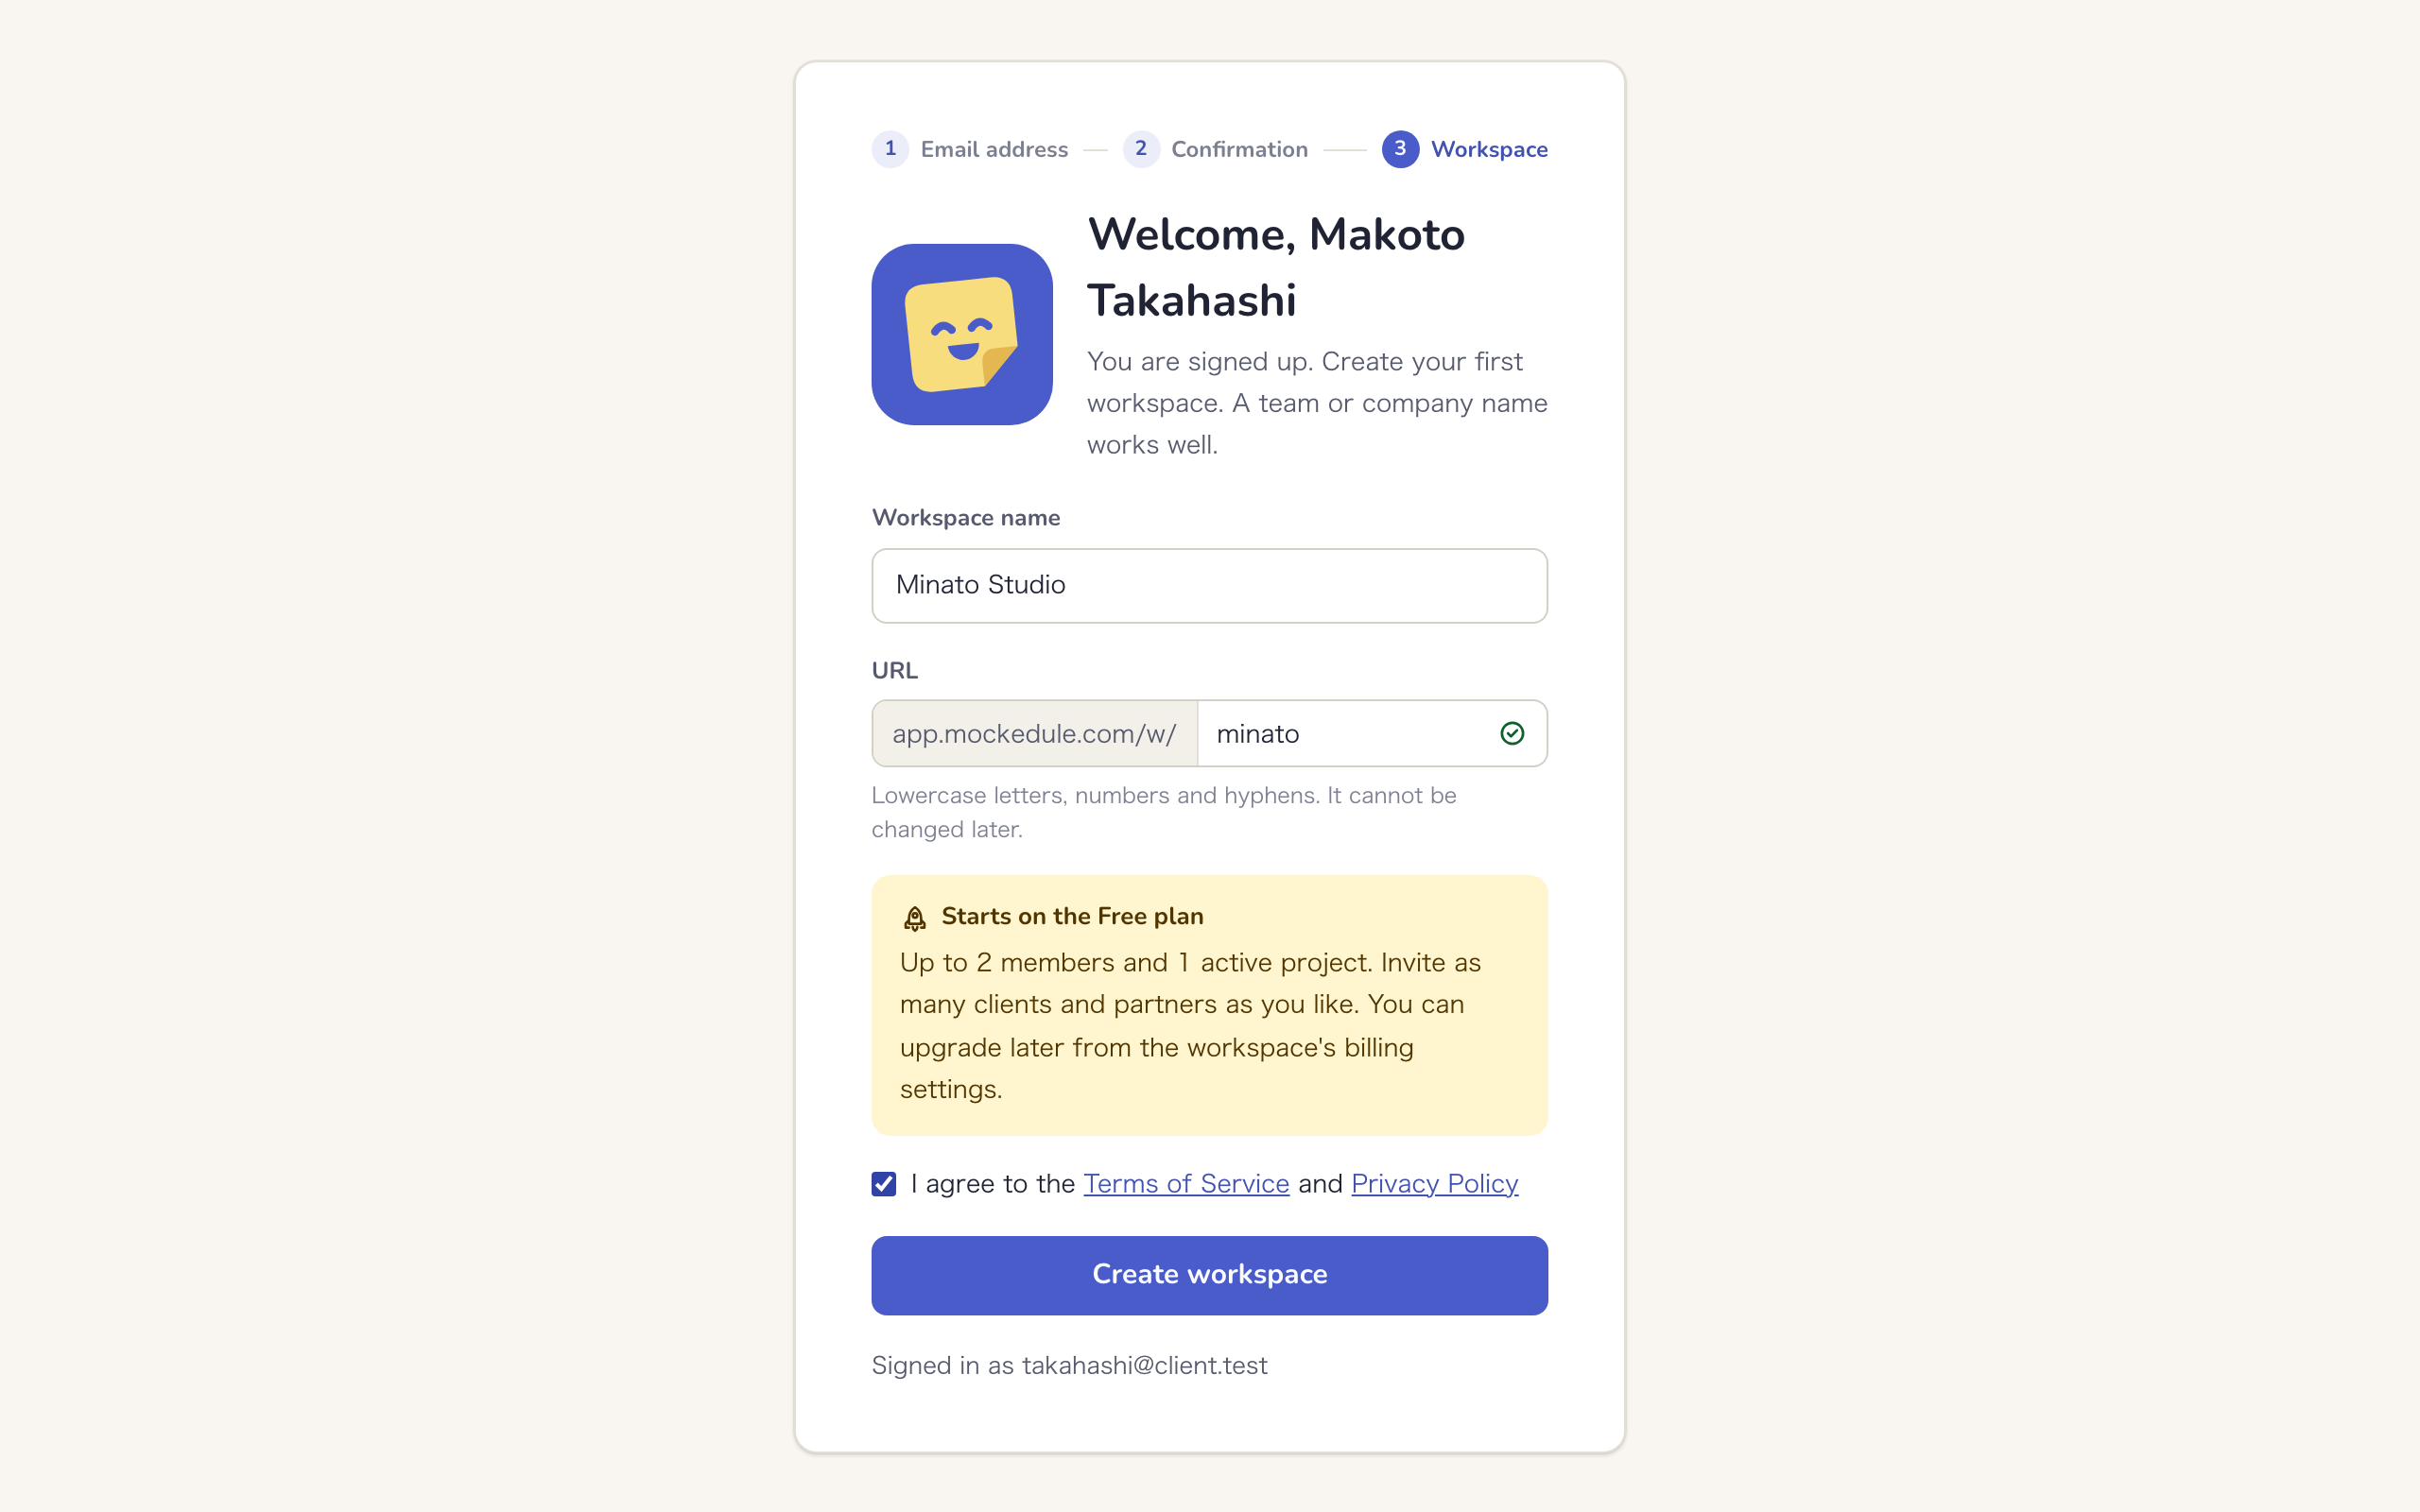
- When you finish signing up, the page to create a workspace opens. If you already have an account, choose “Create a workspace” from the ▼ next to the name in the header
- Enter your team or company name under “Workspace name”
- Under “URL”, enter at least 3 lowercase letters, numbers or hyphens. This becomes the workspace’s address and cannot be changed later
- Click “Create workspace”. The workspace’s project list opens
You become the workspace’s Owner. Workspaces start on the Free plan, which allows up to 2 internal members and 1 active project. Clients and people from other companies do not count toward the internal member limit. See Plans and billing for details.
If you were added as an internal member or joined by invitation, you also see a checkbox to agree to the Terms of Service and Privacy Policy the first time you create a workspace.
You can own only one Free workspace. If you already own one, the page asks you to upgrade that workspace instead.
Accept an invitation
When someone invites you to a project as a Client, External editor or External viewer, you receive an invitation email. Internal members are not invited by email. A workspace Owner or Admin adds them by email address, and they then sign in with that address. See Roles and visibility for what each role can do.
Join from the invitation link
- Open the link in the invitation email. You see who invited you, the project and workspace names, the role you will join as (such as “Join as Client”) and what that role can do
- Under “Address to join with”, pick the address the invitation was sent to
- Click “Join”. The project’s board opens
Join with another address or account
You can accept an invitation sent to your work address with the address you usually use.
- Pick “Another address”, enter it and click “Get a link”. Open the link sent to that address within 15 minutes, then click “Join with this address”
- If you are already signed in, you join with that account. If it differs from the invited address, “Invitation sent to” and “Joining as” appear side by side. Click “Join with this account” or “Switch account”. The person who invited you can see both addresses
- If the invited address already has an account, we send a confirmation email. Open its link, then join
Invitation links last 7 days and work once. If you see “This invitation cannot be used”, ask the person who invited you to send it again. If you have already joined, just sign in to open the project.
Internal members of the workspace cannot join as external participants. Ask a Manager to add you as an internal member instead.
Find your way around
On every page, the header at the top takes you where you want to go.
Workspace header
- ▼ next to the workspace name: switch between your workspaces and the projects you joined as an external participant. “Create a workspace” is here too
- Gear: opens “Workspace settings”. Only Owners and Admins see it
- Your avatar on the right: opens your account menu
Project header
- Logo: back to the workspace’s project list
- ▼ next to the project name: go to another project in the same workspace, or to “All projects”. External participants see the projects they have joined
- Tabs: switch between “Board”, “Timeline” and “Shared page”. “Shared page” appears only for internal members and Clients
- Right side of the board: “Comments”, the notifications bell, the avatars of people viewing the same board, and “Share”. Only Managers see “Share”; everyone else sees “Participants”, which opens the participant list
- Gear: opens “Project settings”
For more, see Boards, Schedule, Shared page and view links and Project settings.
Your account menu
Click your avatar (the circle with your initial) at the right end of the header. Under your name and email address, you see these items.
| Item | What it does |
|---|---|
| “Settings” | Opens “Profile & display” in your account settings. You can move to workspace and project settings from there |
| “Help” | Opens this guide in a new tab |
| “Sign out” | Signs you out and returns to the sign-in page |
Notifications
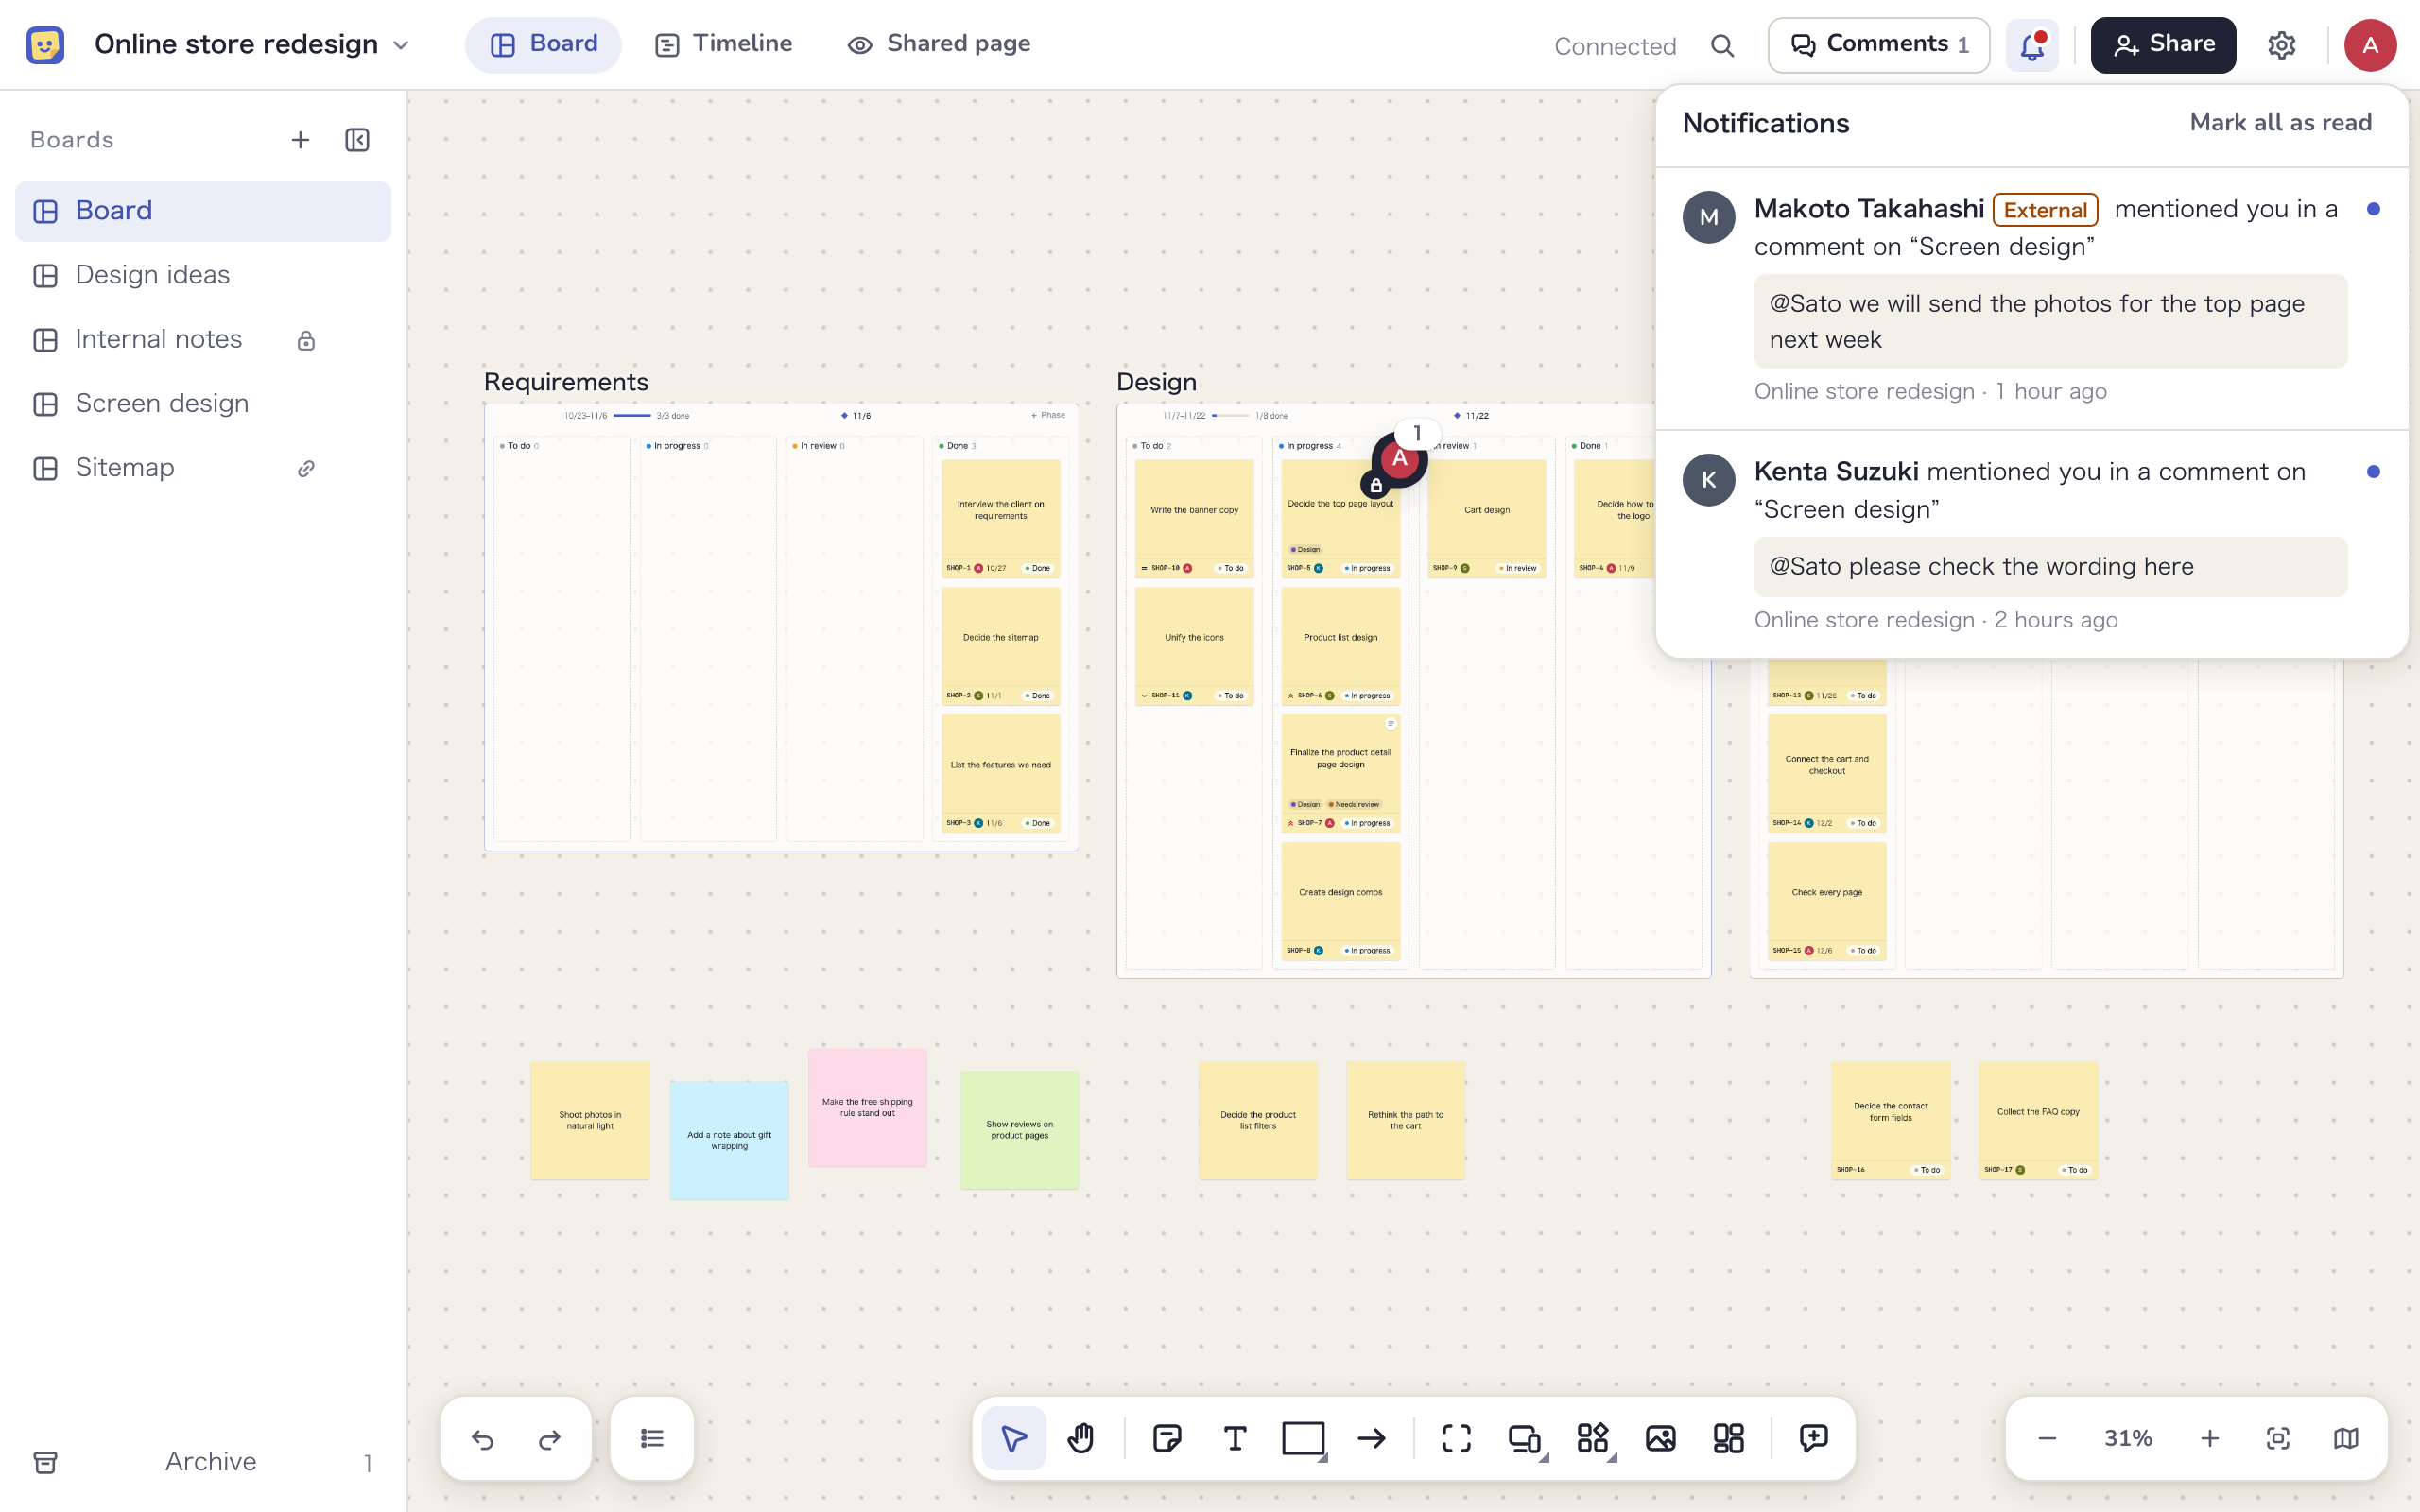
The bell sits in the header of the board and timeline pages. A dot appears on it when you have unread items. Click it to open “Notifications”, which lists, newest first:
- Comments that mention you, from every project in the workspace. Click one to open that thread on its board
- Replies from “Mockedule Support” to your support requests. Click one to open the request
“Mark all as read” clears everything unread at once. If a mention stays unread for 30 minutes, it is also sent to you by email. Replies that do not mention you are not listed. See Comments and activity for writing comments.
Banners at the top
- If a payment for the workspace has failed, Owners and Admins see a banner that names the workspace. The Owner also sees “Update card”. If payment keeps failing, the workspace returns to Free
- When we revise the Terms of Service and Privacy Policy, a notice shows the date the changes take effect. Click “Dismiss notice” to close it