Three ways to share
| Method | Who sees it | Sign-in | What they see |
|---|---|---|---|
| Shared page | People invited with the Client role, and internal members | Required | Note from the team, this week’s activity, the schedule and the boards they can open |
| View link | Anyone with the link | Not required | One board, view only |
| Whoever you send the file to | Not required | A screen design or a schedule |
Use the shared page when clients follow along and comment on boards, a view link when you only want someone to look at a screen design or sitemap before a meeting, and a PDF when you need a document to keep.
Shared page
The shared page sums up a project’s progress for clients. It is built automatically from the current state of the boards and timeline, so it shows where things stand the moment it is opened, with no one writing it up. It uses your workspace’s theme.
Open the shared page
- Open it from the “Shared page” tab in the project header. The tab appears only for internal members and Clients
- Invite clients to the project with the Client role. They sign in from the link in the invitation email and can then open the shared page. For more on roles, see Roles and visibility
- External editors and External viewers cannot open the shared page
- When an internal member opens it, a note at the top says you are viewing it the way the client sees it. Use “Back to the project” to return
The top of the page shows your workspace name and a title. Set the title in “Shared page title” under General in the project settings. If it is empty, the project name is shown.
The Progress tab
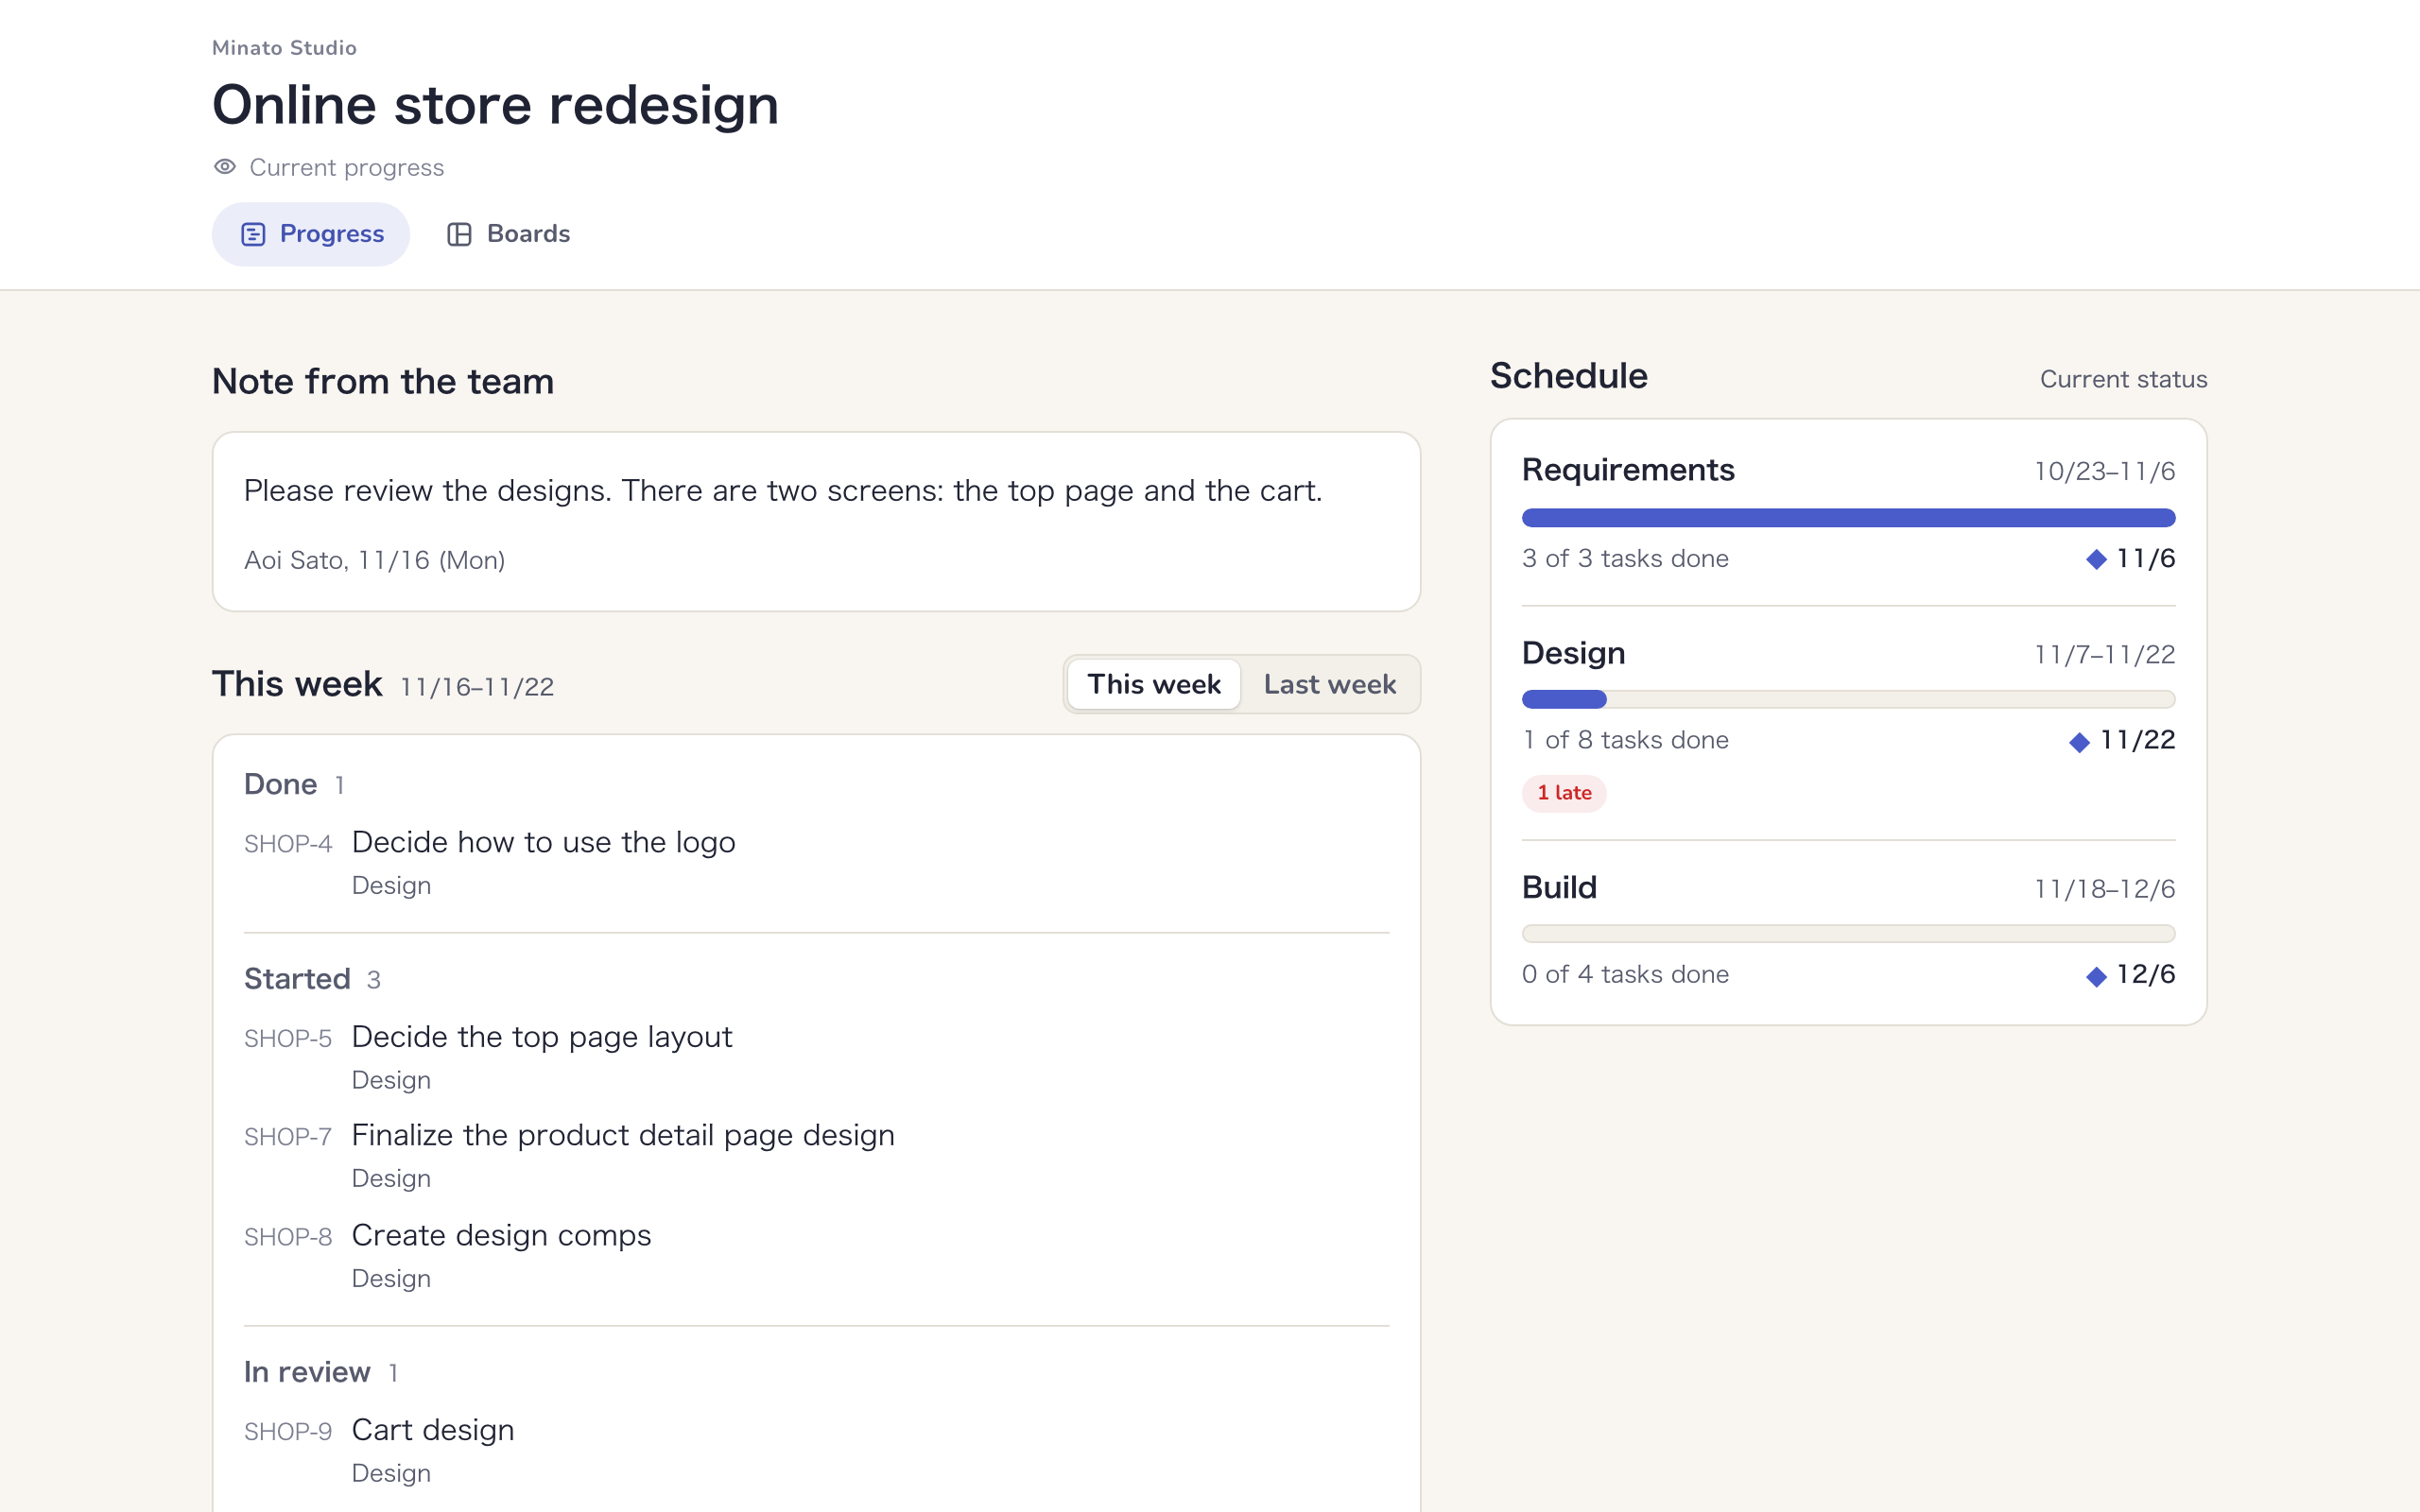
| Section | What it shows |
|---|---|
| Note from the team | Text written by a Manager, with the date and the writer’s name. Hidden when nothing is written |
| This week | Tasks under “Done”, “Started”, “In review” and “Due next”. Switch between “This week” and “Last week” |
| Schedule | Each phase’s dates and a progress bar such as “8 of 12 tasks done”. Overdue tasks show as “2 late”, and a phase past its due date shows “Past its due date” |
- Only tasks and phases on shared boards, which everyone in the project can see, appear here. Nothing from internal-only boards is shown
- This week shows only the groups that have tasks. “Due next” lists tasks due between today and the end of next week
- Change the day the week starts and the time zone under “Shared page” in the project settings (see Project settings)
The Boards tab
A list of the shared boards the Client can open. Each board opens in a new tab, where they can view and comment. See Comments and activity for how comments work.
Note from the team
Use the note for things this week’s activity and the schedule do not say, such as the reason for a delay or a request for the client. Only Managers can write it.
- Open the shared page and click “Write” in the Note from the team section. If a note already exists, click “Edit”
- Write up to 1,000 characters in “Note shown to the client”. Line breaks are kept
- Click “Save”. Clients see it right away
- Each project has one note. Saving a new one replaces the old one
- The note shows the writer’s name and date, so readers know when it was written
- Save it empty to remove it
- Saving does not email the client. To let them know, use chat notifications (see Integrations) or send an email
You can ask your AI to summarize this week’s progress, then edit the text and paste it into the note. The AI cannot change the note itself, so a person always saves what clients read (see Works with your AI).
View log
The view log shows whether Clients have looked at the shared page. Only Managers can see it.
- Open the shared page
- Click “View log” in the note at the top
“Shared page views” lists each Client with “Last opened” and the number of views in 30 days, followed by “Recent views”. Clients who have not opened the page show “Not opened yet”.
- Only views by Clients are recorded. Internal members checking how the page looks are not counted
- Reopening within 30 minutes counts as one view
- Views older than 90 days are deleted
View links
A view link lets anyone see a board without signing in. It is a quick way to show a screen design or sitemap without asking people to create an account. Only Managers (including workspace Owners and Admins) can create view links, and they are available on every plan.
Create a link
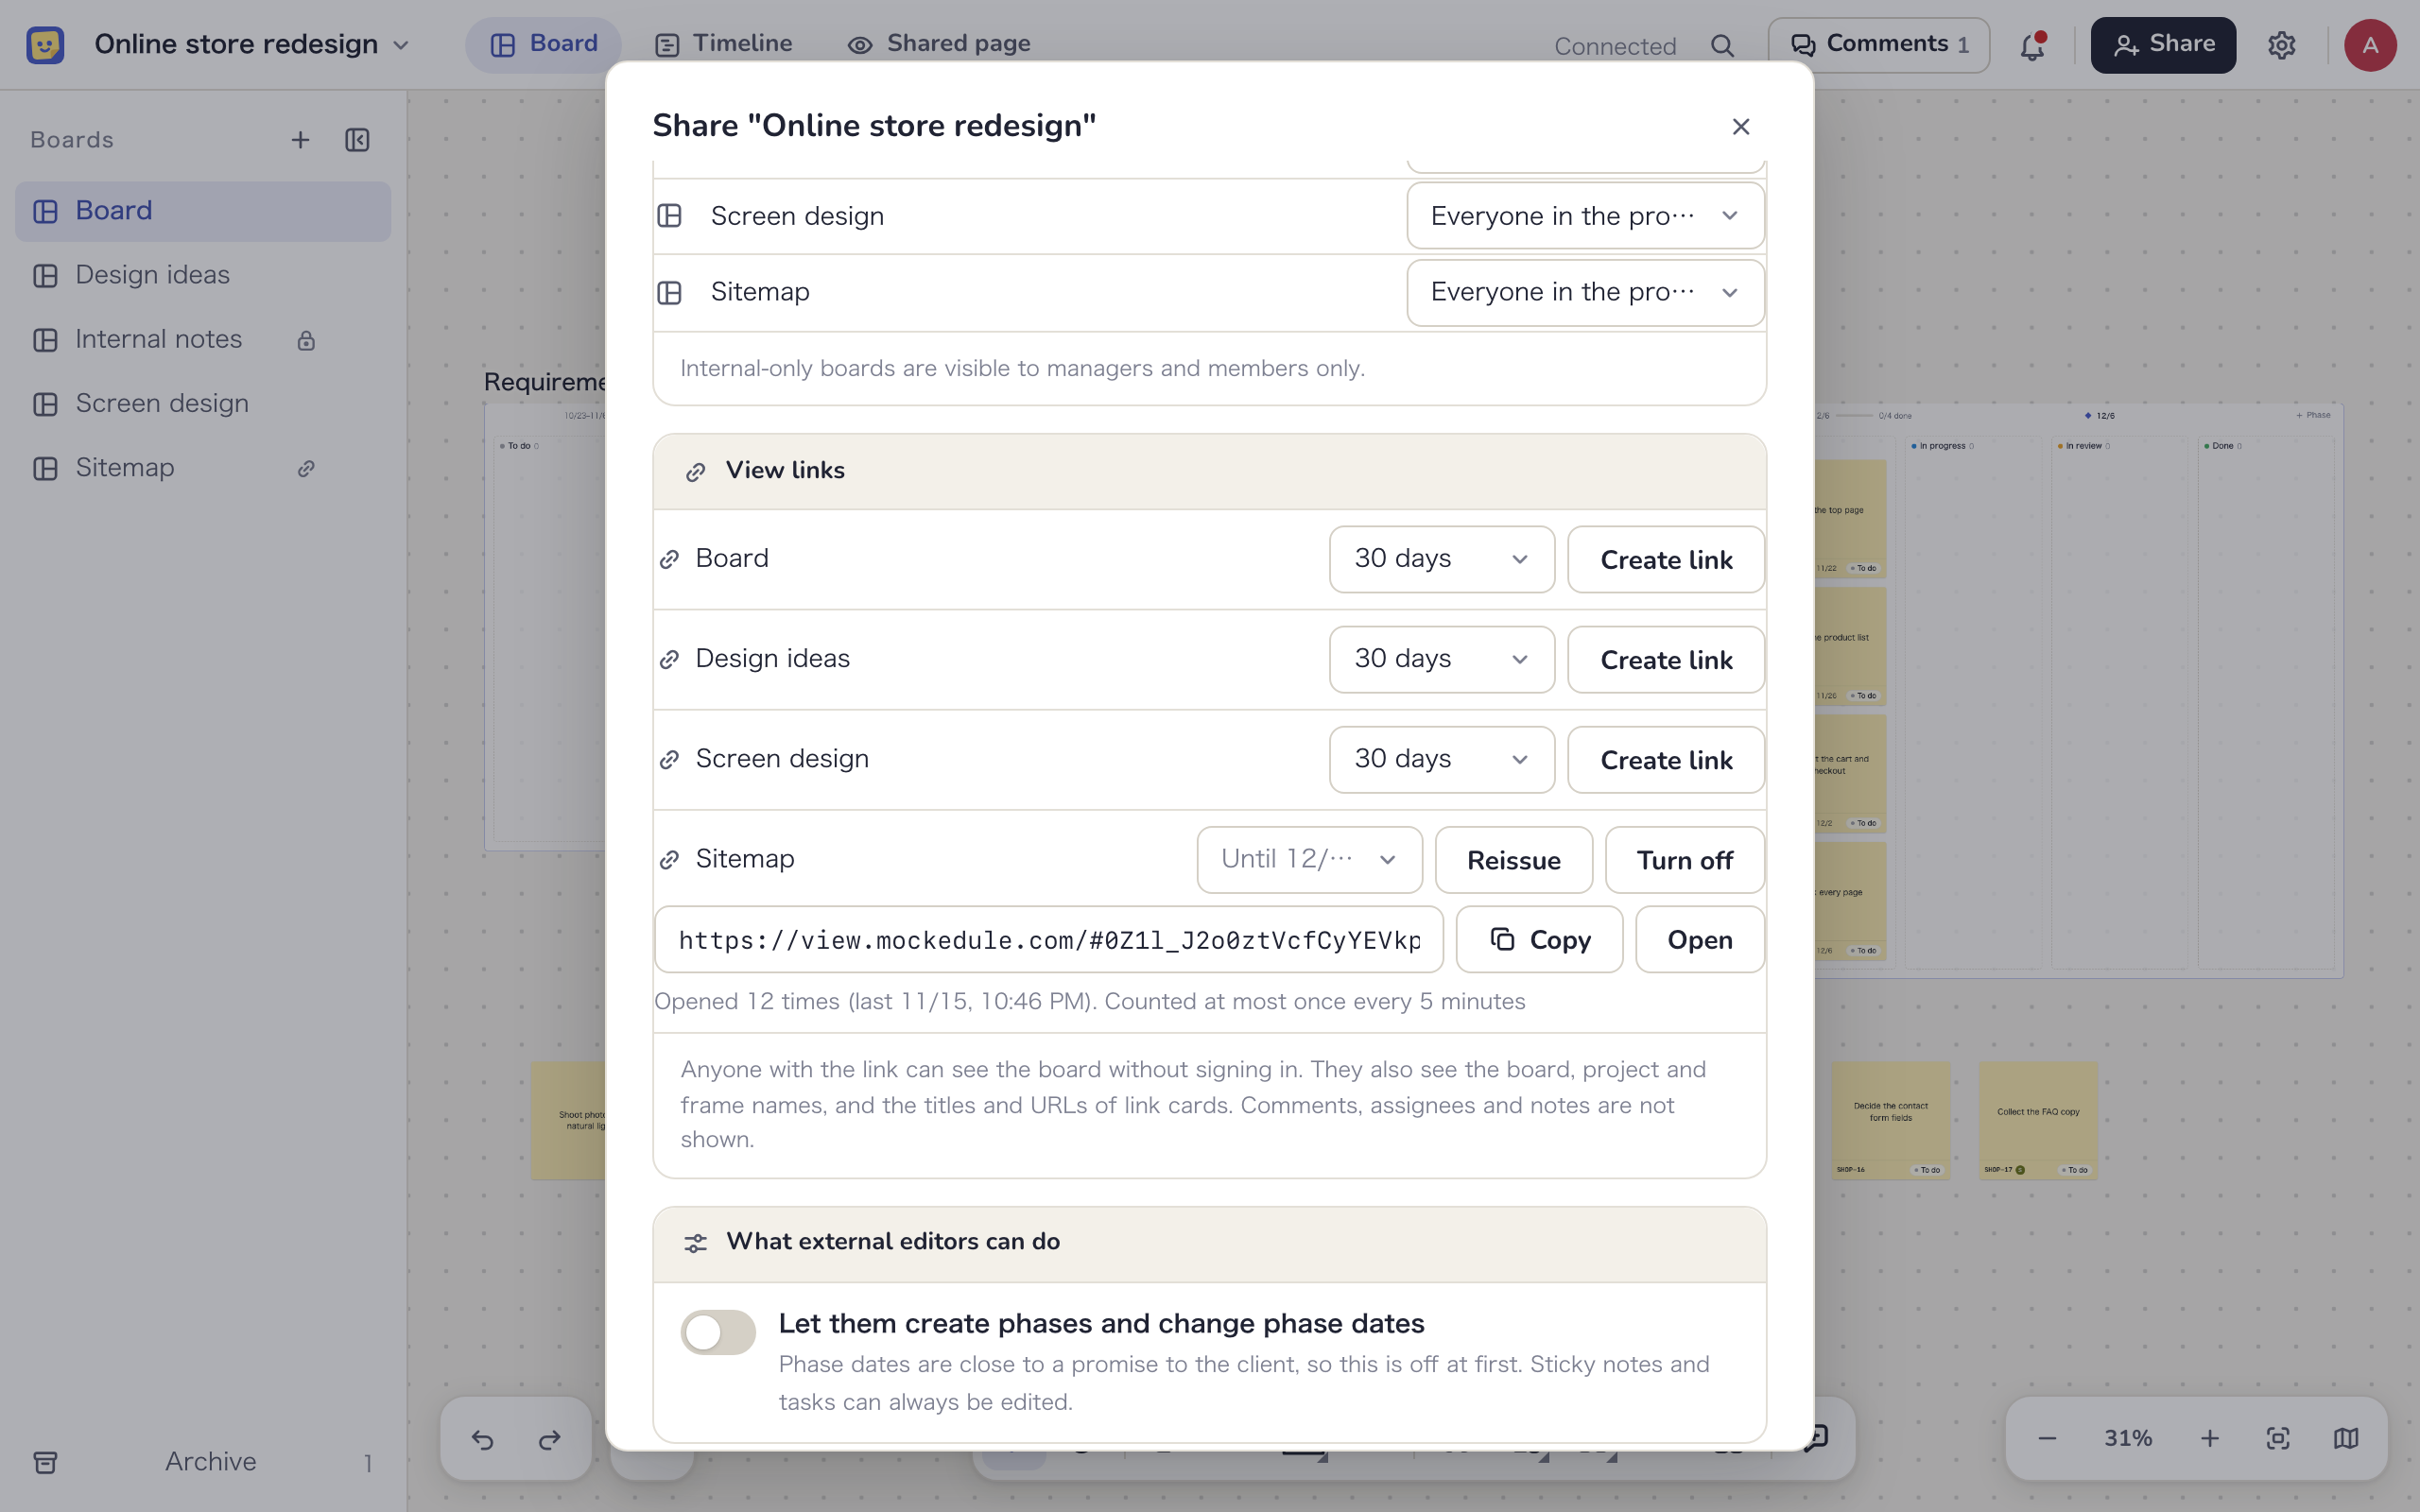
- Open a board and click “Share” at the top right
- Under “View links”, pick an expiry for the board you want to share: “7 days”, “30 days”, “90 days” or “No expiry”. The default is 30 days
- Click “Create link”
- Click “Copy” and send the URL. Click “Open” to see what the other person will see in a new tab
- Only shared boards can have a view link. Internal-only boards are not listed
- Each board has one link. To share separately with different people, invite them instead
- Below the row you see how many times the link has been opened and when it was last opened. Views are counted at most once every 5 minutes, so treat the number as a guide
- In the board list, internal members see an icon on boards with a view link
- Internal members who are not Managers see only whether a link exists and its expiry. External participants do not see this section
What people with the link see
People who open the link see only the board itself. Board and frame names often contain internal wording, so check them before you share.
| Shown | Not shown |
|---|---|
| Sticky notes, text, shapes, arrows, frames, images, link cards (title and URL), and screens with their elements and screen flow | Comments, notes and memos |
| Task keys, statuses and due dates | Assignees, priority, labels, checklists and start dates |
| Board and project names, frame names and phase dates | Participant names, the workspace name, other boards, the timeline and the shared page |
- Viewers can pan and zoom around the board. They cannot edit, comment or export
- The board is shown as it was when the page was opened. Click “Refresh” in the header to load it again
- Link cards and Figma embeds are drawn as cards and do not open when clicked
- Links from a workspace on the Free plan show “Made with Mockedule” in the header
- “Report a problem” at the bottom lets anyone report inappropriate content to Mockedule
Change the expiry, reissue or turn off a link
- Change the expiry: Pick a new one in the row’s expiry menu. The URL stays the same, and the new period starts from now
- “Reissue”: Creates a new URL. The current URL stops working and the view count resets to 0
- “Turn off”: Links you have sent stop working
A link that no longer works shows “This link can’t be used”. If a link expires and you create one again, it gets a new URL.
Making a board internal only or archiving it turns its view link off. Showing the board to everyone again or restoring it does not bring the link back, so create a new link if you need one.
Turn off view links for a workspace
Owners and Admins decide whether view links are allowed with “Allow view links” under General in the workspace settings. They are allowed by default.
- When disabled, no new links can be created and every existing link is turned off. Enabling it again does not restore them
- “Active links” on the same page lists each link’s project, board, creator and expiry, and you can turn any of them off. This is how you find links left behind by people who have left a project
- This setting can only be changed on the web, and every change is recorded in the audit log
PDF export
You can export screen designs and schedules as PDF. Only internal members (Managers and Members) can export, on any plan. External participants do not see the button.
Screen design PDF
- Select screens or a frame that contains screens, open “…” in the small toolbar and choose “Export as PDF” to export what you selected
- Right-click an empty spot on the board and choose “Export screen design as PDF” to export every screen on the board. This item does not appear on boards without screens
The PDF has a cover, a list of screens, then one page per screen. Next to each screen you get the screen and element notes, the screen flow and memos (text from sticky notes). Turn on “Draw sticky notes on screens” to draw them on the screen. When it is off, their text is listed under “Memos” instead.
Schedule PDF
- On the timeline page, open the timeline, calendar or long calendar view and click “Export as PDF”. The button does not appear in the list view
- Under “Period”, choose “All” or “Choose months”. For months, set “From” and “To”
- The export keeps your current filters
Paper and saving
- Choose A4 or A3 under “Paper” and “Landscape” or “Portrait” under “Orientation”. The default is A4 landscape, and your last choice is remembered
- Change the “File name” if you like
- Click “Save PDF”. Progress is shown while pages are drawn, and you can stop with “Cancel”
- You can export up to 100 pages at a time. If you go over, you see how many pages it would take. Select a frame to split it, or choose a shorter period
- PDFs always use the light appearance so they print well, even if you use dark mode
- Pages are drawn as images, so text in the PDF cannot be selected or searched
- On the Free plan, each page has the logo and “Made with Mockedule” at the bottom