The schedule shows the tasks and phases from every board in the project, in date order. They are the same tasks as the sticky notes on the board, so changing a date or status here changes the card on the board too. Managers, Members and External editors can change dates and add tasks. External viewers and Clients can only view.
Views
Click the “Timeline” tab in the project header to open the schedule. Switch views in the toolbar at the top.
| View | Good for |
|---|---|
| Timeline | Seeing at a glance when each task is due, with bars grouped by phase |
| Calendar | Seeing meetings and deadlines in a month laid out week by week |
| Long calendar | Seeing several months at once, one month per column |
| List | Sorting tasks in a table |
The view you pick is kept in the URL (the list is ?view=list). Filters carry over when you switch views, and clicking a task in any view opens the task panel on the right. See Tasks for how the panel works.
On narrow screens, the view buttons show icons instead of text.
Timeline
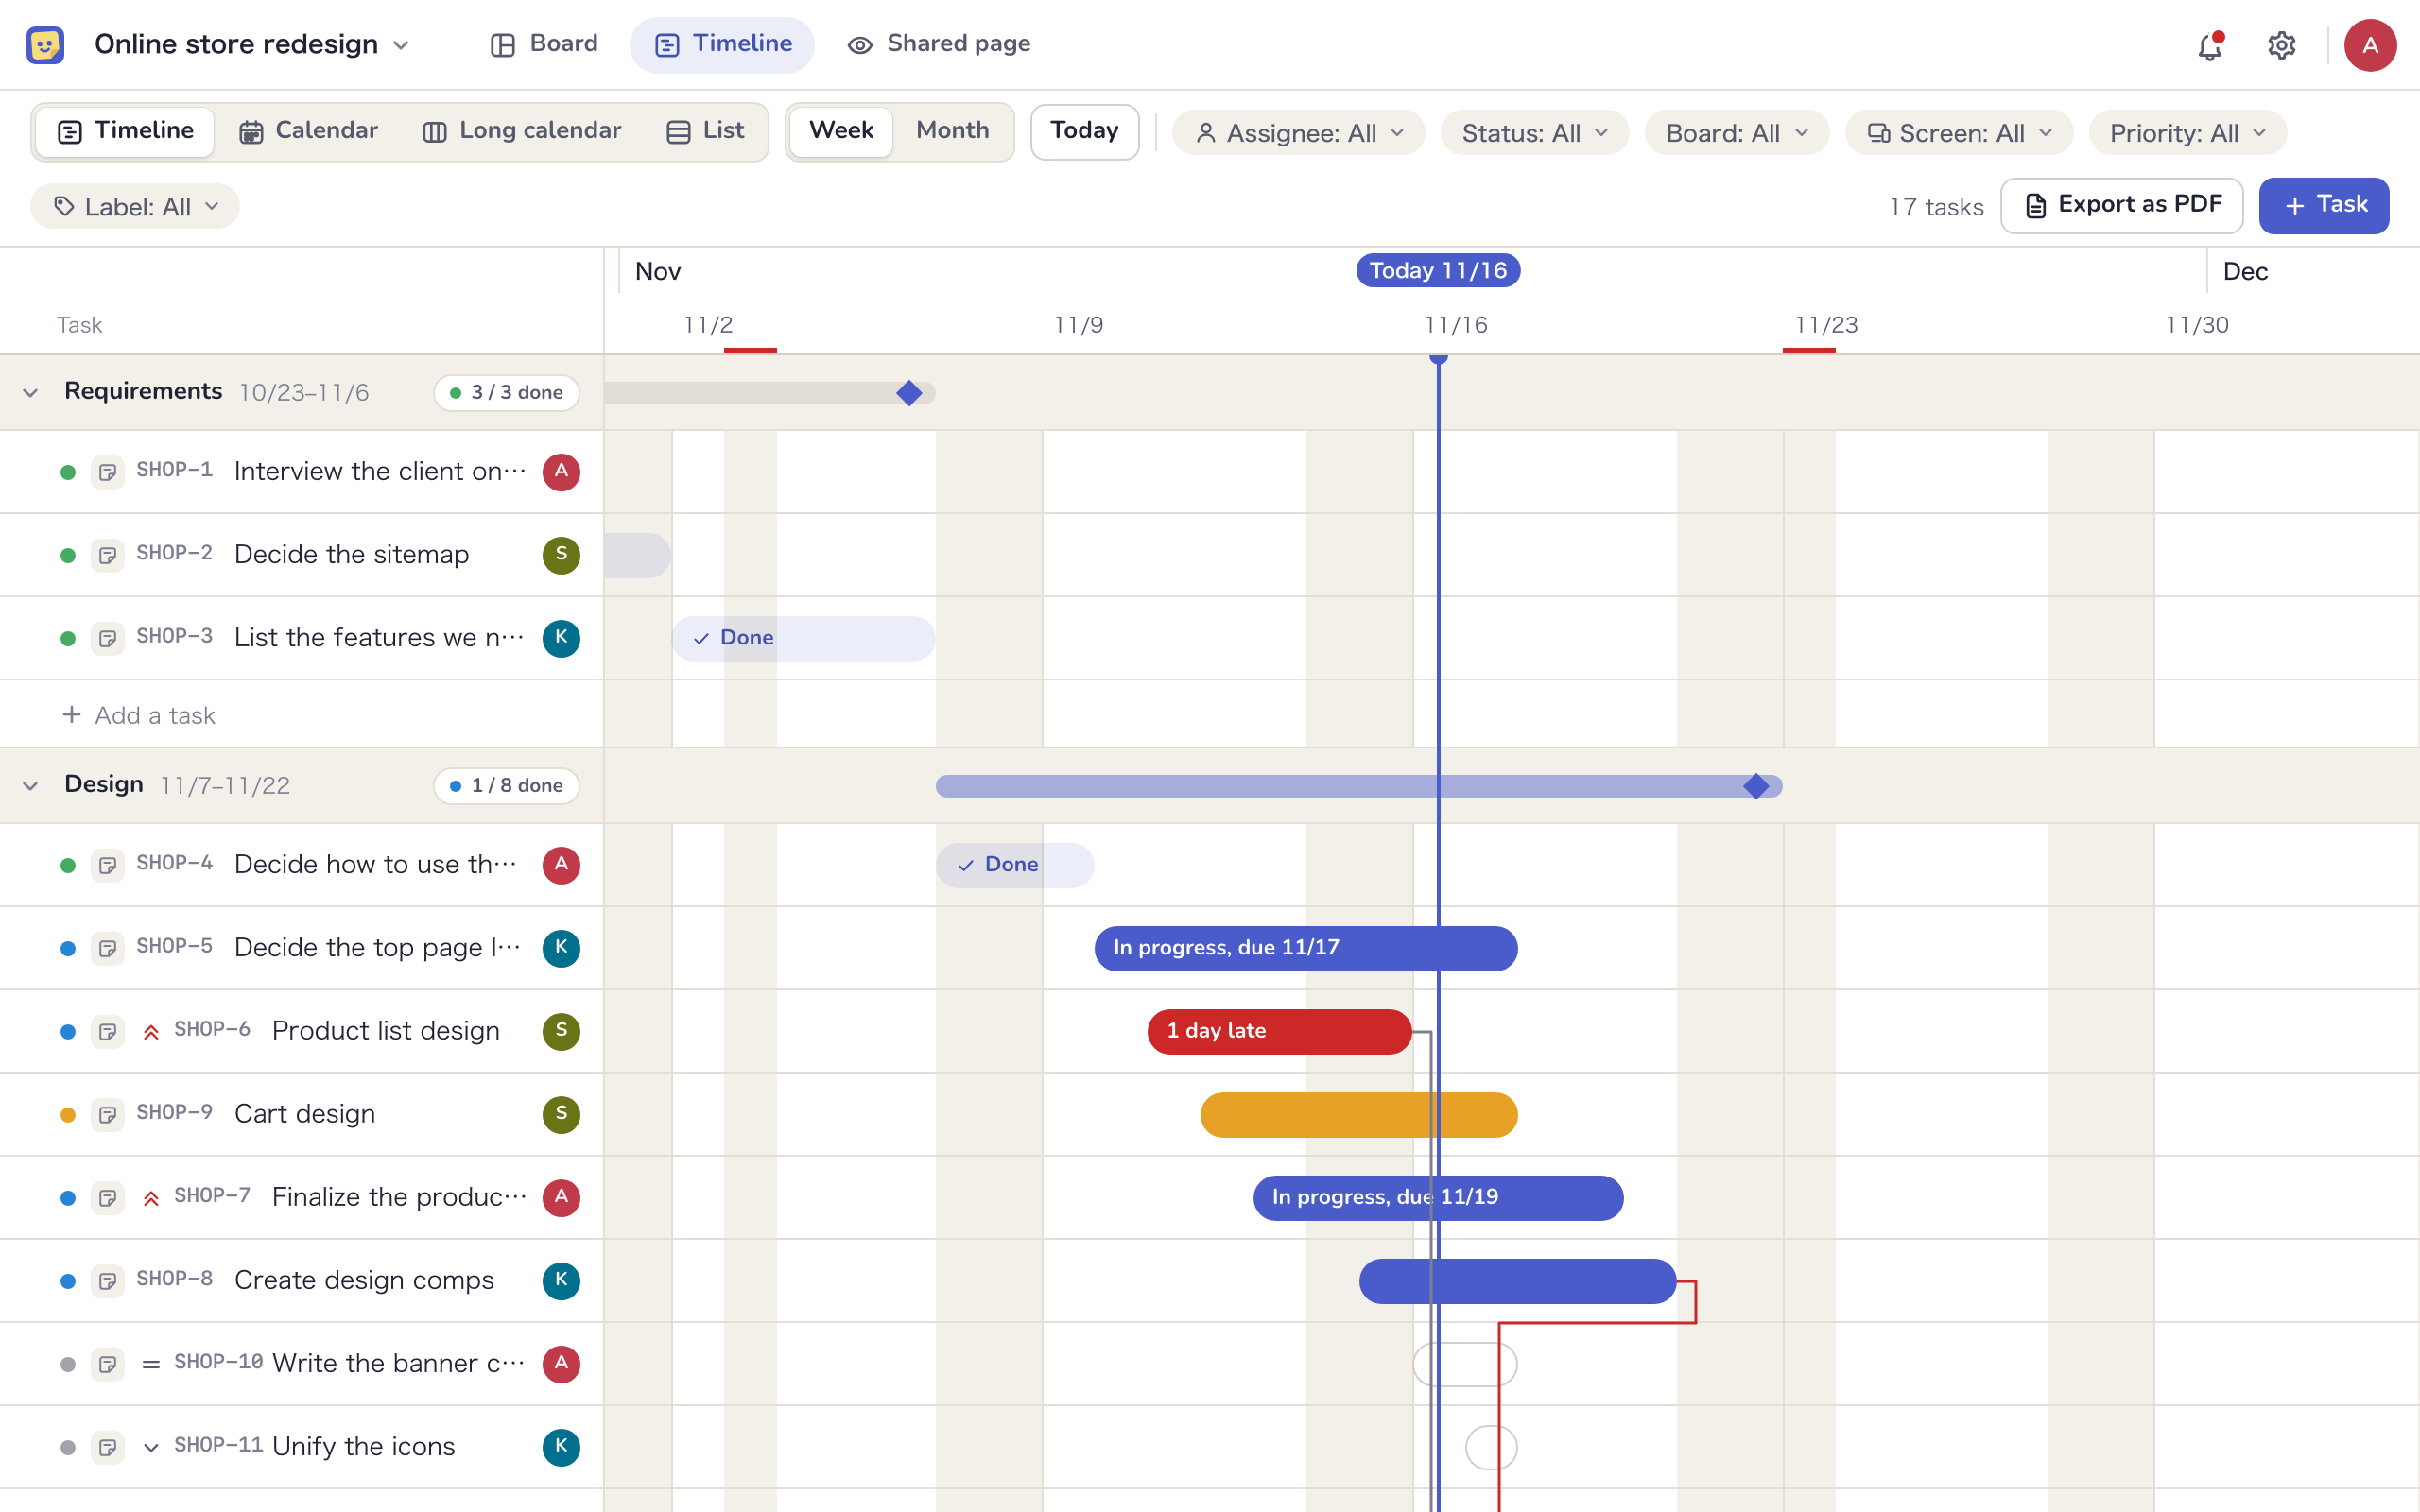
- Phase groups: phases are listed by start date, with “No phase” last. Each header shows the phase name, how many tasks are done (“3 / 8 done”), the phase bar and a ◆ milestone. Use the arrow on the left of the header to collapse a group
- Task rows: each row shows a status dot, the priority icon, the key and the text, with a bar from the start date to the due date on the right. A task with no start date shows as a dot on its due date. Tasks inside a screen show the screen name
- Frame tasks: tasks inside are indented under the parent row. Collapse the parent with its arrow and it shows a count such as “3 tasks inside”
- No dates: tasks without dates are gathered under “No dates” at the end of each phase group
- Scale: switch between “Week” and “Month”. Click “Today” to jump back to today, which is marked with a vertical line
- Dependencies: linked tasks are joined by lines. See “Dependencies” on the Tasks page for how to link them
- Name column width: drag the right edge of the “Task” column header to resize it. Double-click to reset. Your browser remembers the width
Change dates
On the timeline, calendar and long calendar, you can drag bars to change dates.
| Action | Result |
|---|---|
| Drag a bar | Moves the start date and due date by the same number of days. The new dates show while you drag |
| Drag the end of a bar | Changes only the start date or the due date. If the task has only one date, the missing one is filled in |
| Select a bar and press ←→ | Moves it one day at a time |
| Select a bar and press ⇧+←→ | Changes only the due date, one day at a time |
| Drag a phase bar | Changes the phase dates |
You can also change dates with “Start date” and “Due date” in the panel. When someone else changes the same task, the screen updates shortly after, and an open panel shows “Someone else updated this task.” What you’re typing is kept.
Managers and Members can change phase dates. External editors can only do so when the project settings allow it.
Add tasks
- Timeline: click “Add a task” at the bottom of a phase group, type the text and press Enter. Clicking “Task” in the toolbar opens the same field in the phase group that includes today
- Calendar and long calendar: double-click an empty day to open “Add a task due (day)”. Type the text, choose a “Phase” and click “Add”. If only one phase includes that day, it is already selected
The new task is placed on the board as a sticky note. Where it goes depends on the phase.
- Tasks with a phase: the phase’s “To do” column, or inside the phase frame if there is no such column
- Tasks with no phase: an inbox frame on the project’s default board. The inbox frame is always named “受信箱”, the Japanese word for inbox
Calendar
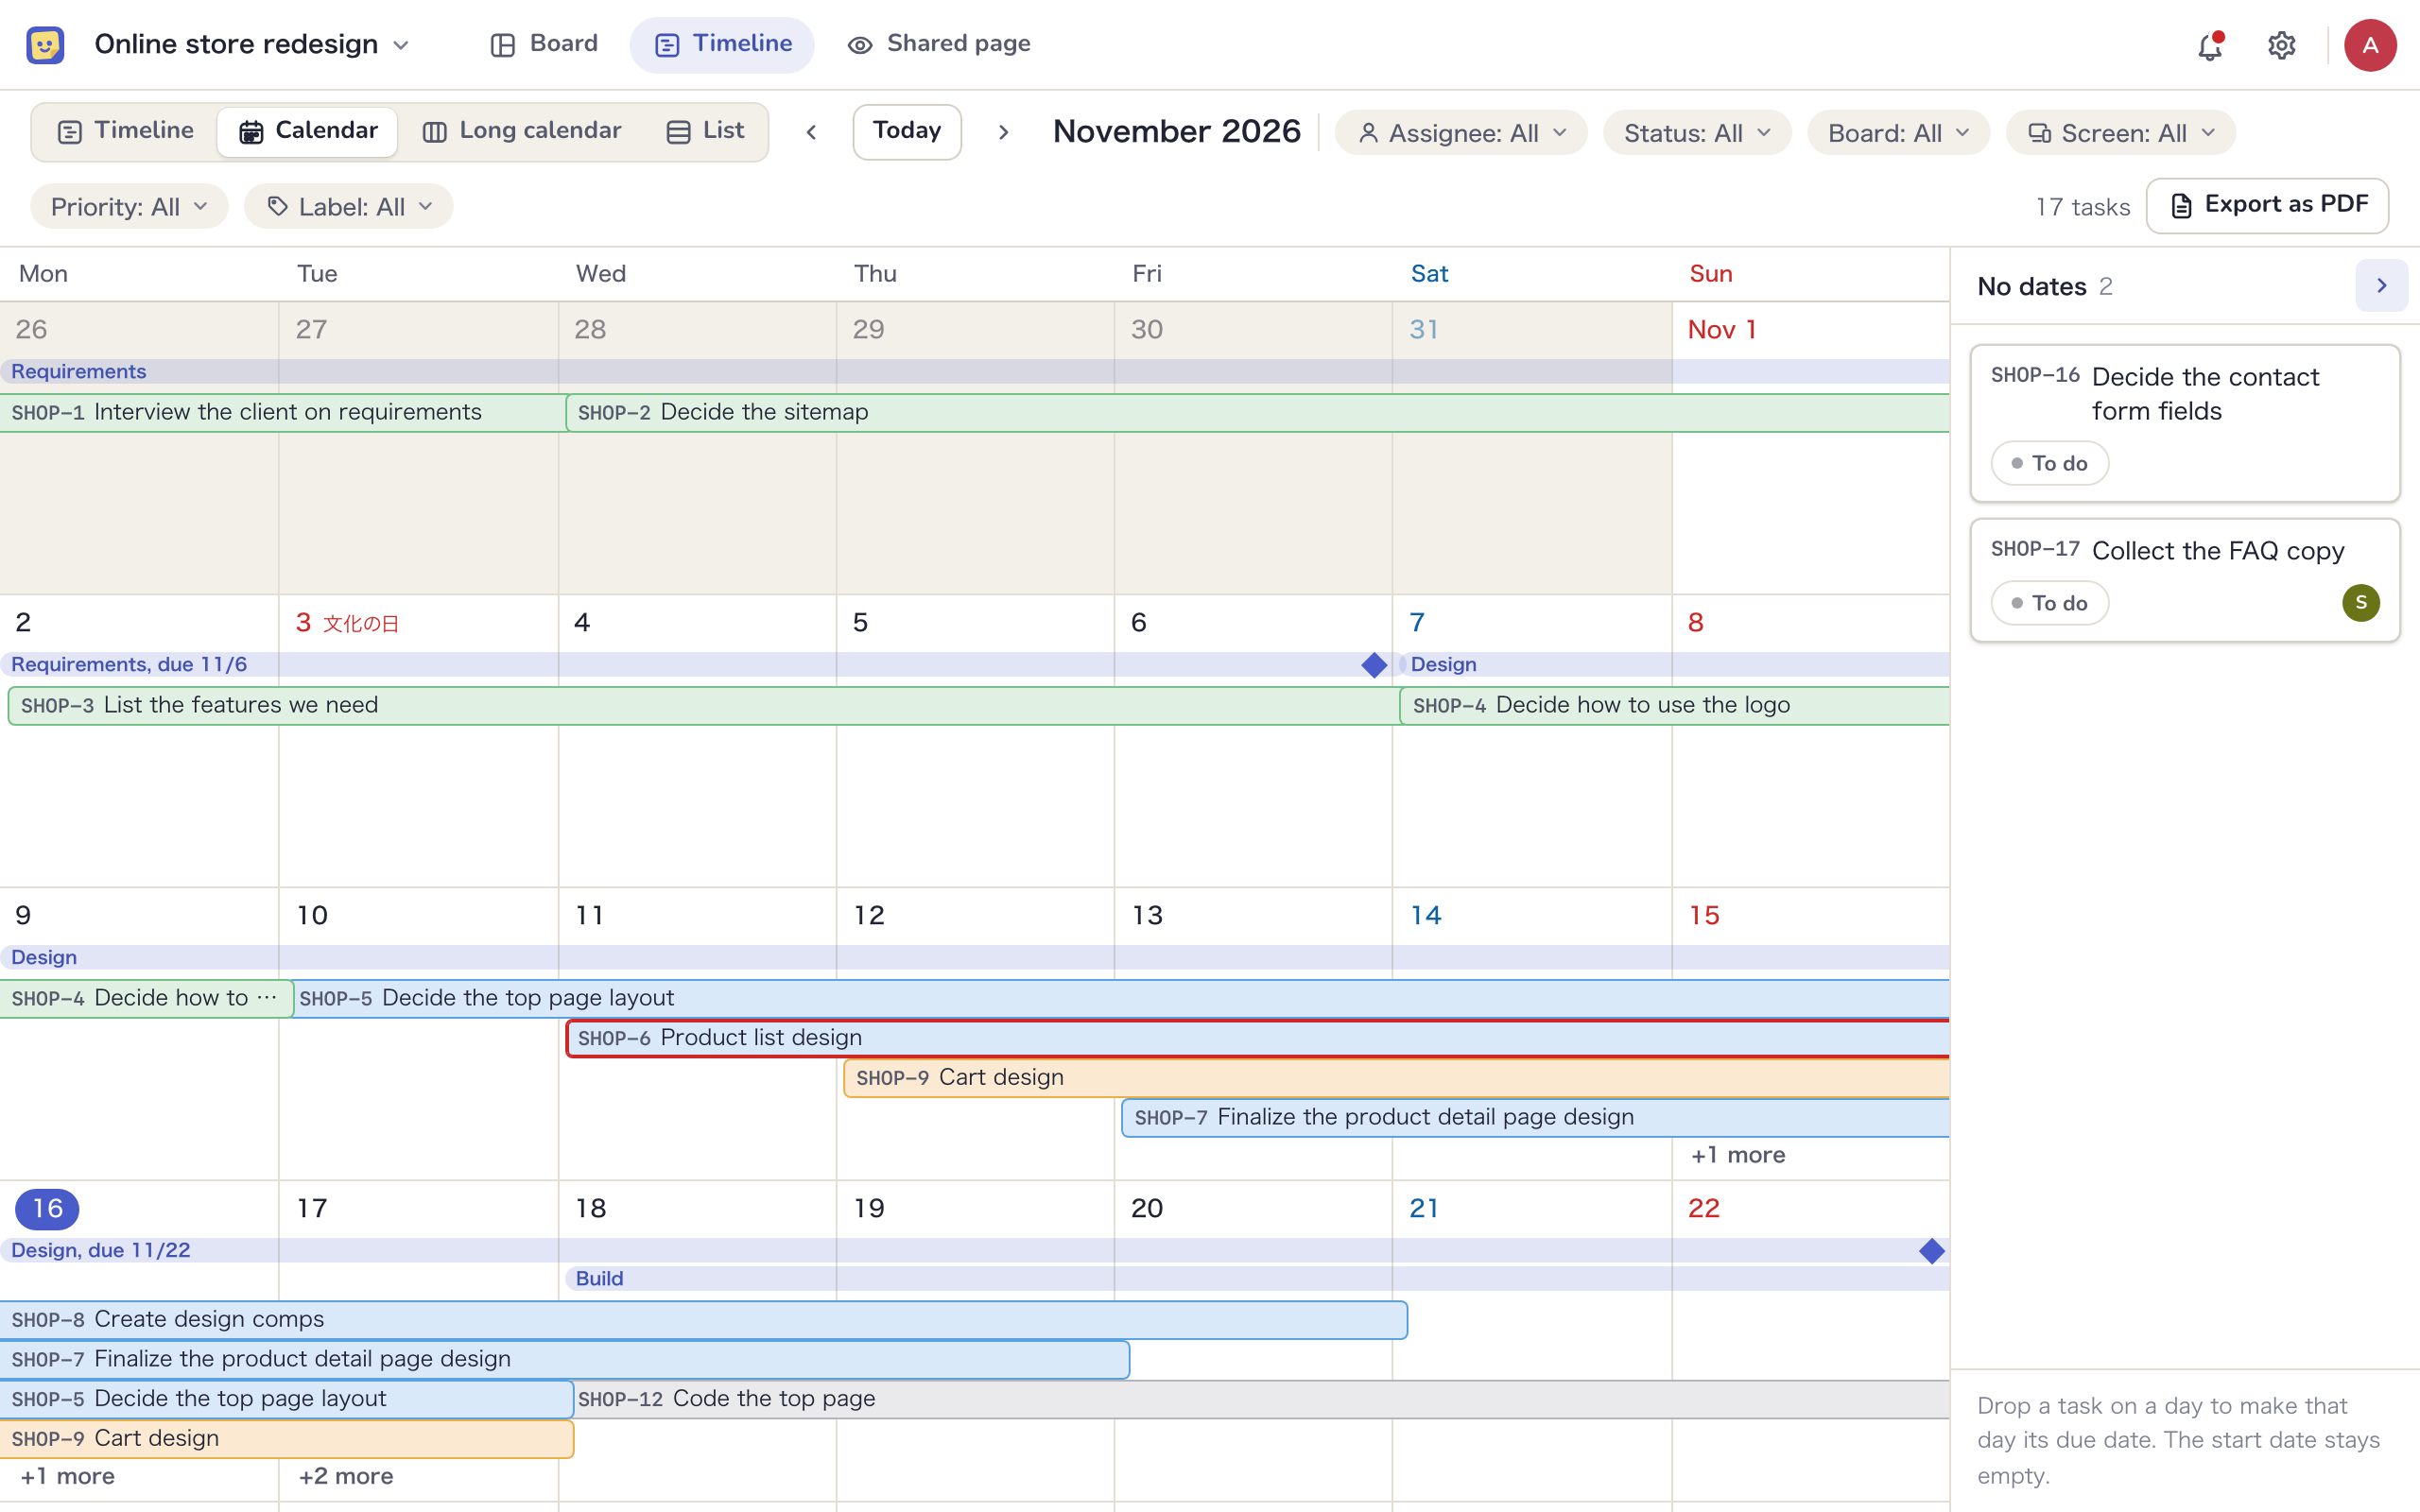
- A month is laid out in rows of weeks starting on Monday. Days from the previous and next months are faded, and today’s date is circled
- Each task is a bar from its start date to its due date, continuing onto the next row when it crosses a week. The color shows the status. A task with only one date is a one-day bar
- Phases appear as thin bars above the week rows, and milestones as ◆ on their due dates
- Up to four bars fit in a day. The rest are grouped as “+2 more”. Click it to list that day’s tasks
- Move between months with the “Previous month” and “Next month” arrows in the toolbar, and click “Today” to return to this month
- The “No dates” pane on the right lists tasks without dates. Drop one on a day to make that day its due date (the start date stays empty). You can collapse the pane
Long calendar
Each month is one column, with as many months side by side as fit on the screen. Use it to see several months of a long project at once.
- Every month has 31 rows. Short months fill the extra rows with faded days from the next month, so the months line up side by side
- Each row shows the date and day of the week. Saturdays are blue, and Sundays and holidays are red, with holiday names added. The column header shows the month and year
- Tasks appear as boxes from the start-date row to the due-date row. Overlapping tasks sit side by side, and more than three become “+2 more”
- Phases appear as thin vertical bars to the left of the dates, and milestones as ◆ on their due-date rows
- Changing dates, adding tasks and the “No dates” pane work the same as on the calendar
List
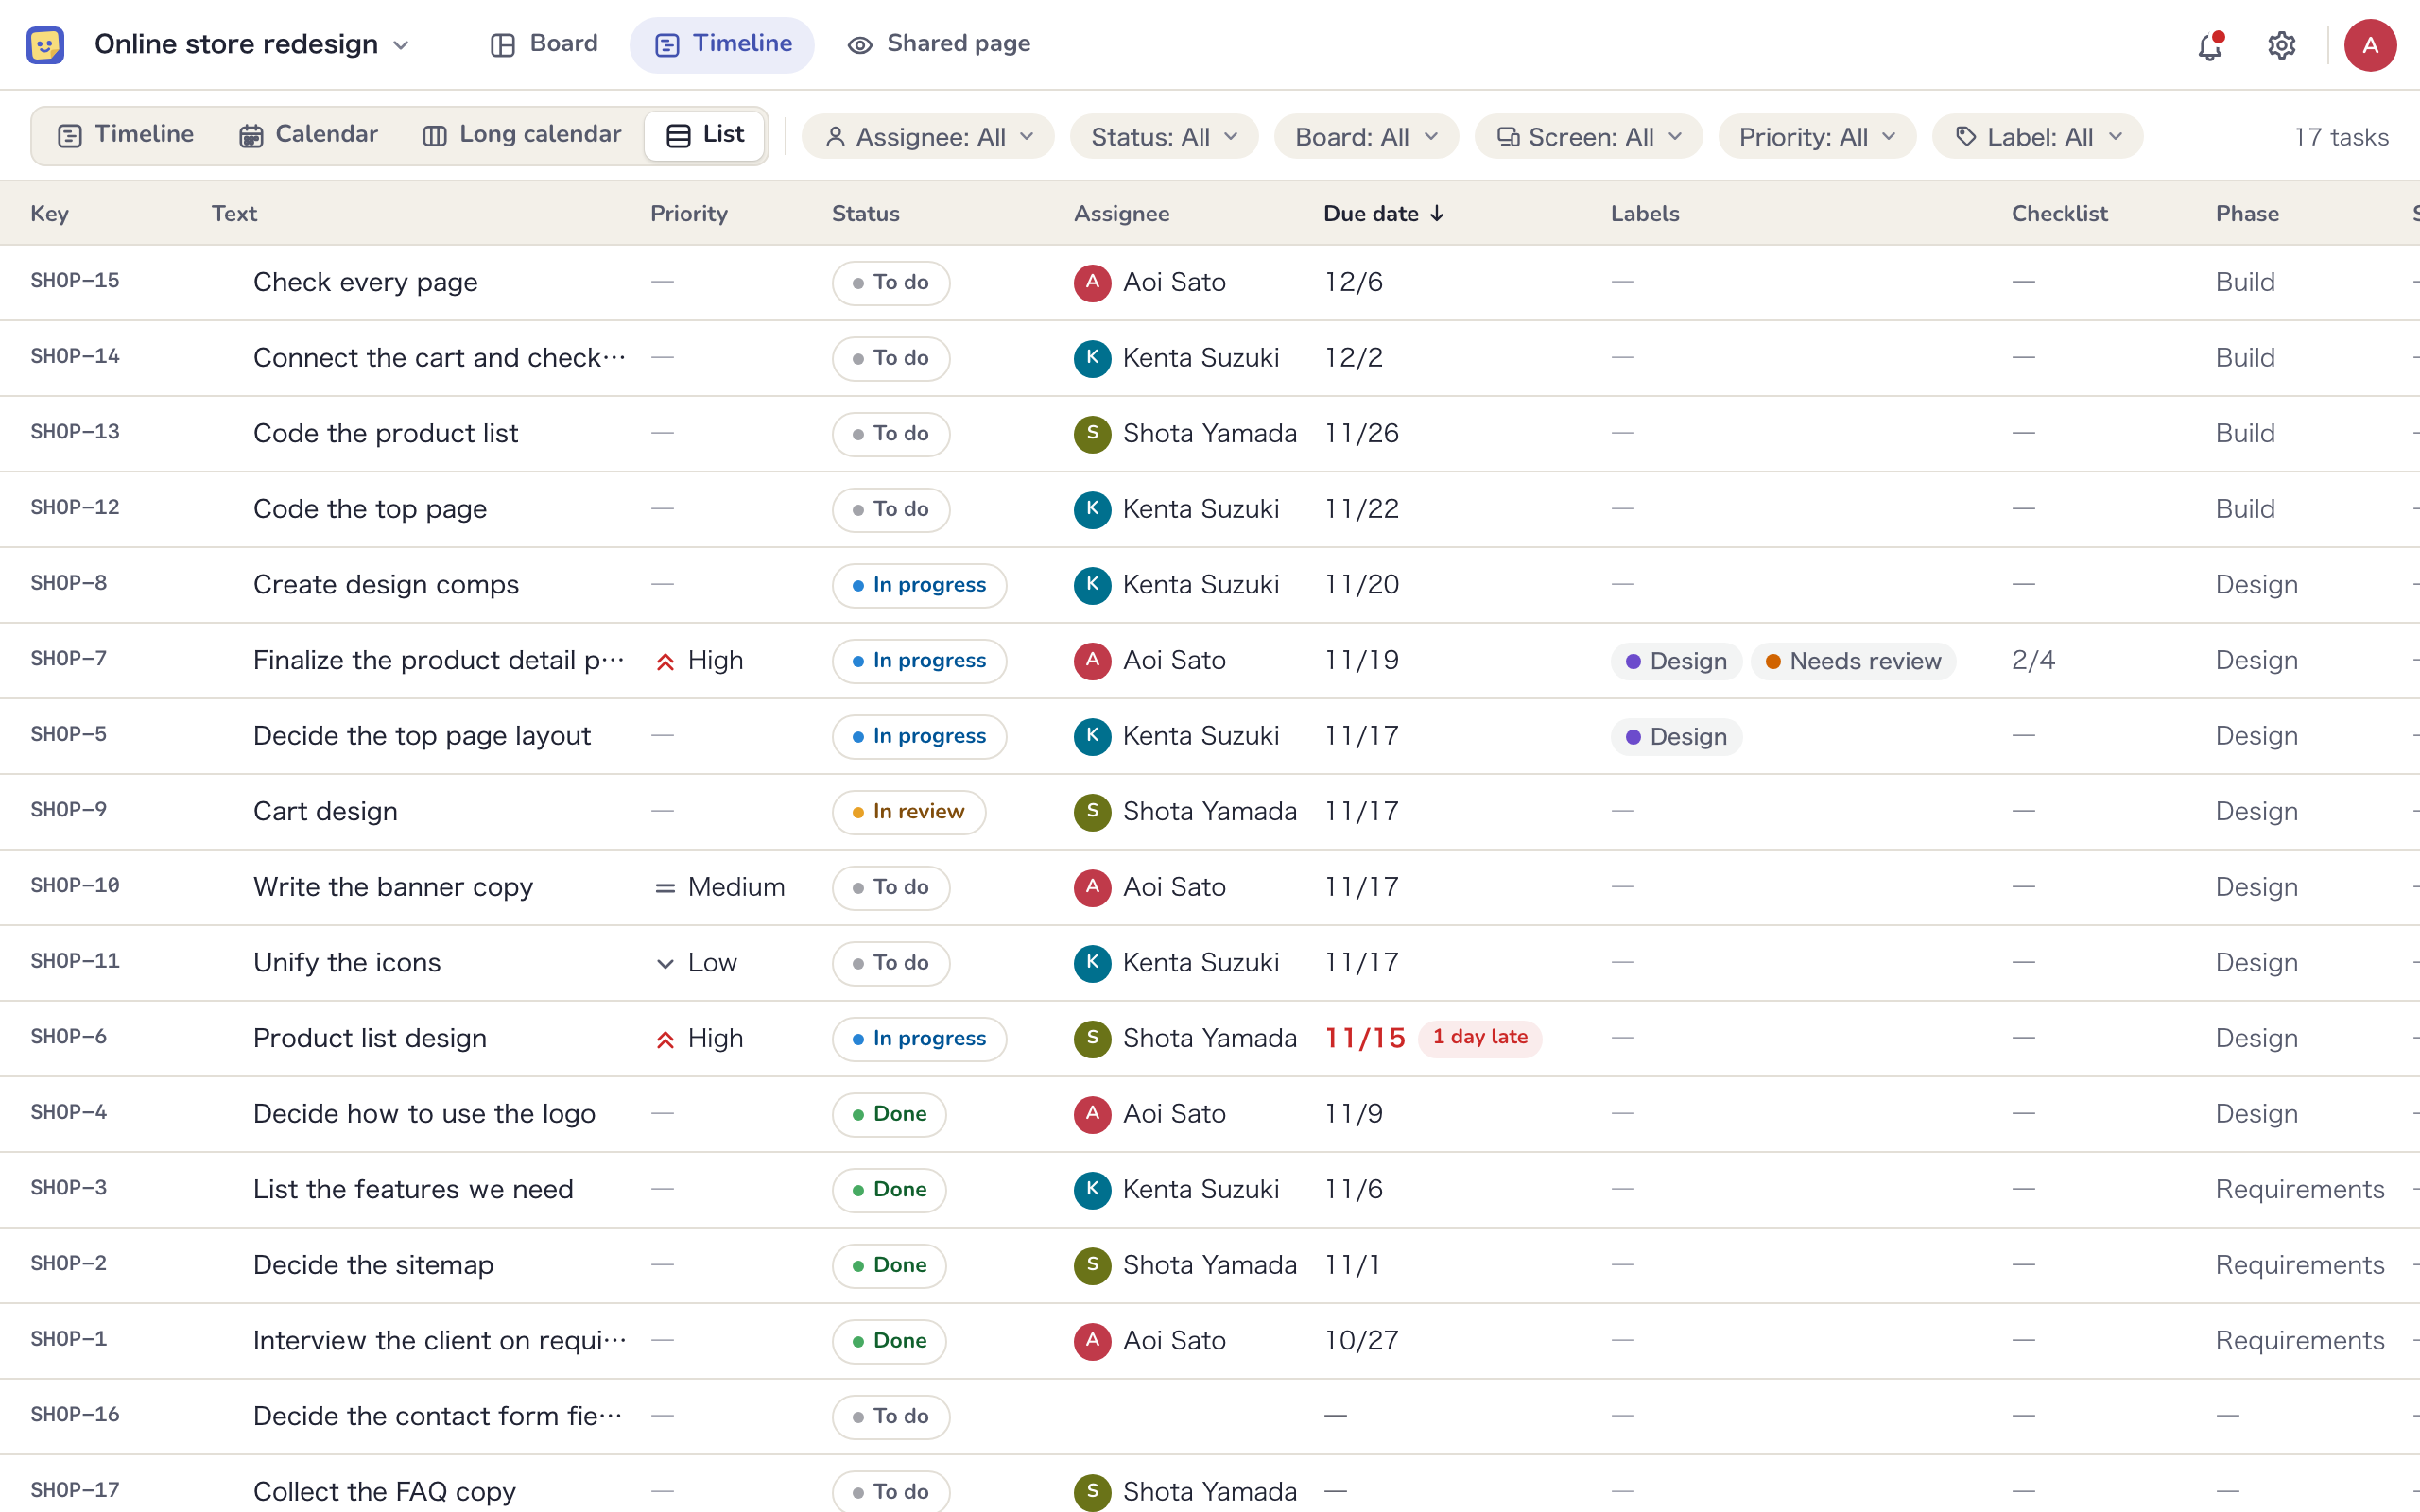
The list shows tasks in a table with these columns: “Key”, “Text”, “Priority”, “Status”, “Assignee”, “Due date”, “Labels”, “Checklist”, “Phase”, “Screen”, “Parent task” and “Board”.
- Click a column header to sort by it, and click again to reverse the order (all columns except “Labels”)
- Tasks inside a frame task are indented under the parent, and you can collapse the parent row. Sorting keeps tasks inside under their parent
- Click “Open on the board” at the right end of a row to open the board with that task
Filters
The filters in the toolbar work the same on the timeline, calendar, long calendar and list. Active filters are highlighted, and the count appears on the right, such as “12 of 40 tasks”.
| Filter | Options |
|---|---|
| Assignee | “All”, “Me”, “Unassigned” and the people in the project |
| Status | “All”, “To do”, “In progress”, “In review” and “Done” |
| Board | Shown when the project has two or more boards |
| Screen | Screens grouped by board, and “No screen”. Shown when there are screens |
| Priority | “All”, “High”, “Medium”, “Low” and “None” |
| Label | The project’s labels and “No label”. Shown when the project has labels |
Overdue tasks and holidays
- A task past its due date and not done gets a red outline on its bar. The panel and list show something like “3 days overdue”
- A tip at the bottom right of the timeline explains that you can drag the end of a bar to change its due date. It goes away once you do that or click “Dismiss this tip”
- On the timeline scale, weekends and holidays are shaded. Holidays also get a red mark below the scale, and the name shows when you hover over it
- Holidays are Japan’s national holidays, including substitute holidays. You can’t set your own days off for a workspace
Export as PDF
On the timeline, calendar and long calendar, “Export as PDF” in the toolbar saves the current view, with its filters, as a PDF.
- Click “Export as PDF”
- Under “Period”, choose “All” or “Choose months”. For months, set “From” and “To”
- Check “Paper”, “Orientation” and “File name”, then click “Save PDF”
Only internal members (Managers and Members) can export PDFs. The button doesn’t appear in the list view. PDFs of the shared page and boards are covered in Shared page and view links.