Overview
Integration settings are in the pages you open with “Settings” from your menu at the top right. Here is where each one lives and who can set it up.
| Integration | Where | Who |
|---|---|---|
| Link a Figma design to a screen | The side panel of a board | Anyone who can edit the board |
| Connect Figma | “Integrations” under Account | Each internal member, for themselves |
| GitHub App | “Integrations” under Workspace | Owners and Admins |
| Link repositories | “Integrations” under Project | Managers |
| GitHub account | “Integrations” under Account | Everyone, for themselves |
| Chat notifications | “Chat notifications” under Project | Managers |
What comes in from GitHub and Figma becomes activity. Only internal members can see activity (see Comments and activity).
Figma
Link a Figma frame to a screen
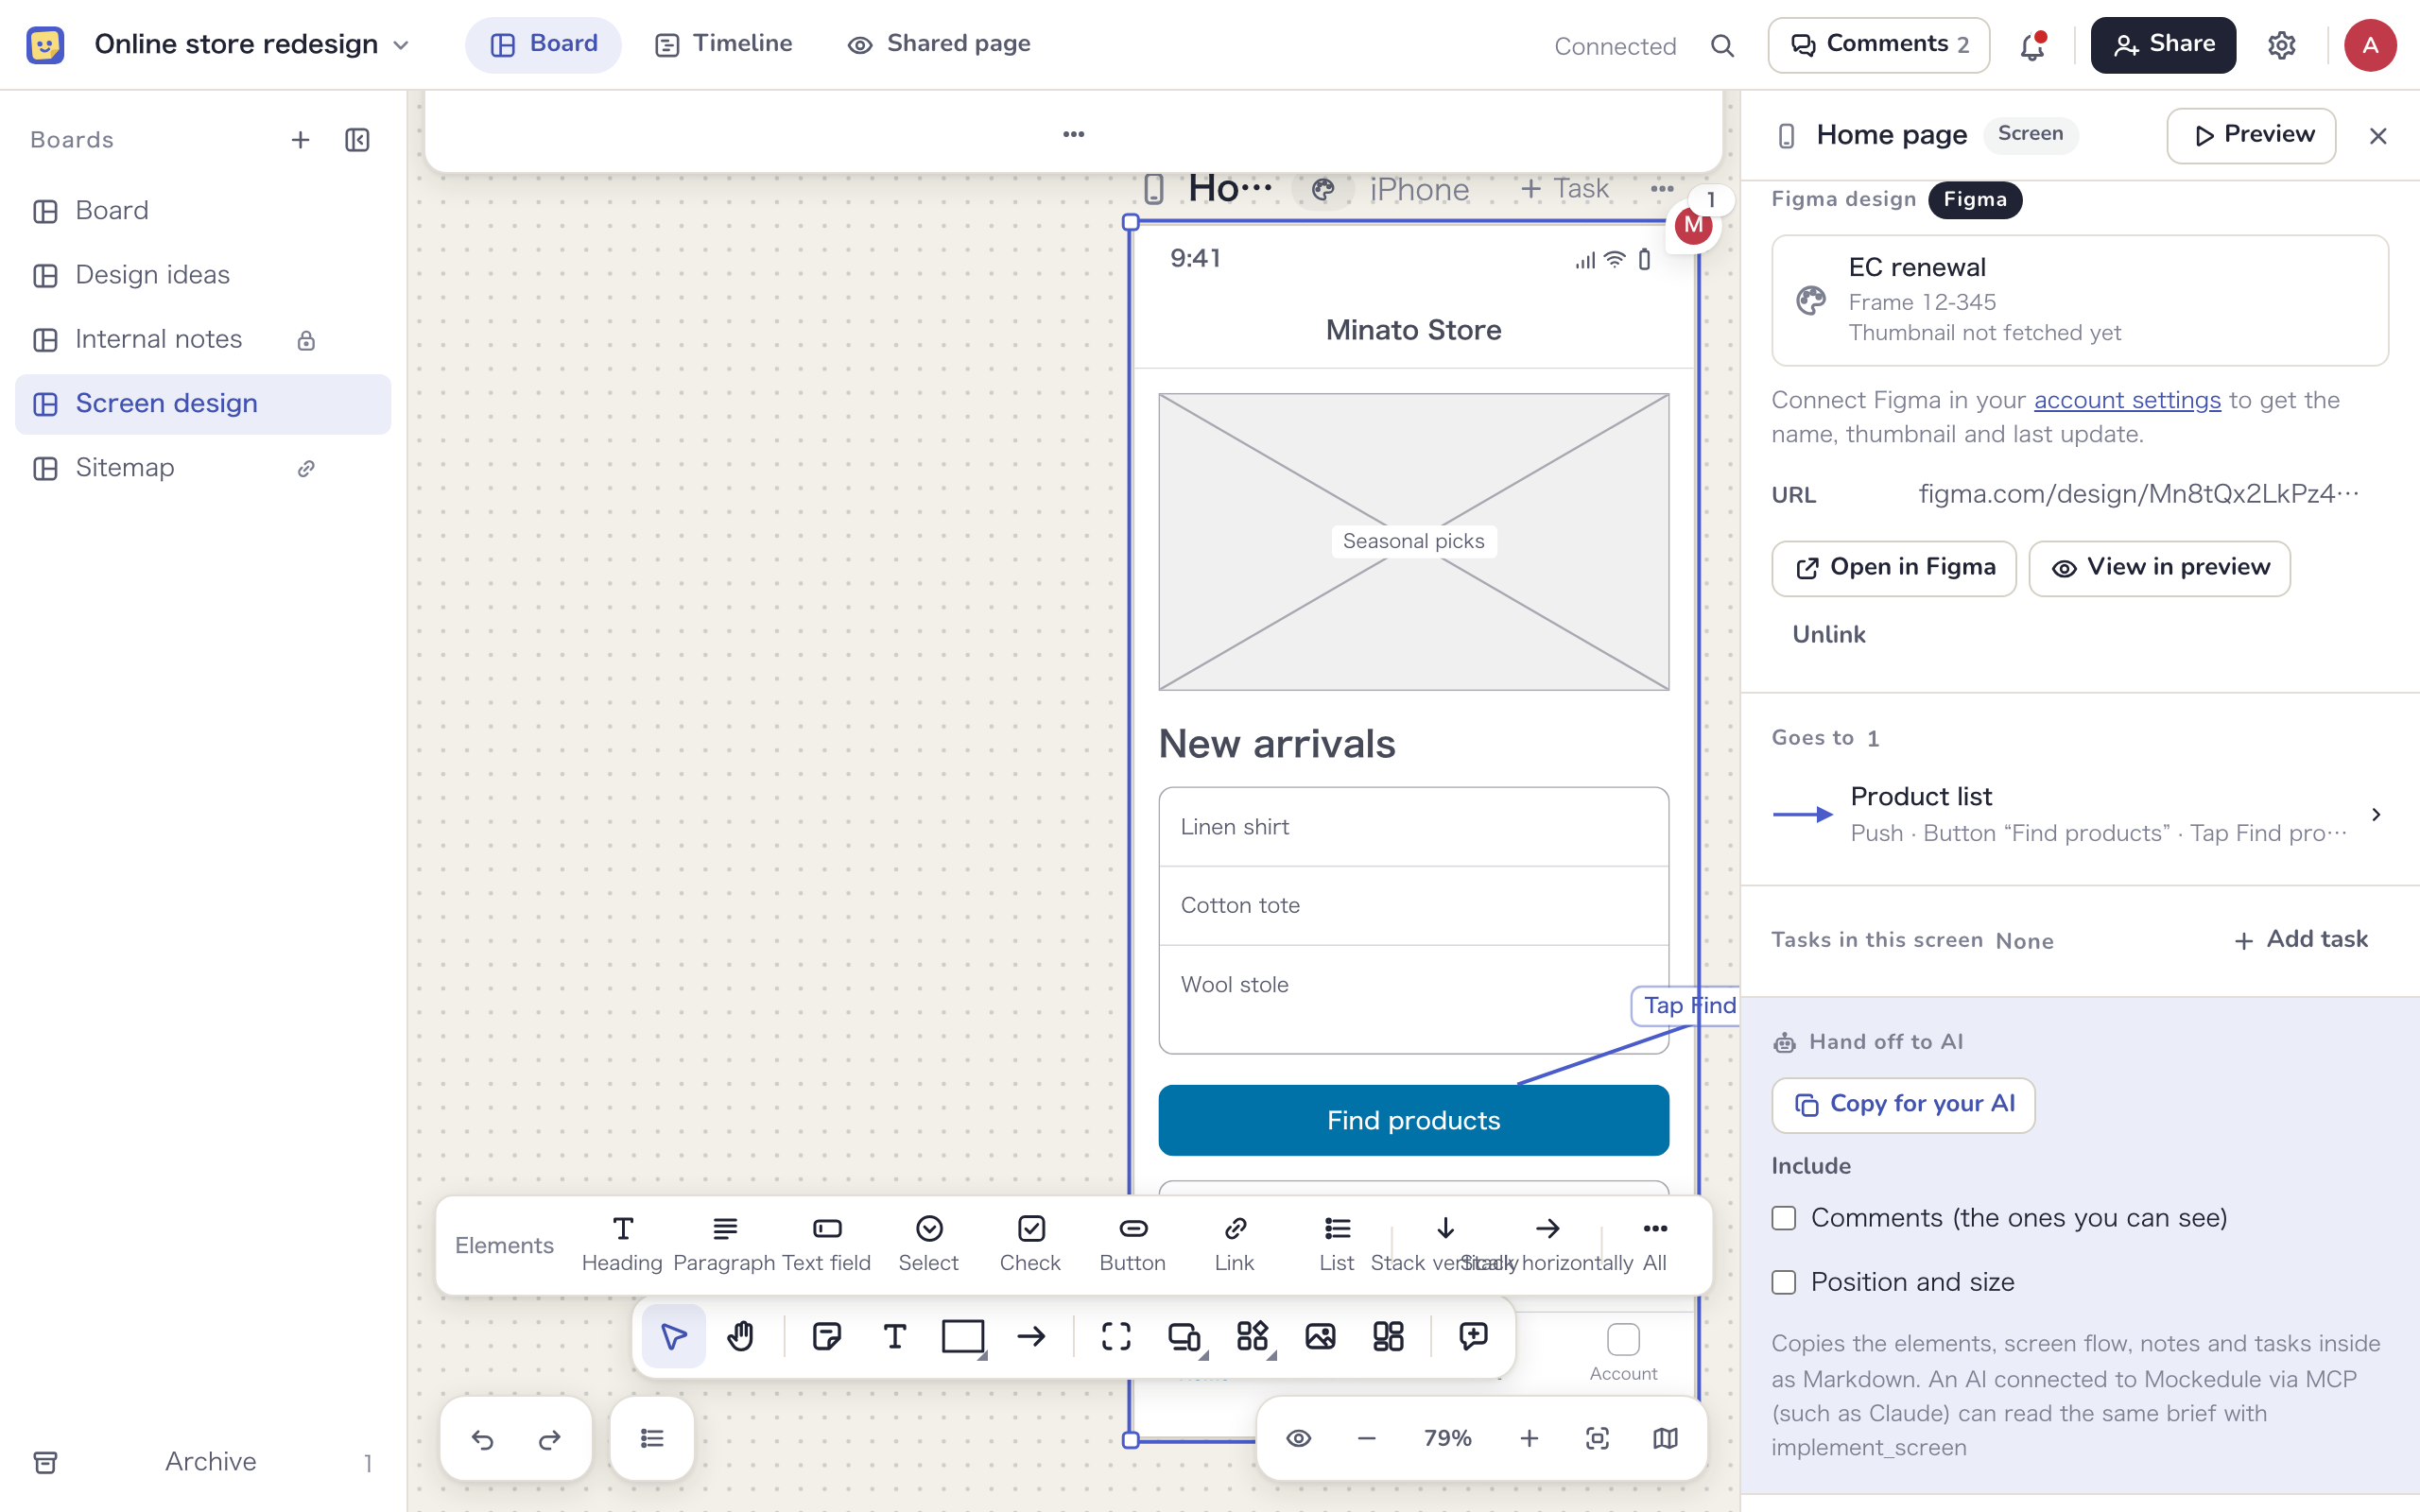
You can link a design frame made in Figma to a screen in your screen design, then switch between the wireframe and the Figma design as you review.
- In Figma, right-click the frame and choose “Copy link”
- On the Mockedule board, select the screen and open the side panel
- Paste the URL into “Paste the URL of a Figma frame” under “Figma design” and click “Link”
- Only Figma design file URLs can be linked. Prototype, FigJam and Slides URLs cannot
- Copy the link of the frame itself, not a layer inside it
- Linked screens show an icon on the board saying a Figma design is linked
- “Open in Figma” opens the frame in Figma, and “View in preview” opens the preview. Switch between “Wireframe” and “Design” at the top of the preview
- If you are not signed in to Figma or cannot view the file, Figma shows its sign-in page
- Click “Unlink” to remove the link
You can also paste a Figma URL on the board as a link card (see Boards). “Figma files” under Integrations in the project settings lists every Figma file linked to a screen.
Connect Figma
Click “Connect Figma” under Integrations in your account settings to let Mockedule read information about Figma files on your boards with your Figma account. The connection applies to you only.
| What it reads | File names, thumbnails, last updates and the list of named versions |
|---|---|
| What it does not read | File contents, frame names and images, comments |
| What it writes | Nothing. It never changes your Figma files |
- Once connected, Figma files in the side panel show their name and thumbnail. Use “Fetch thumbnail” and “Reload” to read them again
- New named versions in Figma are added to the activity
- Without a connection, you can still link files. They show a name guessed from the URL
- “Disconnect” deletes the token stored in Mockedule. Names and thumbnails already read stay on your boards
Public Figma apps need Figma’s review. Until it passes, the button shows “Not available yet” and you cannot connect. Linking screens, opening in Figma and the preview all work without a connection.
GitHub
Mockedule collects pushes, PRs and issues from GitHub as task and project activity. It only reads and never writes to GitHub. Set it up in this order.
Install the GitHub App
A workspace Owner or Admin does this once.
- Open “Integrations” under Workspace in the settings and click “Install the GitHub App”
- On GitHub, choose an organization or personal account and the repositories to read. The only permissions requested are read access to code, PRs, issues and metadata
After installing, “Installed on” shows how many repositories are shared and the delivery status. To change which repositories it reads, click “Change on GitHub”.
Link repositories to a project
A project Manager does this. Events from repositories that are not linked are received but do not become activity.
- Open “Integrations” in the project settings
- Under “Repositories”, pick one with “Choose a repository”
- Click “Add repository”
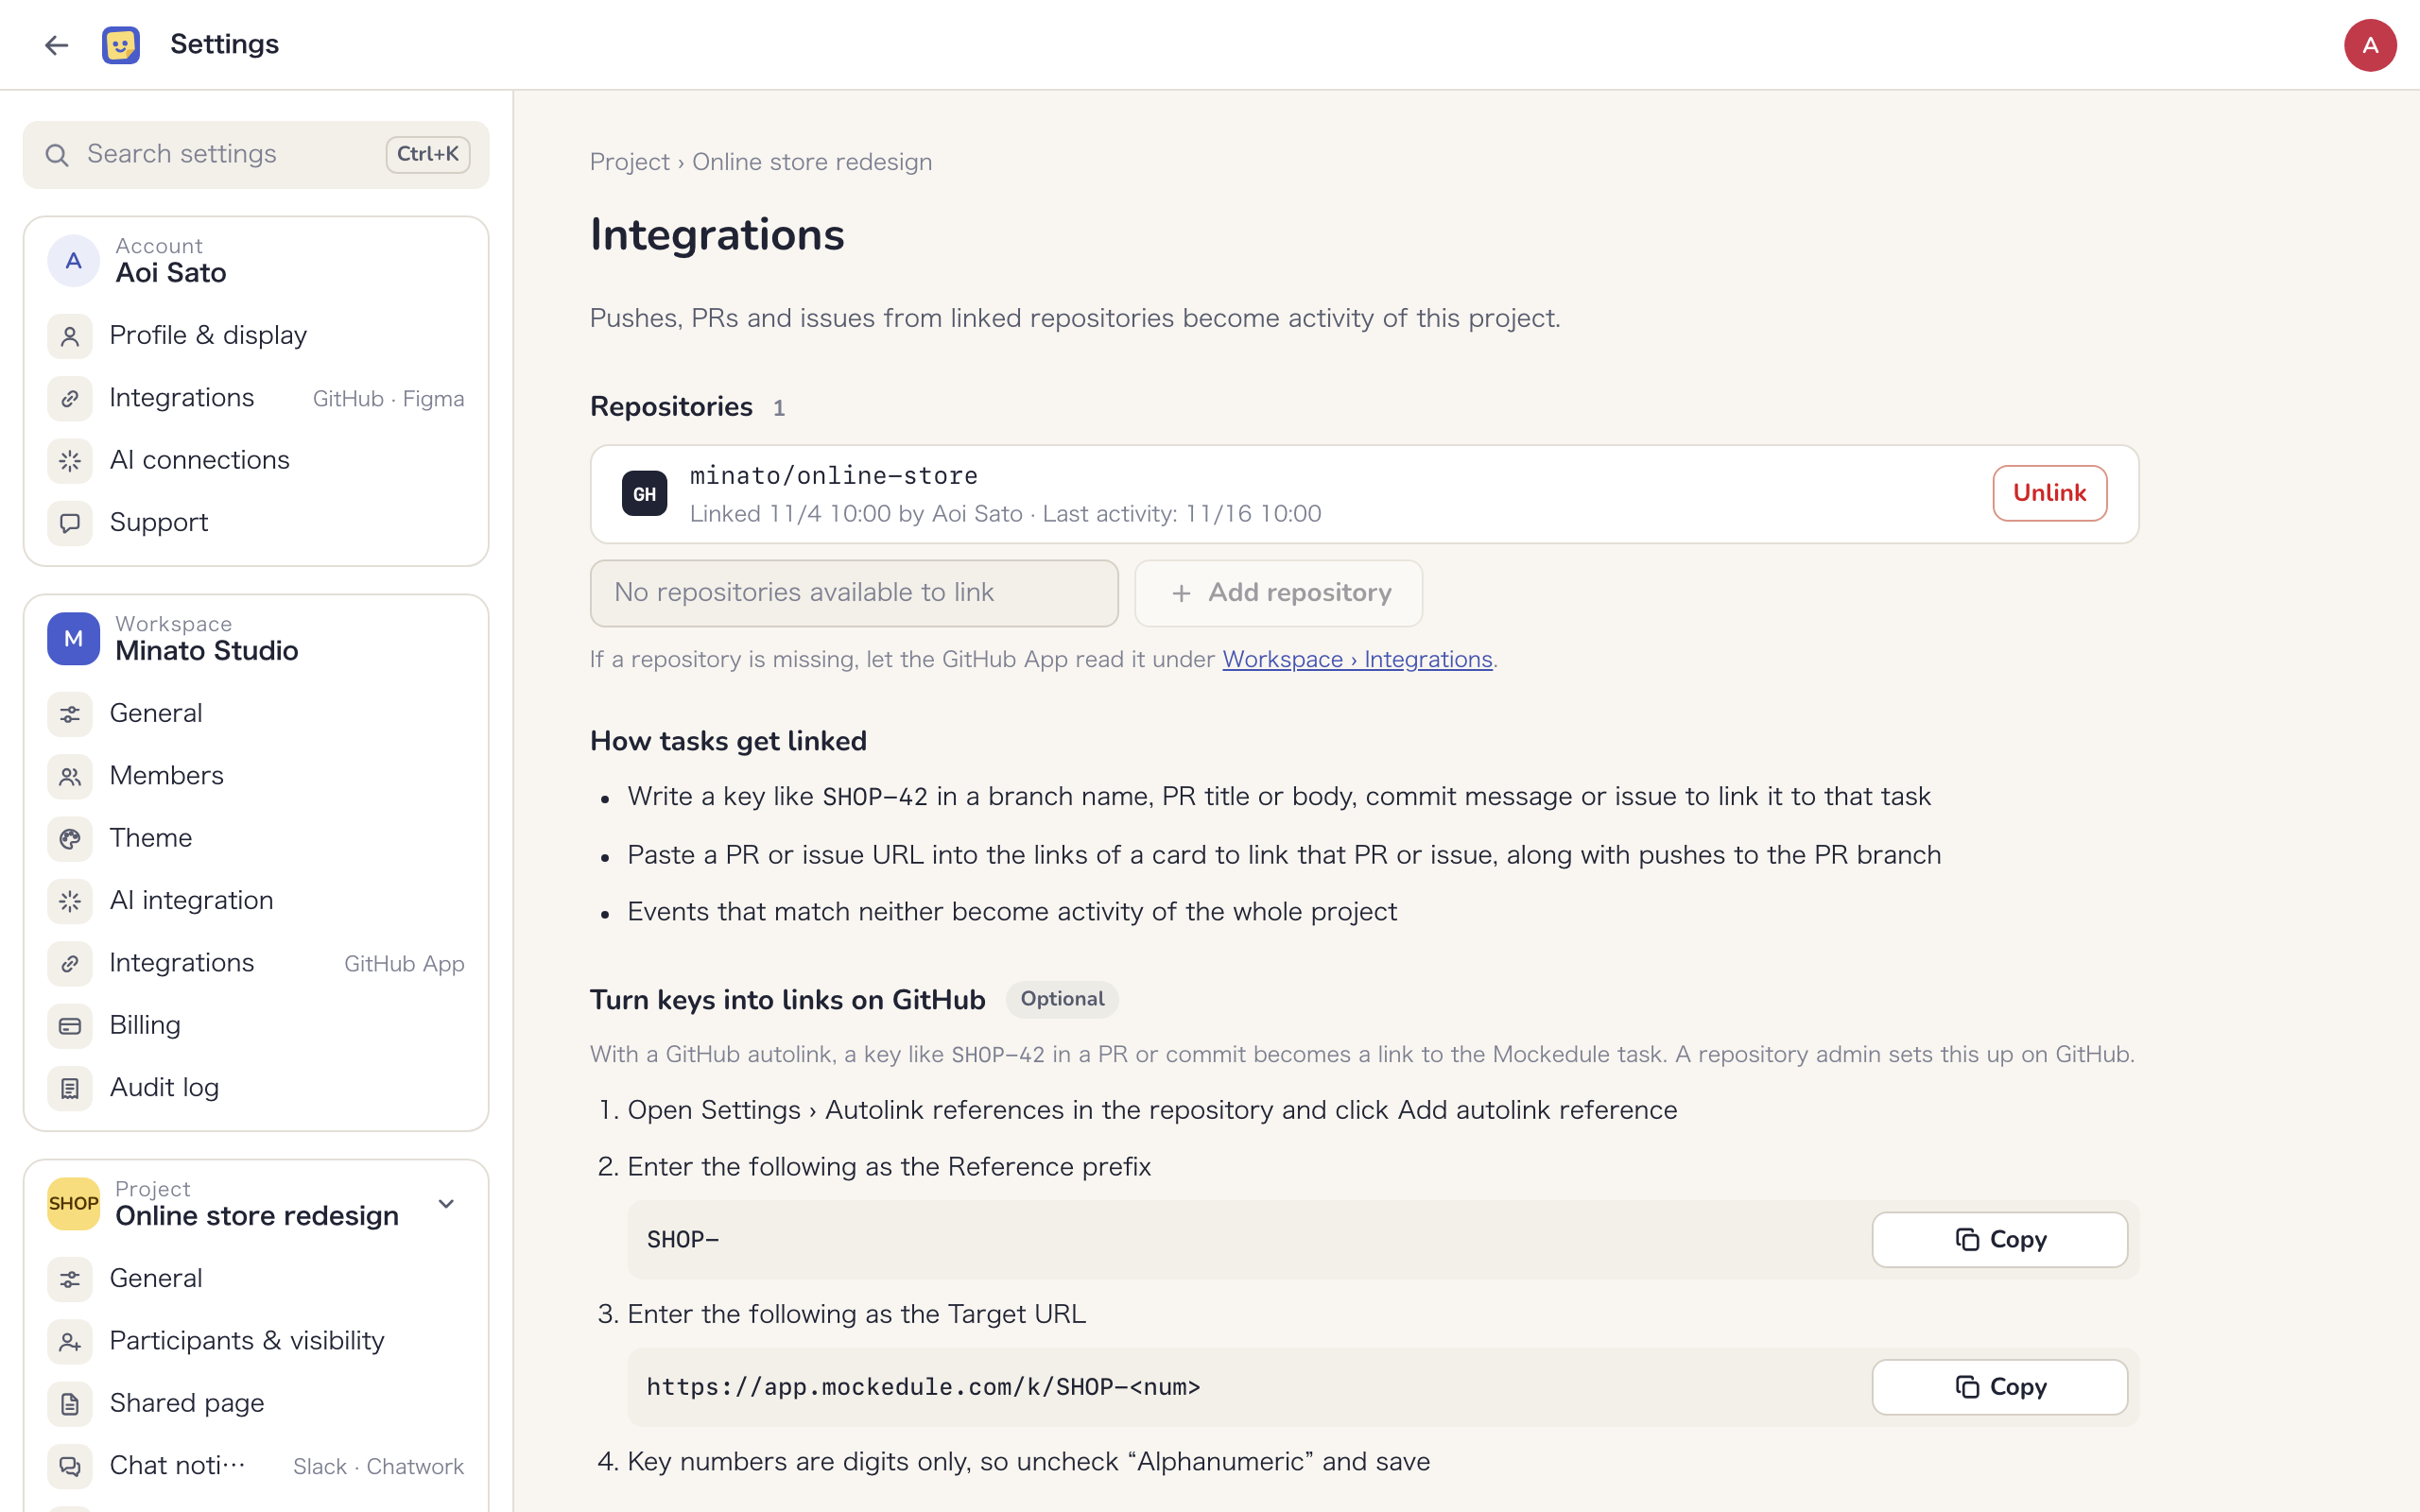
- If a repository is missing, let the GitHub App read it under Integrations in the workspace settings first
- The same repository can be linked to more than one project
- “Unlink” stops new events from becoming activity in this project. Activity already collected stays
Link work to tasks with keys
GitHub events are linked to a task in either of these ways.
- Write a task key like
SHOP-12in a branch name, PR title or body, commit message or issue (for example, the branchfeature/SHOP-12-login). Keys are not case-sensitive - Paste a PR or issue URL into a task’s links. That PR or issue is linked, along with pushes to the PR branch
Events that match neither become activity of the whole project. The key prefix (the SHOP part) is set when the project is created and cannot be changed later. You can check it in “Task key” under General in the project settings.
Mockedule collects these events.
- Pushes (each push becomes one entry, keeping the commit messages)
- PRs opened, merged, closed and reviewed
- Issues opened and closed
If a repository admin sets up an autolink on GitHub, keys in PRs and commits become links to Mockedule tasks. The values to enter and the steps are shown in “Turn keys into links on GitHub” under Integrations in the project settings.
Connect your GitHub account
Click “Connect GitHub” under Integrations in your account settings so your GitHub pushes, PRs and reviews appear under your name. Without it, they show your GitHub login. Each person can connect one GitHub account.
Slack and Chatwork notifications
Send project updates to a Slack channel or a Chatwork room, so people who are not in Mockedule still get mentions and this week’s activity. Only content that Clients can also see is sent.
Connect a destination
A project Manager does this under “Chat notifications” in the project settings. Each project has one destination, either Slack or Chatwork. It is available on every plan.
- Slack: Click “Connect Slack” and choose the channel on Slack’s screen
- Chatwork: Enter the “API token” and the “Room ID” (the number after “rid” at the end of the room’s URL), then click “Connect Chatwork”. Messages are posted as the account that owns the token, so we recommend a token from an account used only for notifications
When you connect, one message saying so is sent to the destination. If it does not arrive, the connection is not made and the reason is shown.
What to notify
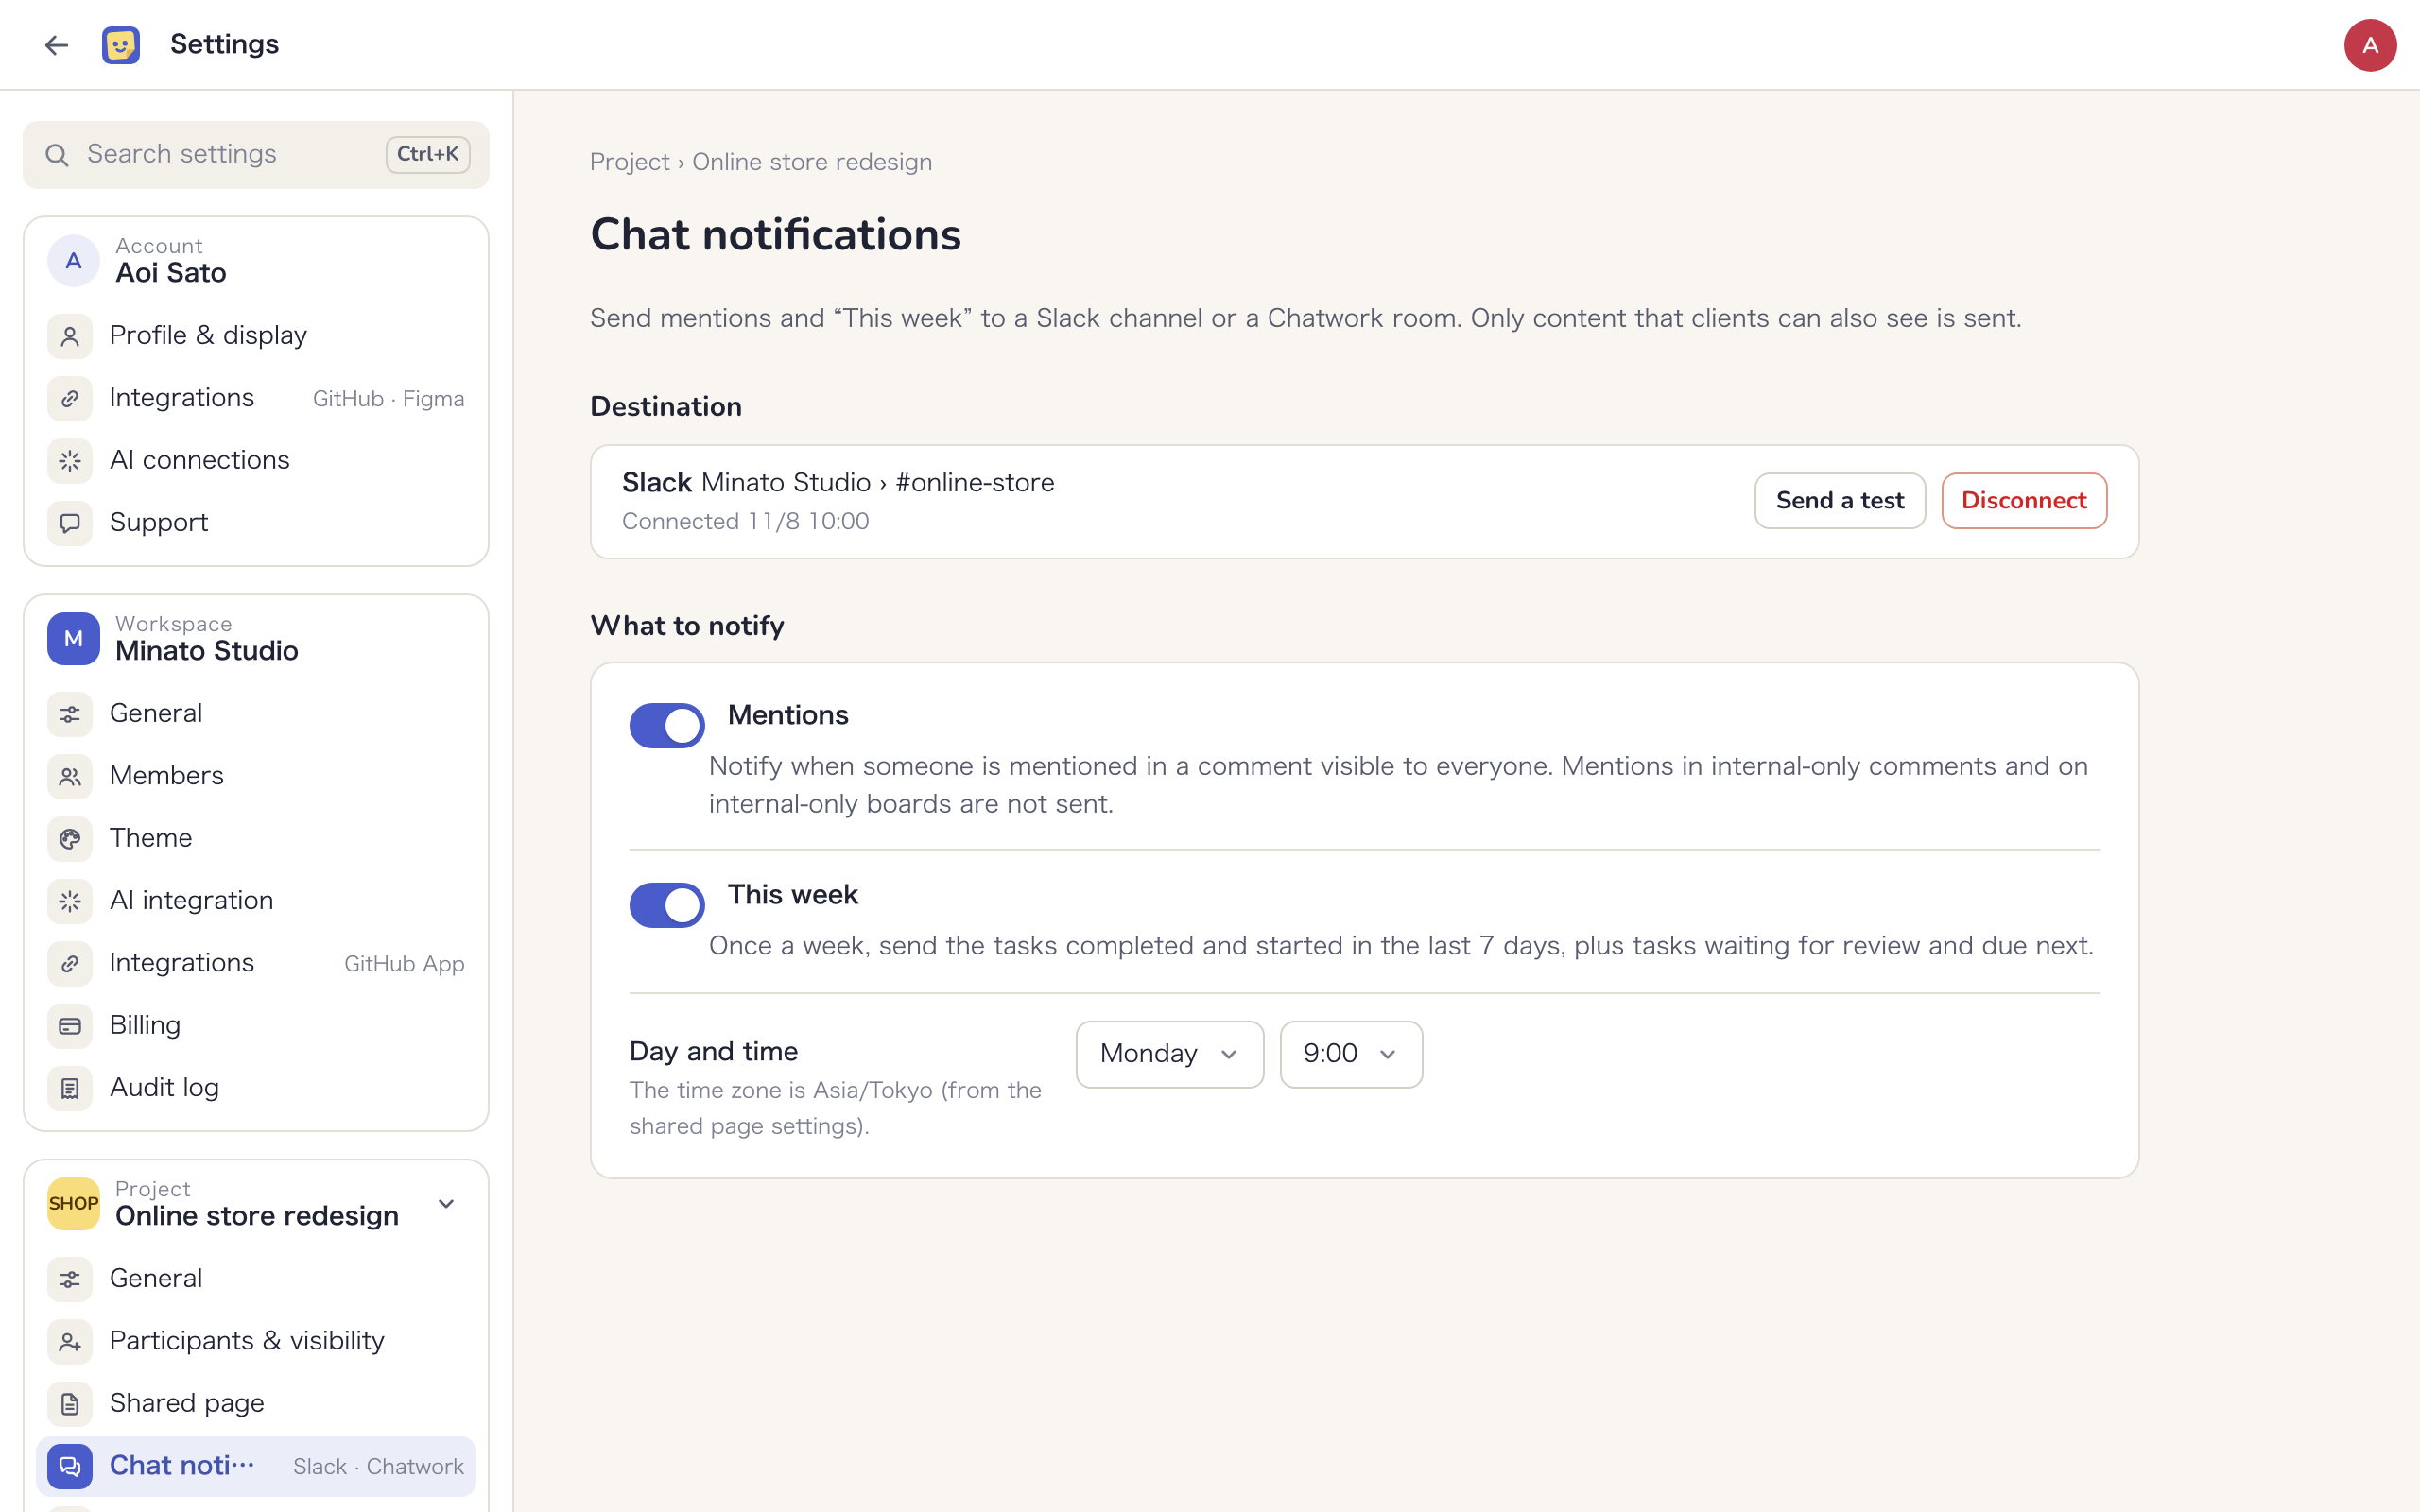
Under “What to notify”, turn each of these on or off. Both are on when you connect.
| Item | When | What is sent |
|---|---|---|
| Mentions | When someone is mentioned in a comment visible to everyone | The writer, the names of the people mentioned, the start of the comment and a link to it |
| This week | Every week on the day and time you choose | Tasks completed and started in the last 7 days, tasks in review and due next, and a link to the shared page |
- Mentions in internal-only comments and on internal-only boards are not sent
- Choose the day and time for This week under “Day and time”. The default is Monday at 9:00, in the time zone from the shared page settings
- This week lists up to 10 tasks per group and shows a count for the rest. Weeks with nothing in any group are skipped
Send a test or disconnect
- “Send a test” sends a test message to the destination
- “Disconnect” stops notifications. You can connect again later
- If messages stop arriving because a channel was deleted or a token became invalid, notifications pause and the reason is shown. They resume once you reconnect or “Send a test” gets through
- Internal members who are not Managers see only whether a destination is connected and its name. External participants do not see the page