A board is a canvas where you place sticky notes, shapes and screen designs freely. Changes from everyone on the same board arrive instantly, so you can write on it together during a meeting.
The board screen
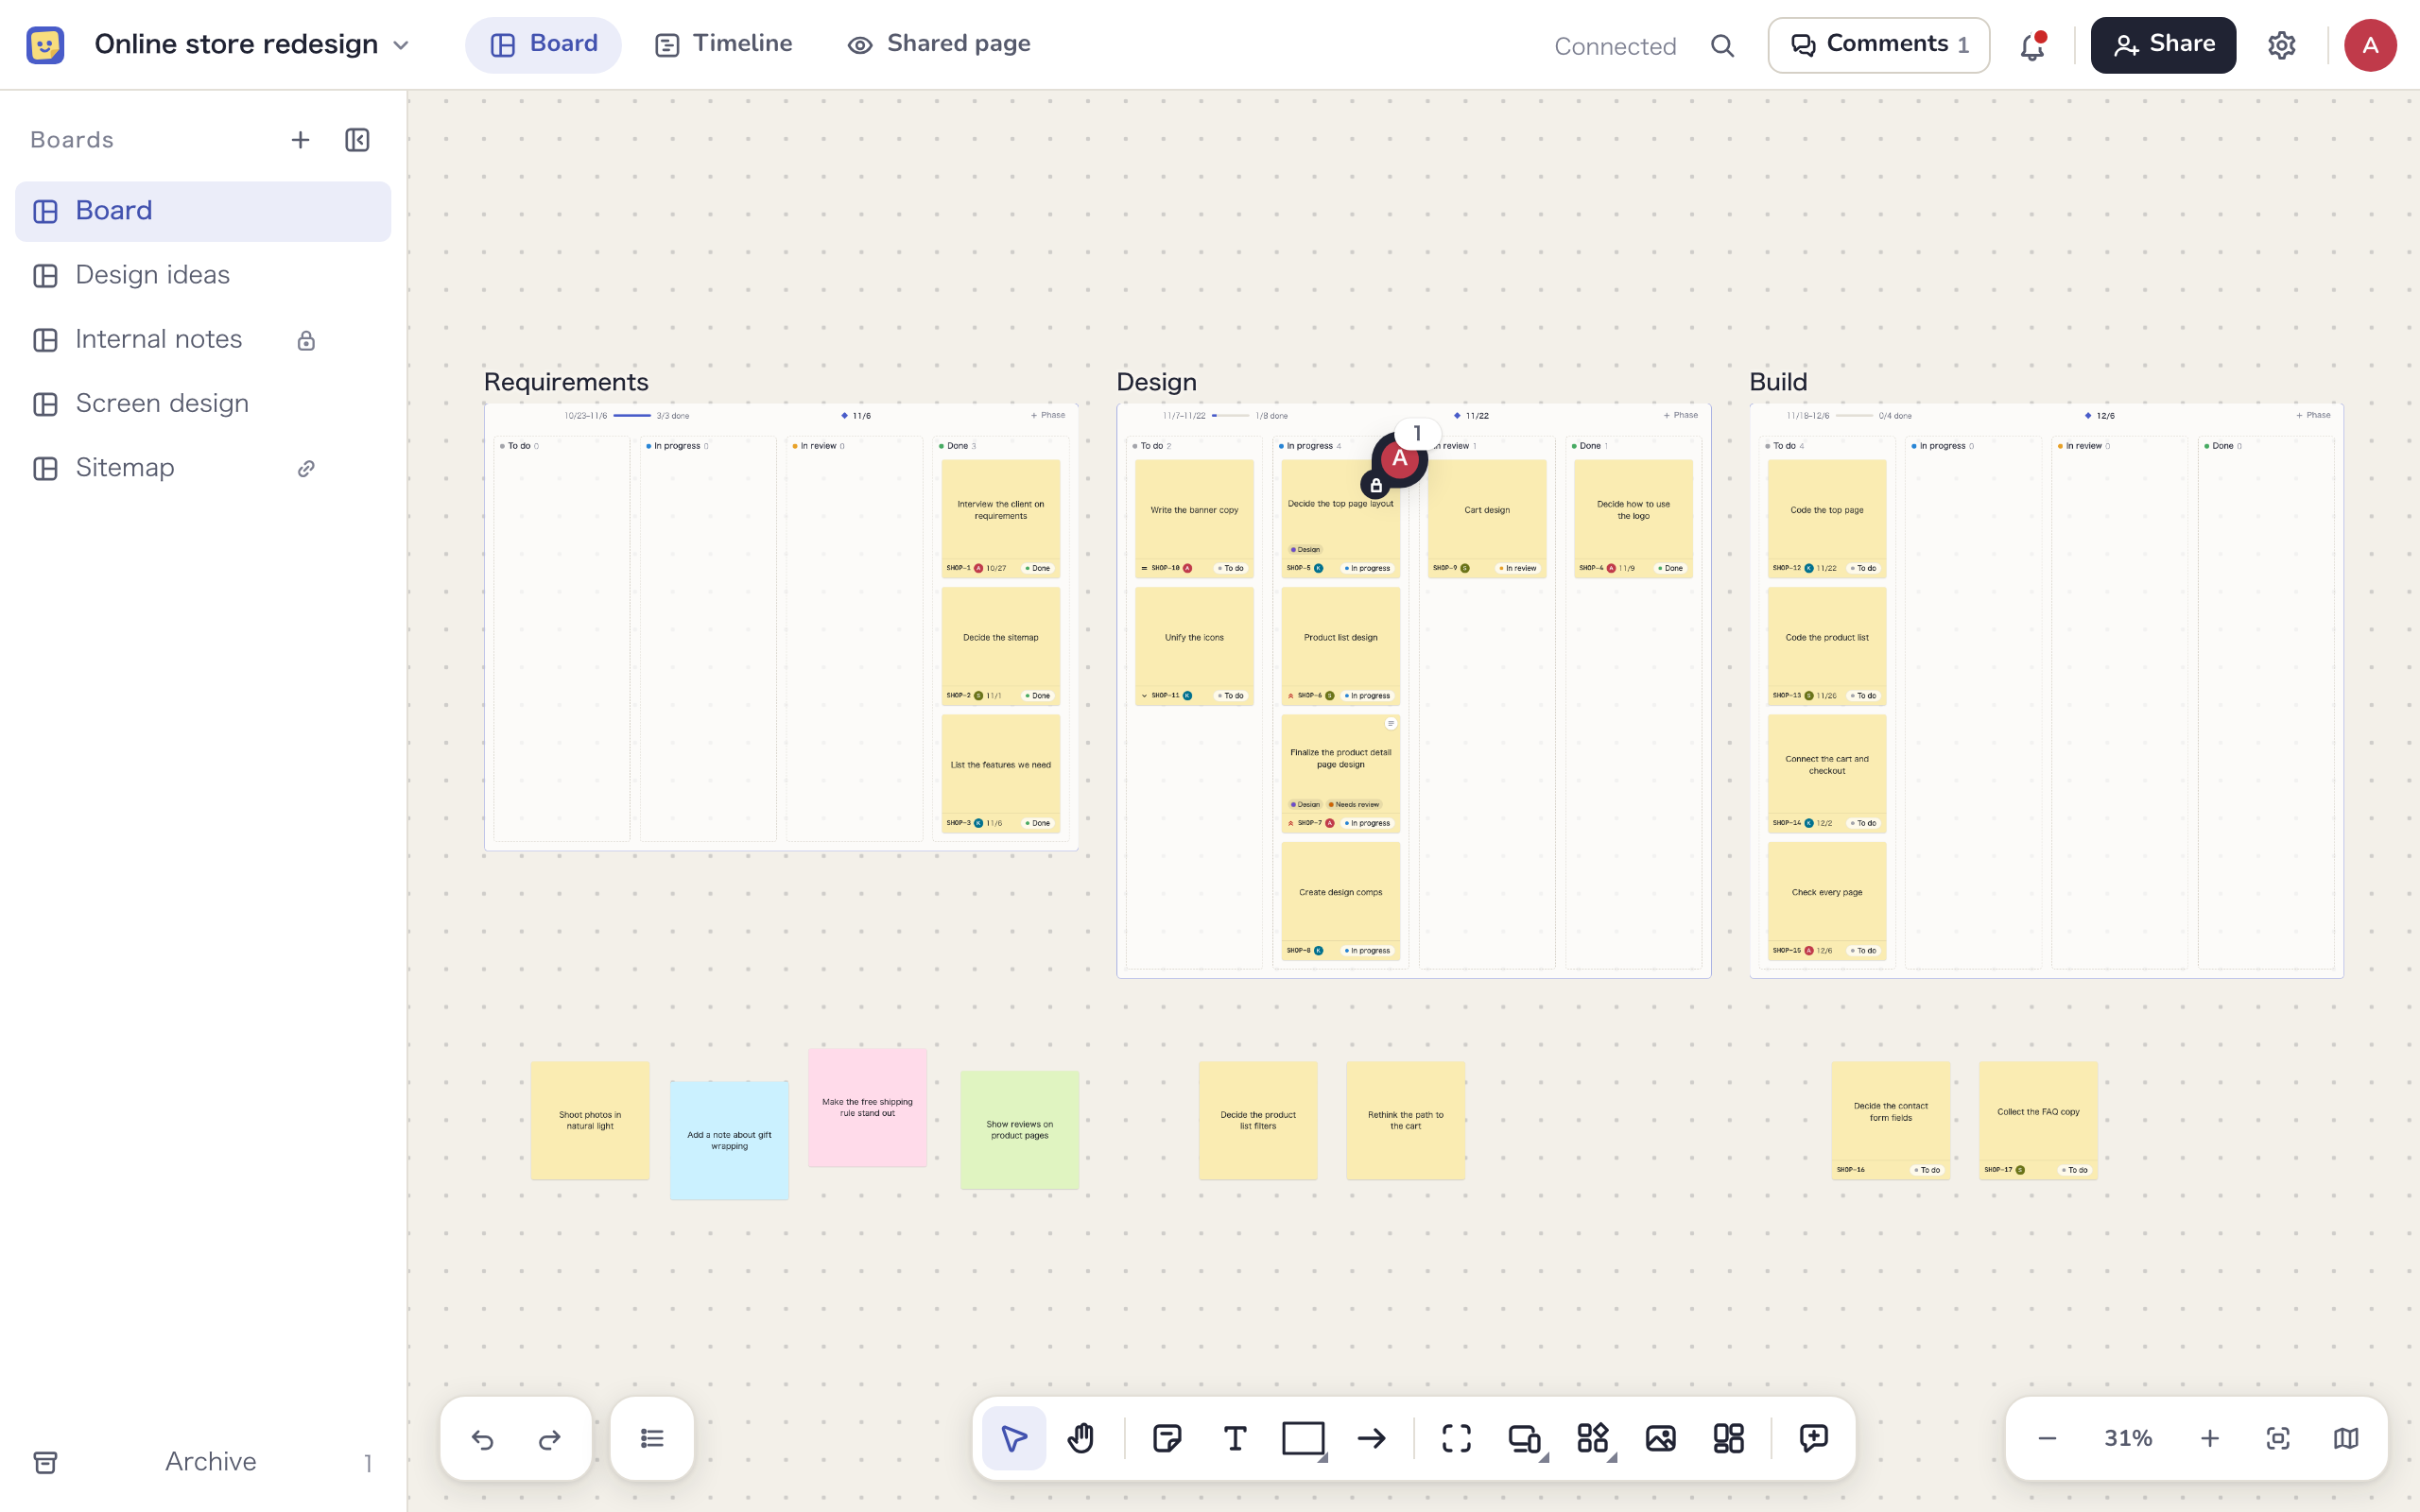
| Where | What is there |
|---|---|
| Header | The project name, the “Board”, “Timeline” and “Shared page” tabs, a magnifier to search the board, “Comments”, the notification bell, the avatars of people on the board, “Share” and settings |
| Left list | The boards in the project. Click one to open it. Internal-only boards have a lock icon |
| Bottom left | “Undo”, “Redo” and the “List of frames and headings” |
| Bottom center | The tools toolbar |
| Bottom right | Zoom, “Fit to screen” and the minimap. Boards with screen groups or transition arrows also show switches for them (Screen design) |
| Right | The side panel, which opens with the details and settings of what you select |
Switch boards and tabs
Use the header tabs to move between the board, the timeline and the shared page. The shared page tab only appears for internal members and Clients. To open another board in the project, pick it in the left list.
For more room on the canvas, click “Hide the board list”. While it is hidden, a button at the top left of the canvas brings it back. Your browser remembers the choice, so it stays that way when you switch boards or reopen one. Creating, renaming and archiving boards are covered in Workspaces and projects.
Zoom and pan
- Scroll with the mouse wheel or two fingers on a trackpad to move around. You can also drag while holding Space, or drag with the Hand tool
- Hold ⌘ and scroll, or pinch on a trackpad, to zoom. ⌘++ and ⌘+− step through levels from 5% to 400%
- Click the zoom percentage at the bottom right, or press ⌘+0, to go back to 100%
- “Fit to screen” (⇧+1) shows the whole board, and ⇧+2 zooms to your selection
- When you zoom out, frame names and large headings turn into labels. Rest the cursor on a sticky note or shape whose text is too small to read, and its text pops up in a card
The “List of frames and headings” at the bottom left lists named frames and large text from top to bottom. Pick one to jump there without changing your selection. “Show minimap” at the bottom right opens a small map of the whole board; click or drag in it to move.
Choose a tool
Pick a tool in the toolbar at the bottom center, then click the canvas to place it. Every tool except Image and Templates has a shortcut key.
| Tool | Key | What it does |
|---|---|---|
| Select | V | Select, move, resize and rotate |
| Hand | H | Move around the board |
| Sticky note | N | Place a sticky note |
| Text | T | Place text |
| Shape | R | Place one of 23 shapes |
| Arrow | A | Connect items |
| Frame | F | Enclose an area |
| Screen | S | Place a screen (Screen design) |
| Element | W | Place elements such as text fields and buttons (Screen design) |
| Image | None | Choose a file to place |
| Templates | None | Add a ready-made set of frames and headings (Workspaces and projects) |
| Comment | C | Comment on an item or a point on the board (Comments and activity) |
- After you place one item, the tool goes back to Select. To keep placing, double-click the tool button or press its key with ⇧ (⇧+N, ⇧+R, ⇧+F, ⇧+S, ⇧+W). A yellow dot shows the tool is kept; press Esc to release it. Text and Arrow are kept by double-clicking
- The Shape, Screen and Element buttons open a list. Pick from the list, then click where it goes. If you click the canvas without picking, you get the last one you used
- External viewers and Clients only see Select, Hand and Comment. While the connection is lost, the placing tools are dimmed
An empty board shows “Start from a template” in the middle. If you don’t need one, click “Start with a blank board”.
What you can place
Sticky notes
Press N and click the canvas, or double-click an empty spot, to place a sticky note and start typing. Choose from 16 colors. Dragging a corner snaps to the nearest of the large, medium and small sizes, and setting the font size to “Auto (shrink to fit)” keeps the text inside the note. Sticky notes placed in a status column become tasks (Tasks).
Text
Press T and click the canvas to start typing. Text you leave empty disappears. Drag the left or right edge to set a width, and the text wraps at that width. Large text counts as a heading and appears in the “List of frames and headings”.
Shapes
The Shape button lists 23 shapes: basic shapes, arrow shapes and flowchart shapes. Pick one and drag on the canvas to set its size, or just click to place it at a default size. Double-click a shape to write inside it. You can switch to another shape later with “Shape” in the small toolbar.
Arrows
Press A and drag from where the arrow starts to where it ends. Start or end on an item and the arrow connects to it, following when the item moves.
- Double-click an arrow to add a label
- In the small toolbar, “Line shape” switches between straight, curved and elbow lines, and “Arrowheads” sets the ends
- With one arrow selected, handles appear at both ends and in the middle. Drag the middle to bend it, or an end to reconnect it
- An arrow from one screen to another becomes a screen transition (Screen design)
Frames
Press F and drag on the canvas to place a frame around that area, or just click for a default size. Items inside a frame move with it. Select a frame to change its name and “Role” (None, Phase, Status or Screen) in the side panel.
Phases
A phase is a frame for a stage of the work, such as “Design” or “Build”. Right-click an empty spot and choose “Add a phase”, or click “+ Phase” at the right end of a phase heading.
- Enter a “Name” and a “Period” (start date and end date). The end date becomes the milestone, shown as ◆ on the timeline and the shared page
- Check “Columns inside”. By default there are four: To do, In progress, In review and Done
- Choose whether to “Make sticky notes placed in a column into tasks automatically” (on by default), then click “Add”
Internal members can create phases, and so can External editors if the project settings allow it. Phases appear as bars on the timeline (Schedule).
Images
There are three ways to add images. Pasted images go to the center of the screen, dropped images go where you drop them, and images chosen with the Image tool go to the center. PNG, JPEG, GIF and WebP are supported, up to 20MB and 50 megapixels (width × height) each, and up to 10 images at a time.
Large images are scaled down so the longest side is 640, and resizing always keeps the aspect ratio. Your plan sets how much image storage the workspace has (Plans and billing).
Link cards
Paste a URL with nothing selected to place a link card in the center of the screen. A selected link card shows “Open” and “Copy URL” in its small toolbar.
- Switch Figma and Miro links to “Show as embed” to see their contents on the board. Double-click to interact with the embed and press Esc to leave. “Show as card” switches back
- GitHub pull requests and issues show their title and state if the repository is linked to the project (Integrations)
- Paste a URL while one task is selected to add it to that task’s links. Dropping a link card onto a task sticky note also moves it into the task’s links
Select and move
- Click to select. ⇧-click to add to the selection, or drag from an empty spot to select everything in the area. ⌘+A selects everything. You can select up to 2,000 items at once
- Drag a selection to move it. Drop it on a frame to put it inside
- With one item selected, drag the corner handles to resize, or drag just outside a corner to rotate. Hold ⇧ to keep the aspect ratio and rotate in 15° steps. With several items selected, you can only move them
A small toolbar appears above the selection: format controls on the left, common actions such as “Duplicate” and “Make a task” next, and “More actions” (…) at the end for everything else. Right-clicking a selection opens the same menu.
Right-clicking an empty spot offers “Sticky note here”, “Text here”, “Paste”, “Select all”, “Fit to screen”, “Search the board”, “Export the board as image”, “Export screen design as PDF” and “Add a phase”. “Export screen design as PDF” is only shown to internal members, on boards that have screens.
Duplicate, copy, delete and undo
- “Duplicate” or ⌘+D copies the selection slightly offset. Duplicating a task sticky note creates a new task in To do
- Use ⌘+C, ⌘+X and ⌘+V to copy, cut and paste, including into another tab or board. Copying a frame copies what is inside it too
- Press Delete or ⌫, or choose “Delete” in the … menu. When you delete a phase or status frame with tasks, or a screen, choose “Delete only the frame and keep the contents” or “Delete with contents”
- “Undo” (⌘+Z) and “Redo” (⇧+⌘+Z) only affect your own changes, never other people’s
- Change the stacking order with “Bring to front”, “Bring forward”, “Send backward” and “Send to back” in the … menu, or with ], [, ⇧+] and ⇧+[
Format and lock
The controls in the small toolbar change how things look. With several items selected, only the shared controls appear.
| Control | What it changes |
|---|---|
| Sticky color | 16 colors |
| Fill | The color, and “None”, “Semi-transparent” or “Solid” (shapes, text background, frames) |
| Border | Color, width, and solid, dashed or dotted lines (shapes, arrows, images) |
| Aa (text format) | Font (sans serif, serif, monospace), font size, bold, italic, underline, strikethrough, text color and alignment |
| Line shape and arrowheads | Straight, curved or elbow lines and the arrowheads at each end (arrows) |
- “Copy format” and “Paste format” in the … menu copy the look of one item to others. Text and size are not copied
- The last format you used is applied the next time you place the same kind of item
- “Lock” in the … menu (⇧+⌘+L) keeps items from being moved by accident. Locked items can’t be moved, resized, rotated or deleted, but you can still edit their text and format. Click “Unlock” to release them
Align and distribute
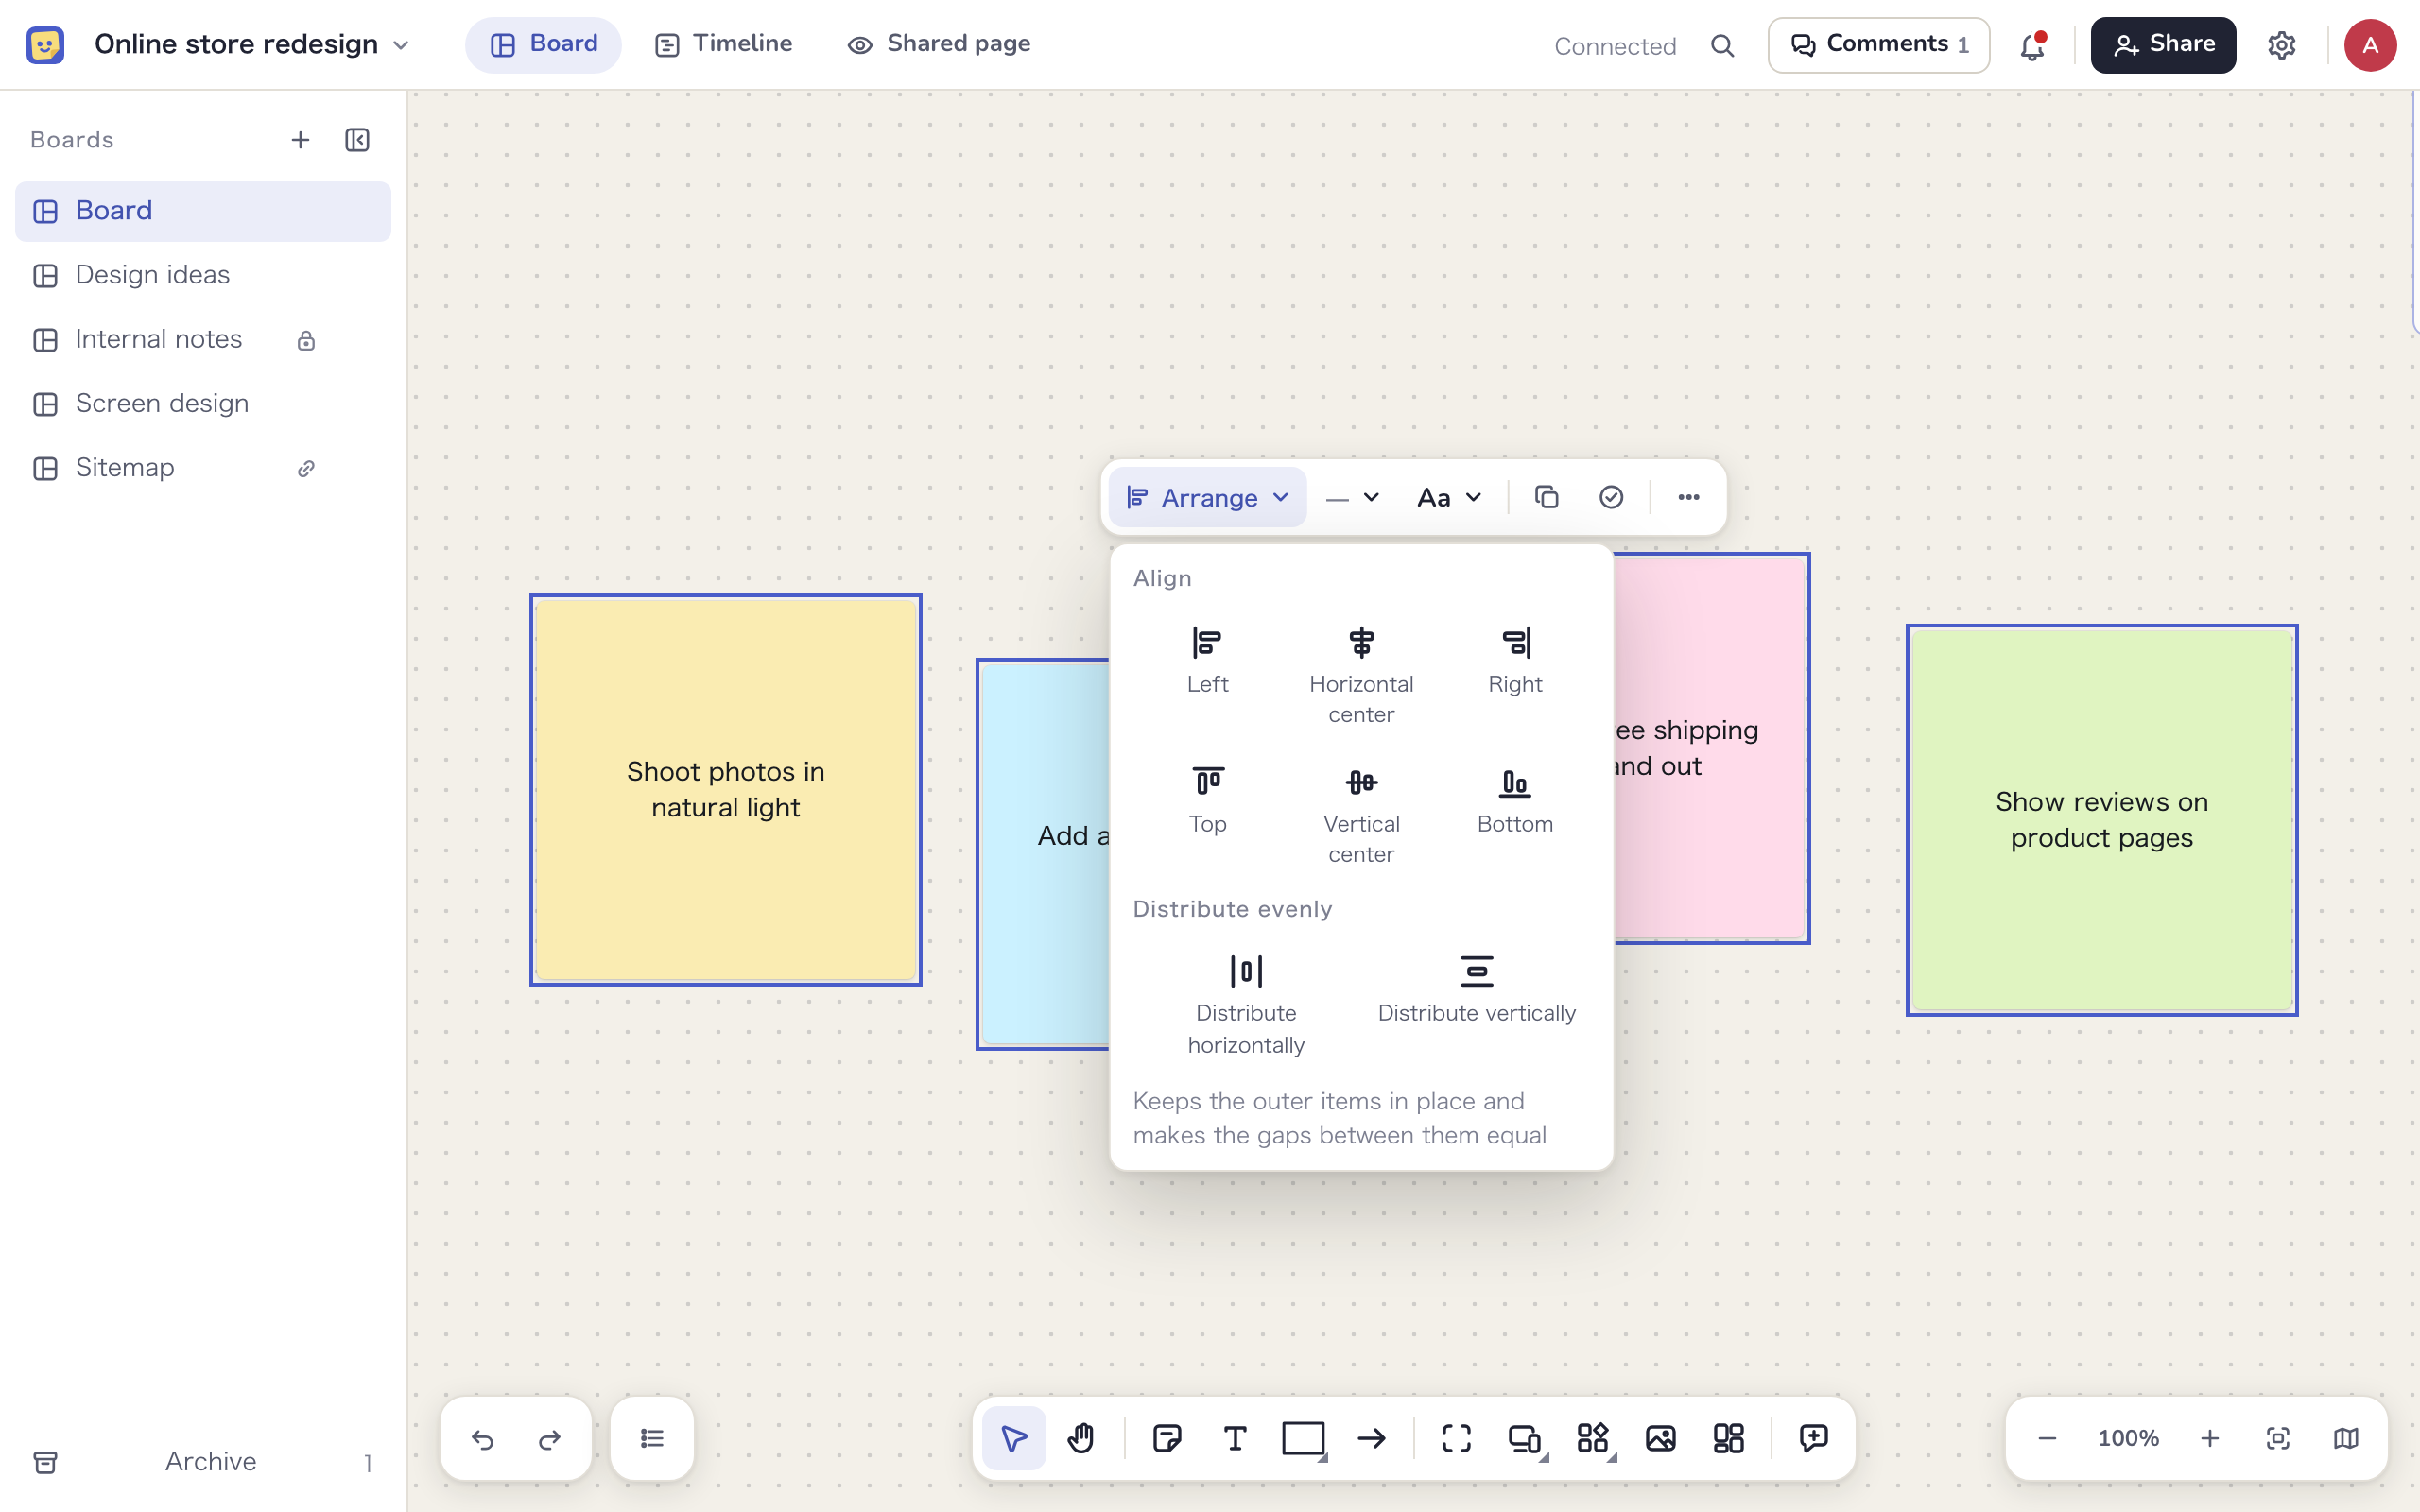
Select two or more items and “Arrange” appears at the left of the small toolbar. It opens these buttons.
| Button | What it does | Key |
|---|---|---|
| Left, Horizontal center, Right | Aligns to the left edge, center or right edge of the area around the selection | ⌥+A, ⌥+H, ⌥+D |
| Top, Vertical center, Bottom | Aligns to the top edge, center or bottom edge | ⌥+W, ⌥+V, ⌥+S |
| Distribute horizontally, Distribute vertically | Keeps the outer items in place and makes the gaps between them equal. Needs three or more items | ⌃+⌥+H, ⌃+⌥+V |
Locked items, items inside a laid-out frame and components pinned to the top or bottom are not moved. Arrows are left out and follow the items they connect. The selection stays after aligning, so you can align in another direction straight away. Each arrange is a single undo step.
Search the board
Press ⌘+F or click the magnifier in the header to open a search box at the top right of the canvas. Unlike the browser’s search, it also finds items that are off screen.
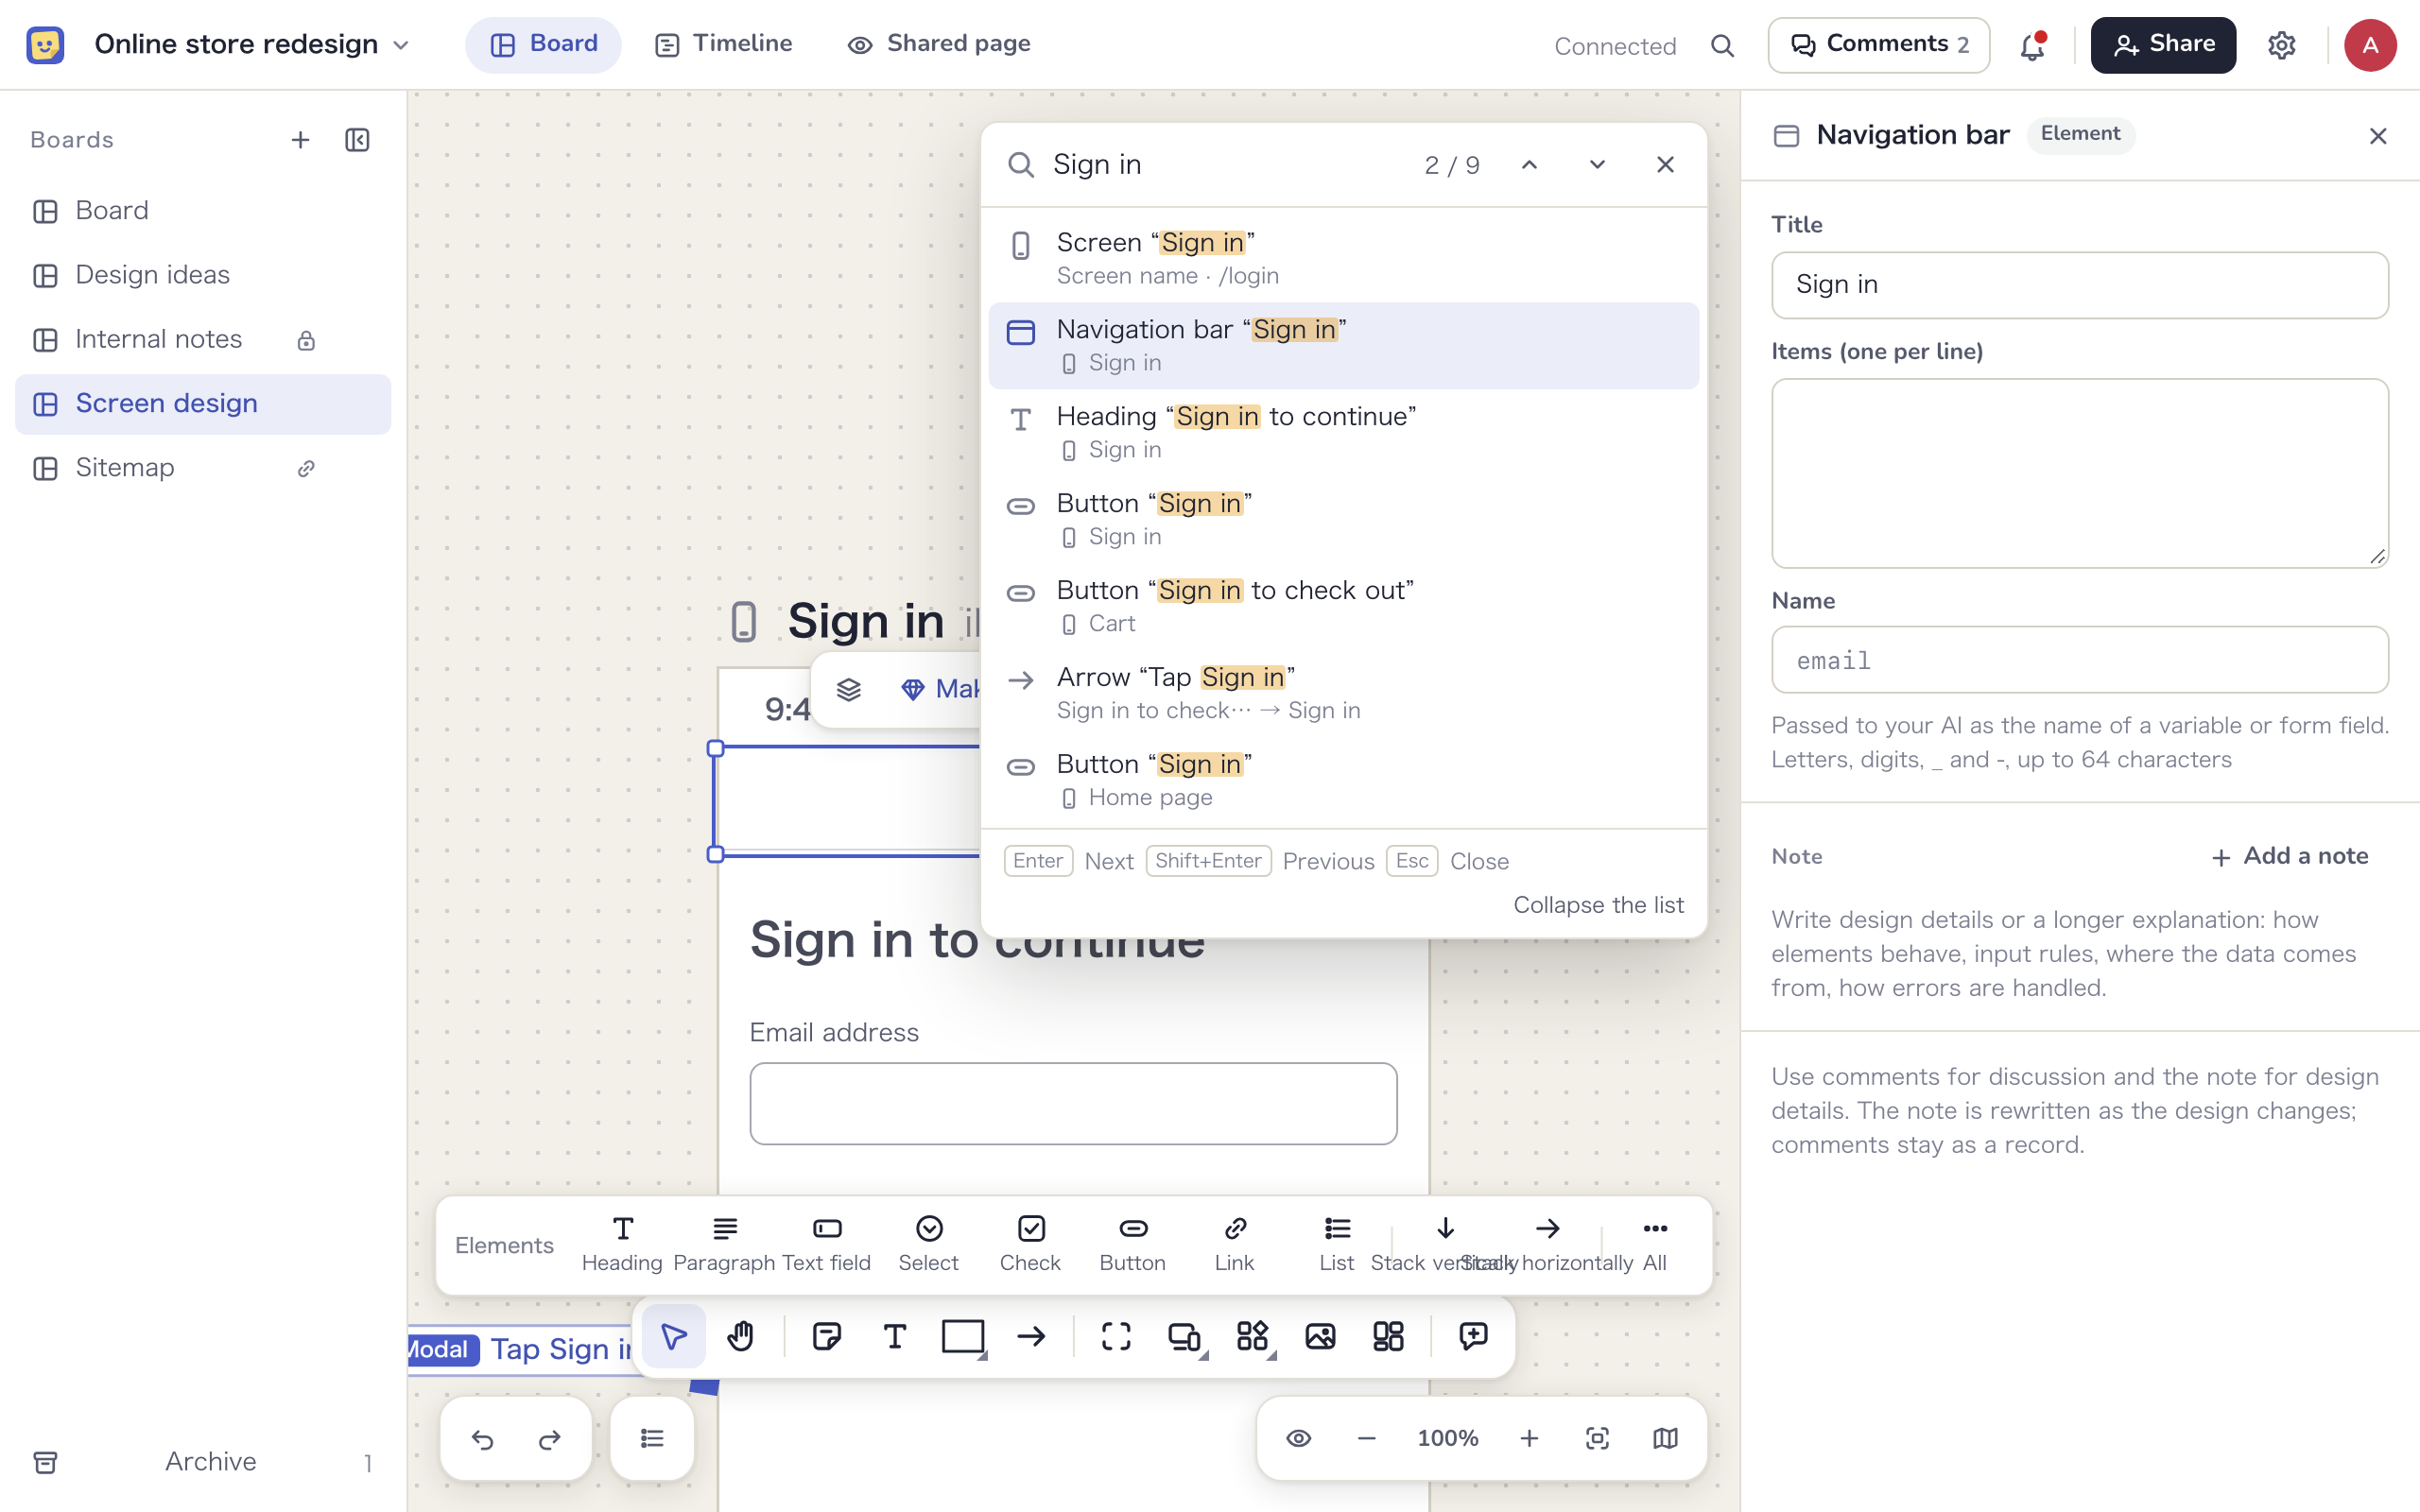
- It searches the text of sticky notes, text and shapes, frame and screen names, element text, arrow labels, link card titles and URLs, image descriptions, task keys and the comments you can see. Notes attached to items are not searched
- Full-width and half-width characters, and upper and lower case, are treated as the same
- Press Enter for the next result and ⇧+Enter for the previous one; each result gets selected. Clicking a row in the list also jumps there. “Collapse the list” folds the list away
- Press Esc to close. What you typed stays, so you can pick up where you left off
To search across other boards too, ask your AI through MCP (Works with your AI).
Export a selection as PNG
- Select what you want to export and choose “Export as image” from the … menu in the small toolbar (⇧+⌘+E). If you can’t edit the board, “Export as image” is a button in the small toolbar instead
- Choose 1x or 2x for “Scale”, and “Board color” or “Transparent” for “Background”
- Check the “File name” and click “Save PNG”. “Copy” puts the image on the clipboard so you can paste it into a chat
The export includes the selected items, what is inside selected frames, and arrows whose ends both connect to them. Selection outlines, other people’s cursors, comment pins and note marks are left out. Figma and Miro embeds are drawn as cards. If the area is too large, the scale is lowered to a size that can be exported.
To export the whole board, right-click an empty spot and choose “Export the board as image”. Anyone who can see the board can export PNGs. PDFs of screen designs and the schedule are covered in Shared page and view links.
Editing together
- Changes reach everyone on the same board right away
- Other people’s cursors move with their name and color. What they select is outlined in their color, and a sticky note they are typing in shows “Name is editing”
- The header shows the avatars of people on the board. Click an avatar to jump to what that person is looking at, and click again to follow their view. Moving the view yourself stops following
- Up to three avatars are shown and the rest collapse into “+2” and so on; click it for a list of names
- When external participants are on the board, their avatars are marked and a count such as “1 external” appears
- Changes your AI makes through MCP are outlined in color for a few seconds with a label such as “Yamada (via Claude Code)” showing who made them and from where (Works with your AI)
If the connection drops, the header shows “Connection lost. Reconnecting (editing is paused until it is back)”. It reconnects on its own, so just wait.
Keyboard shortcuts
Keys are shown for Mac. On Windows, use Ctrl for ⌘ and ⌃, Alt for ⌥, and Shift for ⇧. Redo also works with Ctrl+Y.
Tools
| Key | Action |
|---|---|
| V / H | Select / Hand |
| N / T / R / A | Sticky note / Text / Shape / Arrow |
| F / S / W | Frame / Screen / Element |
| C | Comment |
| ⇧+N, R, F, S, W | Keep the tool and place repeatedly |
| Esc | Release a kept tool, or clear the selection |
| Drag with Space held | Move around the board |
View and search
| Key | Action |
|---|---|
| ⌘++ / ⌘+− | Zoom in / Zoom out |
| ⌘+0 | Reset to 100% |
| ⇧+1 | Fit to screen |
| ⇧+2 | Zoom to the selection |
| ⌘+F | Search the board |
| Enter / ⇧+Enter | Next / previous search result |
Editing
| Key | Action |
|---|---|
| ⌘+A | Select all |
| ⌘+C / ⌘+X / ⌘+V | Copy / Cut / Paste |
| ⌘+D | Duplicate |
| Delete / ⌫ | Delete |
| ⌘+Z / ⇧+⌘+Z | Undo / Redo |
| ] / [ | Bring forward / Send backward |
| ⇧+] / ⇧+[ | Bring to front / Send to back |
| ⇧+⌘+L | Lock / Unlock |
| ⇧+⌘+E | Export as image |
| ⇧+T | Make a task (Tasks) |
Align and layout
| Key | Action |
|---|---|
| ⌥+A / ⌥+H / ⌥+D | Align left / horizontal center / right |
| ⌥+W / ⌥+V / ⌥+S | Align top / vertical center / bottom |
| ⌃+⌥+H / ⌃+⌥+V | Distribute horizontally / vertically |
| ⇧+A | Wrap the selected elements in a laid-out frame (Screen design) |
| ↑ ↓ ← → | Move an item one step in the order of a laid-out frame |
| Enter / ⇧+Enter | Select the first item inside a laid-out frame / select the parent |
Arrow keys only work when an item inside a laid-out frame is selected. There is no way to nudge other items with the arrow keys.